Developer Guide
- Acknowledgements
- Setting up, getting started
- Design
- Implementation
- Documentation, logging, testing, configuration, dev-ops
- Appendix: Requirements
- Appendix: Instructions for manual testing
Acknowledgements
- Libraries used: JavaFX, Jackson, JUnit5.
- This project is based on the AddressBook-Level3 project created by the SE-EDU initiative.
- User Guide: Table of Contents with bullet points removed is reused from @ianyong’s team in 2020.
- Reused code from CS2103T-T10-4 to parse optional arguments.
- Reused code from AddressBook-Level4.
Setting up, getting started
Refer to the guide Setting up and getting started.
Design
.puml files used to create diagrams in this document can be found in the diagrams folder. Refer to the PlantUML Tutorial at se-edu/guides to learn how to create and edit diagrams.
Architecture
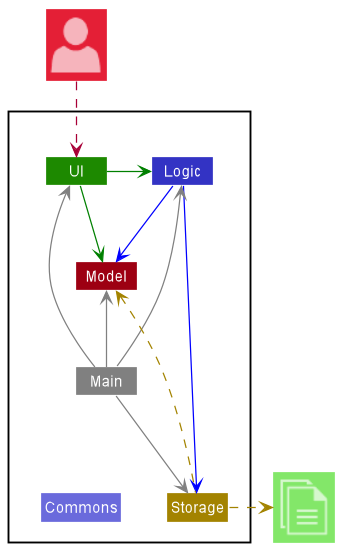
The Architecture Diagram given above explains the high-level design of the App.
Given below is a quick overview of main components and how they interact with each other.
Main components of the architecture
Main has two classes called Main and MainApp. It is responsible for,
- At app launch: Initializes the components in the correct sequence, and connects them up with each other.
- At shut down: Shuts down the components and invokes cleanup methods where necessary.
Commons represents a collection of classes used by multiple other components.
The rest of the App consists of four components.
-
UI: The UI of the App. -
Logic: The command executor. -
Model: Holds the data of the App in memory. -
Storage: Reads data from, and writes data to, the hard disk.
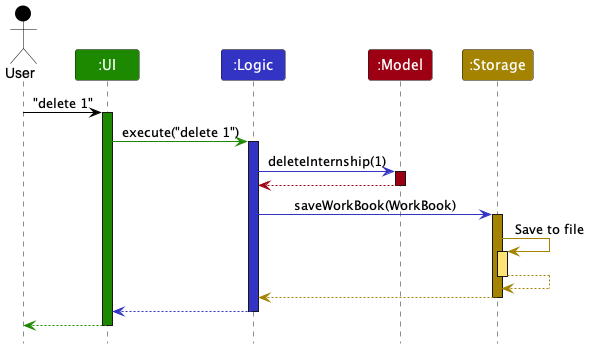
How the architecture components interact with each other
The Sequence Diagram below shows how the components interact with each other for the scenario where the user issues the command delete 1.
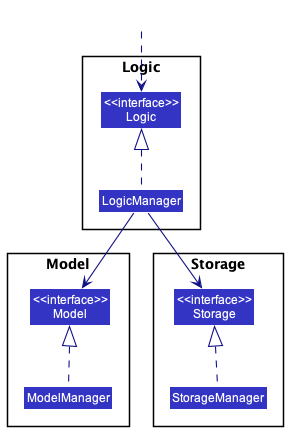
Each of the four main components (also shown in the diagram above),
- defines its API in an
interfacewith the same name as the Component. - implements its functionality using a concrete
{Component Name}Managerclass (which follows the corresponding APIinterfacementioned in the previous point.
For example, the Logic component defines its API in the Logic.java interface and implements its functionality using the LogicManager.java class which follows the Logic interface. Other components interact with a given component through its interface rather than the concrete class (reason: to prevent outside component’s being coupled to the implementation of a component), as illustrated in the (partial) class diagram below.
The sections below give more details of each component.
UI component
The API of this component is specified in Ui.java
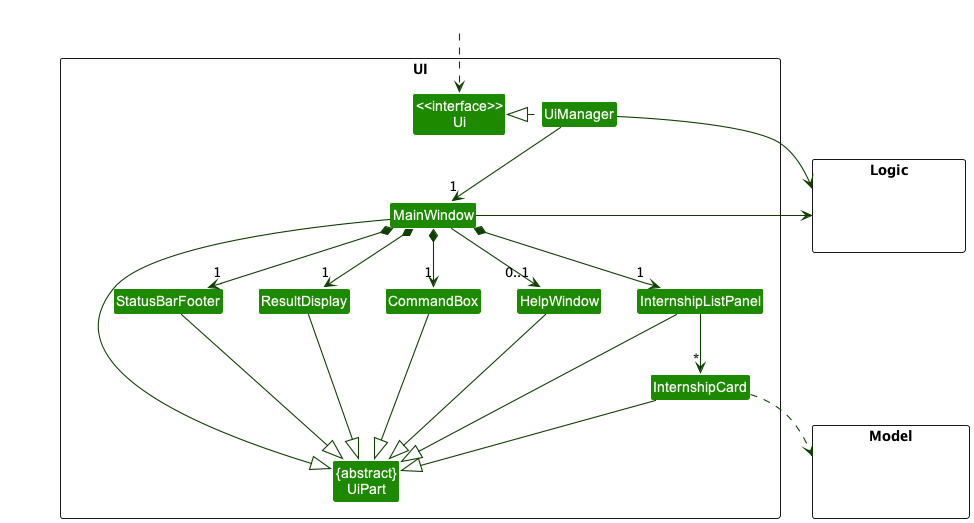
The UI consists of a MainWindow that is made up of parts e.g.CommandBox, ResultDisplay, InternshipListPanel, StatusBarFooter etc. All these, including the MainWindow, inherit from the abstract UiPart class which captures the commonalities between classes that represent parts of the visible GUI.
The UI component uses the JavaFx UI framework. The layout of these UI parts are defined in matching .fxml files that are in the src/main/resources/view folder. For example, the layout of the MainWindow is specified in MainWindow.fxml
The UI component,
- executes user commands using the
Logiccomponent. - listens for changes to
Modeldata so that the UI can be updated with the modified data. - keeps a reference to the
Logiccomponent, because theUIrelies on theLogicto execute commands. - depends on some classes in the
Modelcomponent, as it displaysInternshipobject residing in theModel.
Logic component
API : Logic.java
Here’s a (partial) class diagram of the Logic component:
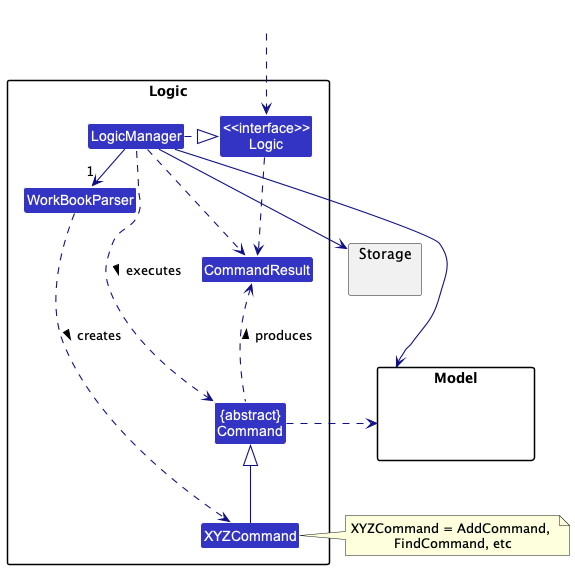
How the Logic component works:
- When
Logicis called upon to execute a command, it uses theWorkBookParserclass to parse the user command. - This results in a
Commandobject (more precisely, an object of one of its subclasses e.g.,AddCommand) which is executed by theLogicManager. - The command can communicate with the
Modelwhen it is executed (e.g. to add an internship). - The result of the command execution is encapsulated as a
CommandResultobject which is returned back fromLogic.
The Sequence Diagram below illustrates the interactions within the Logic component for the execute("delete 1") API call.
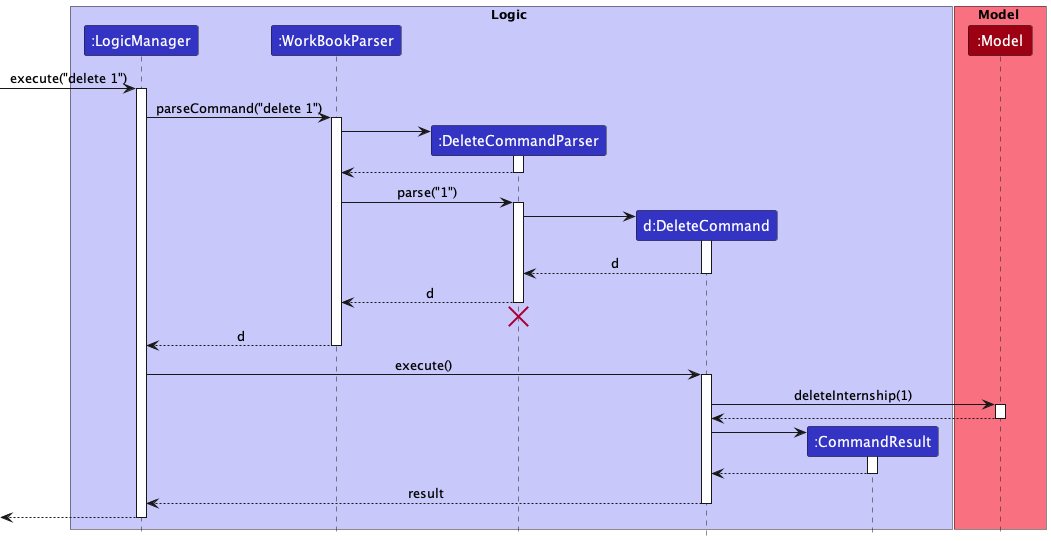
DeleteCommandParser should end at the destroy marker (X) but due to a limitation of PlantUML, the lifeline reaches the end of diagram.
Here are the other classes in Logic (omitted from the class diagram above) that are used for parsing a user command:
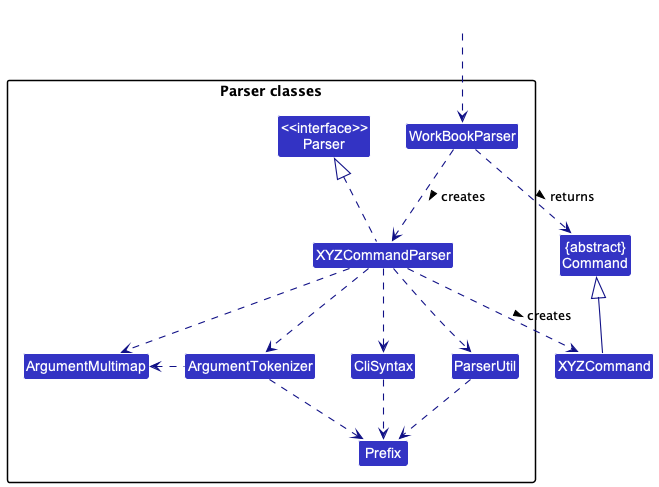
How the parsing works:
- When called upon to parse a user command, the
WorkBookParserclass creates anXYZCommandParser(XYZis a placeholder for the specific command name e.g.,AddCommandParser) which uses the other classes shown above to parse the user command and create aXYZCommandobject (e.g.,AddCommand) which theWorkBookParserreturns back as aCommandobject. - All
XYZCommandParserclasses (e.g.,AddCommandParser,DeleteCommandParser, …) inherit from theParserinterface so that they can be treated similarly where possible e.g, during testing.
Model component
API : Model.java
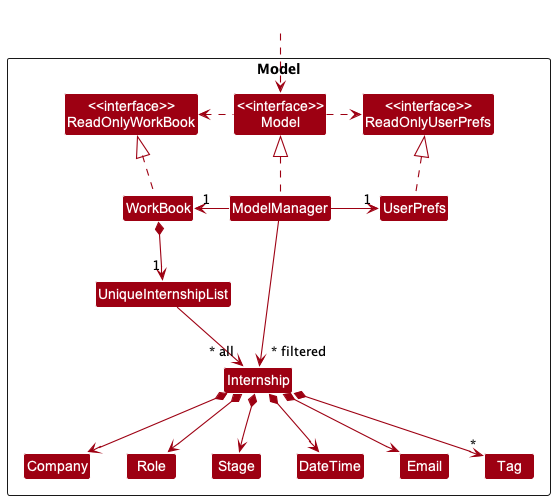
The Model component,
- stores the work book data i.e., all
Internshipobjects (which are contained in aUniqueInternshipListobject). - stores the currently ‘selected’
Internshipobjects (e.g., results of a search query) as a separate filtered list which is exposed to outsiders as an unmodifiableObservableList<Internship>that can be ‘observed’ e.g. the UI can be bound to this list so that the UI automatically updates when the data in the list change. - stores a
UserPrefobject that represents the user’s preferences. This is exposed to the outside as aReadOnlyUserPrefobjects. - does not depend on any of the other three components (as the
Modelrepresents data entities of the domain, they should make sense on their own without depending on other components)
Tag list in the WorkBook, which Internship references. This allows WorkBook to only require one Tag object per unique tag, instead of each Internship needing their own Tag objects.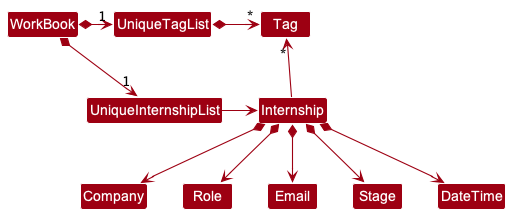
Storage component
API : Storage.java
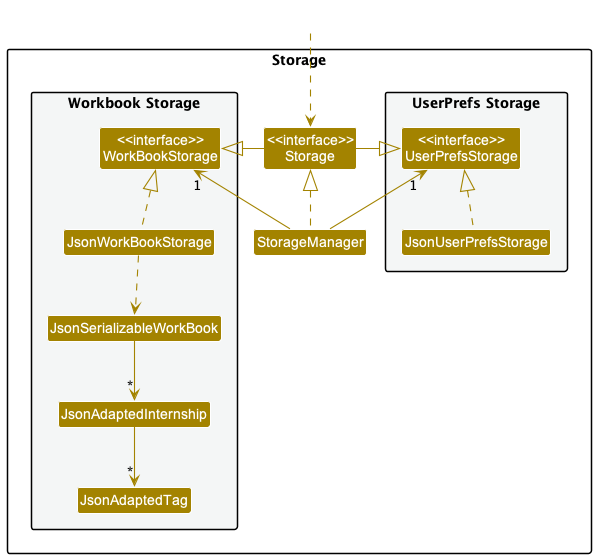
The Storage component,
- can save both work book data and user preference data in json format, and read them back into corresponding objects.
- inherits from both
WorkBookStorageandUserPrefStorage, which means it can be treated as either one (if only the functionality of only one is needed). - depends on some classes in the
Modelcomponent (because theStoragecomponent’s job is to save/retrieve objects that belong to theModel)
Common classes
Classes used by multiple components are in the seedu.workbook.commons package.
Implementation
This section describes some noteworthy details on how certain features are implemented.
Add feature
Implementation
The add feature is facilitated by AddCommand and AddCommandParser classes. The parse method in AddCommandParser
checks if mandatory fields are first present.
If all are present, the new Internship will be added to the UniqueInternshipList in a sorted-by-date order.
Below shows the class diagram of adding a new internship application into the list which automatically sorts using SortedList.
This takes place in the UniqueInternshipList as shown in the diagram below.
Some logic and model details are omitted as they are already explained in the Architecture section above.

Design considerations:
Aspect: Stage field:
-
Alternative 1 (current choice): Not restricting to enums, (proposed: warn if input does not match general stages)
- Pros: Flexibility for user by allowing unique stages from different companies which we did not prepare for to be added.
- Cons: Will not have stage-specific tips that have been gathered for more general interview stages.
-
Alternative 2: Restricting to enums
- Pros: Prevent the need for user to edit previous command in the event of a typo,
- Cons: Flexibility is heavily restricted, user may encounter stages that we may not have prepared for, which may annoy the user if the user is not allowed to add the stage into the internship tracker.
Aspect: DateTime field:
-
Alternative 1 (current choice): Not modularizing Time and Date
- Pros: Most stages have a date and time associated with it. Making one of the two optional takes extra effort for something that uncommon. Can be left to later stages of development.
- Cons: May not be prepared for stages without date and/or time, therefore not making the tracker flexible enough.
-
Alternative 2: Modularizing Time and Date
- Pros: Some stages that we may not have prepared for may omit date or time, encouraging flexibility of the tracker.
- Cons: Effort required is too high in the early stages of development whereby a functional product is prioritized.
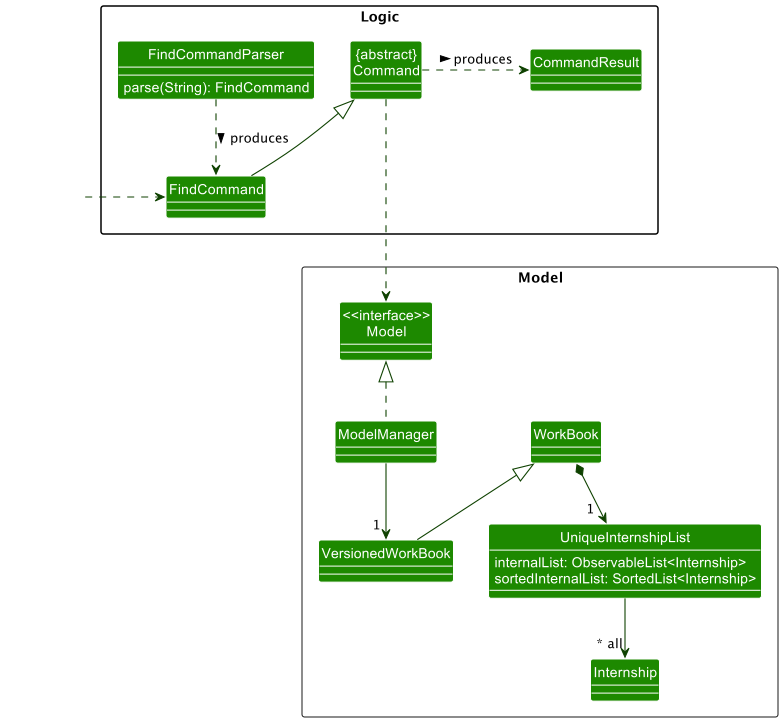
Find feature
Implementation
The find feature is facilitated by FindCommand and FindCommandParser classes. The parse method in FindCommandParser
checks if mandatory fields are first present.
If all are present, the new UniqueInternshipList will contain the internships that contain the keywords the user’s have entered.
Below shows the class diagram of filtering existing internship applications using keywords that are input by the user. The list will only contain internships that pass the predicate. This list automatically sorts using SortedList.
This takes place in the UniqueInternshipList as shown in the diagram below.
Some logic and model details are omitted as they are already explained in the Architecture section above.
Design considerations:
Aspect: Not allowing user’s to find internships using more than one attribute:
-
Alternative 1 (current choice): Only allowing keywords from one attribute, (an error message displayed if user inputs keywords corresponding to more than one attribute)
-
Pros: Allows user to be able to filter internship applications by one attribute of their interest(e.g. Company, Role or Stage). If user was allowed to filter by more than one attribute it will result in them being able to see internships that did not match the other attributes they have input.
-
Cons: User will not be able to filter their internship application listings by more than attribute.
-
-
Alternative 2: Allowing user to filter internships by more than one attribute
- Pros: Allows user to filter and find internships using keywords belonging to multiple attributes.
- Cons: Will result in the user being able to see internships that did not contain keywords of one of the attributes but contained another keyword of another attribute. This is possibly unwanted behaviour.
Undo/Redo feature
The undo feature allows for users to revert back to their previous undone state in the Workbook. The redo feature complements the undo feature by allowing users to restore to its previous changed state following an undo command.
Implementation
The undo/redo mechanism is facilitated by VersionedWorkBook. It extends WorkBook with an undo/redo history, stored internally as an workBookStateList and currentStatePointer. Additionally, it implements the following operations:
-
VersionedWorkBook#commit()— Saves the current work book state in its history. -
VersionedWorkBook#undo()— Restores the previous work book state from its history. -
VersionedWorkBook#redo()— Restores a previously undone work book state from its history.
These operations are exposed in the Model interface as Model#commitWorkBook(), Model#undoWorkBook() and Model#redoWorkBook() respectively.
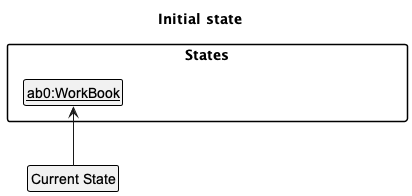
Given below is an example usage scenario and how the undo/redo mechanism behaves at each step.
Step 1. The user launches the application for the first time. The VersionedWorkBook will be initialized with the initial work book state, and the currentStatePointer pointing to that single work book state.
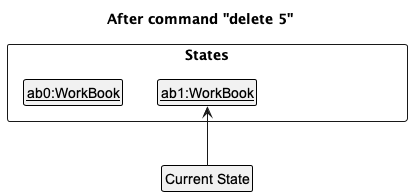
Step 2. The user executes delete 5 command to delete the 5th internship in the work book. The delete command calls Model#commitWorkBook(), causing the modified state of the work book after the delete 5 command executes to be saved in the workBookStateList, and the currentStatePointer is shifted to the newly inserted work book state.
Step 3. The user executes add c/COMPANY … to add a new internship. The add command also calls Model#commitWorkBook(), causing another modified work book state to be saved into the workBookStateList.
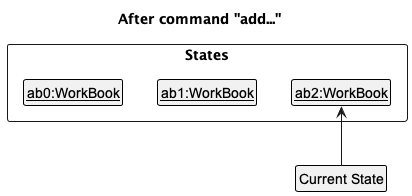
Model#commitWorkBook(), so the work book state will not be saved into the workBookStateList.
Step 4. The user now decides that adding the internship was a mistake, and decides to undo that action by executing the undo command. The undo command will call Model#undoWorkBook(), which will shift the currentStatePointer once to the left, pointing it to the previous work book state, and restores the work book to that state.
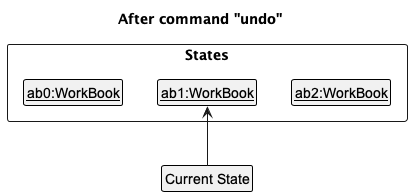
currentStatePointer is at index 0, pointing to the initial WorkBook state, then there are no previous WorkBook states to restore. The undo command uses Model#canUndoWorkBook() to check if this is the case. If so, it will return an error to the user rather
than attempting to perform the undo.
The following sequence diagram shows how the undo operation works:
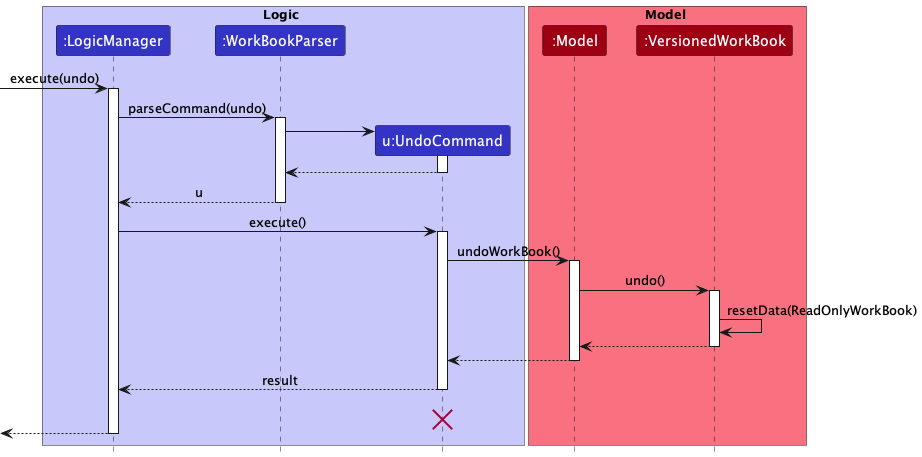
UndoCommand should end at the destroy marker (X) but due to a limitation of PlantUML, the lifeline reaches the end of diagram.
Step 5. The user now decides that undoing the added internship was a mistake, and decides to redo that action by executing the redo command. The redo command will call Model#redoWorkBook(), which will shift the currentStatePointer once to the right, pointing it to the previous undone work book state, and restores the work book to that state.
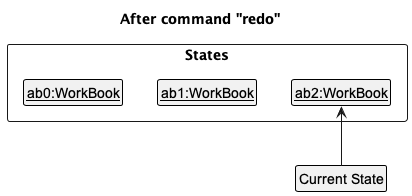
currentStatePointer is at index workBookStateList.size() - 1, pointing to the latest work book state, then there are no undone WorkBook states to restore. The redo command uses Model#canRedoWorkBook() to check if this is the case. If so, it will return an error to the user rather than attempting to perform the redo.
The following sequence diagram shows how the redo operation works:
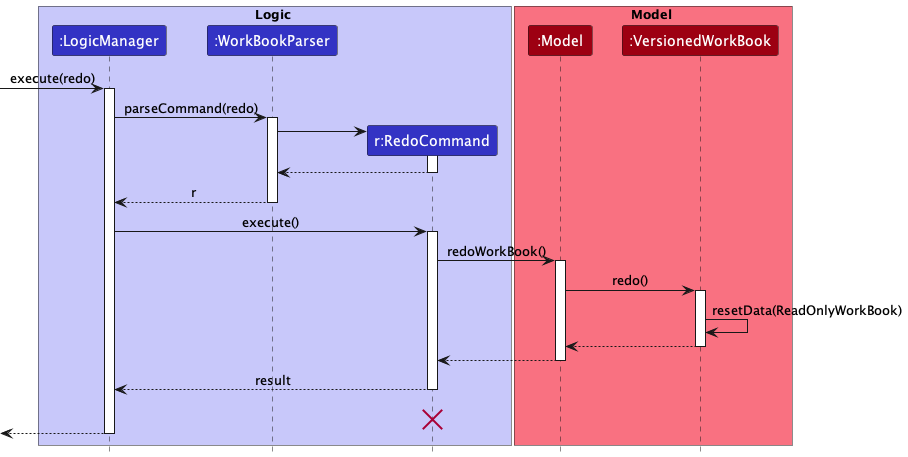
RedoCommand should end at the destroy marker (X) but due to a limitation of PlantUML, the lifeline reaches the end of diagram.
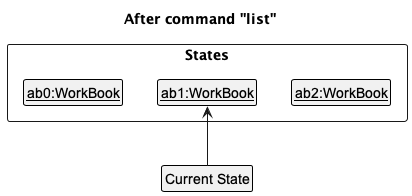
Step 6. The user then decides to execute the command list. Commands that do not modify the work book, such as list, will usually not call Model#commitWorkBook(), Model#undoWorkBook() or Model#redoWorkBook(). Thus, the workBookStateList remains unchanged.
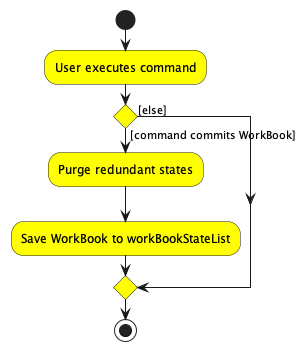
Step 7. The user executes clear, which calls Model#commitWorkBook(). Since the currentStatePointer is not pointing at the end of the workBookStateList, all work book states after the currentStatePointer will be purged. Reason: It no longer makes sense to redo the add c/COMPANY … command. This is the behavior that most modern desktop applications follow.
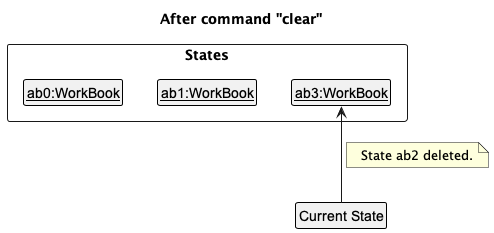
The following activity diagram summarizes what happens when a user executes a new command:
Design considerations:
Aspect: How undo & redo executes:
-
Alternative 1 (current choice): Saves the entire work book.
- Pros: Easy to implement.
- Cons: May have performance issues in terms of memory usage.
-
Alternative 2: Individual command knows how to undo/redo by
itself.
- Pros: Will use less memory (e.g. for
delete, just save the internship being deleted). - Cons: We must ensure that the implementation of each individual command are correct.
- Pros: Will use less memory (e.g. for
Help window feature
The help window has been redesigned to show all the commands supported by WB as well as examples of how to use the commands. This is to enable ease of use as users can quickly reference commands from the help window instead of having to open and refer to the UG.
Implementation
The help window is implemented in the HelpWindow class. The HelpUtil class stores all the headers and examples Strings for the commands in a two HashMaps. The help window will retrieve the list of Commands and then builds a HelpCard for each command and adds it into the GridPane to display in the HelpWindow. The HelpCard retrieves the respective header and example Strings using the getCommandHeader and getCommandExample methods from HelpUtil and shows it using two Labels.
Tips feature
The tips feature shows curated tips for internship applications for specific application stages in order to help the user prepare for their certain deliverables, interviews and tests. The tips are currently only curated for common stages of internship applications due to the feasibility constraints.
Implementation
The tips feature is implemented in the Model component inside the StageUtil class. The list of supported stages is stored inside as a List<Stage>. The tips are stored in a HashMap that maps each Stage object to their respective List<String> of tips. The getStageSpecificTips() method will retrieve the list of tips for a supported stage as a List<String>.
The tips are then stored and shown inside a TipsCard object that extends from UiPart<Region> and consists of one Hbox housing 2 Hboxs with each inner Hbox containing a Label. The first Label shows the index while the second Label shows the Tip itself.
The tips are show to the user in one of two ways depending on the UI layout.
Narrow UI implementation
In the narrow UI layout, the tips can be accessed through a tipsButton which has a light bulb icon on the NarrowInternshipCard which will open the TipsWindow. The TipsWindow is a member of every NarrowInternshipCard object and is created when the constructor is called.
The light bulb button will only appear if the internship application is at a supported stage, The implementation of this is through the hasNoTips() method from the Stage class that returns a boolean hasNoTips depending on whether the stage of the application has tips.
If the application stage has tips and the button is pressed, the TipsWindow UI component of the InternshipCard will have its GridPane populated with TipsCard vertically after retrieving the tips using the getStageSpecificTips() method and building the TipsCard for each tip. The tips window is then opened.
If the application stage does not have tips, the tips button will be set to hidden and the TipsWindow will not be populated and will be inaccessible.
For more details on the UI implementation, please refer to the Responsive UI section of the DG.
Wide UI implementation
In the wide UI layout, the tips are shown to the right of the internship list using the TipsPanel that extends UiPart<Region>. A listener is implemented in the WideInternshipListPanel to check which NarrowInternshipCard is currently selected.
If the internship card currently selected is at a supported stage, the TipsPanel will have its GridPane populated with TipCards vertically after retrieving the tips using the getStageSpecificStips() method and building the TipCard for each tip.
If the internship card currently selected is not at a supported stage, the default TipsPanel will be shown which only has Label message telling the user that there are no tips for the stage yet.
For more detail on the UI implementation, please refer to the Responsive UI section of the DG.
Responsive UI feature
Workbook had two UI layouts depending on the size of the MainWindow. A narrow UI layout is shown when the window is resized narrower than the 1000 pixel breakpoint and a wide UI layout is shown when the window is resized wider than the 1000 pixel breakpoint. This is to improve readability and usability on narrow and wide screens.
Implementation
The implementation starts at the MainWindow class. The class has two UI layouts as members, the WideInternshipListPanel class and the NarrowInternshipListPanel class that both extend UiPart<Region>. The two UI layout objects are instantiated on calling the constructer of MainWindow and are populated with the internship applications on instantiation. This is to enable fast switching between the two layouts.
The setWidthEventHandlers() listener will listen to the current window width. Whenever the window width passes the breakpoint, the internshipListPanelPlaceholder is cleared and populated with either the WideInternshipListPanel or the NarrowInternshipListPanel depending on the window width.
Narrow UI
The narrow UI layout uses the NarrowInternshipListPanel and populates its ListView with the InternshipCard that extends UiPart<Region>. It has a tips button that can open the tips window. Other than the tips button, the implementation is very similar to AB3 with minor styling changes.
For more details on the implementation of the tips button and tips window, refer to the Tips section of the DG.
Wide UI
The wide UI layout uses the WideInternshipListPanel and populates its ListView with the NarrowInternshipCard that extends UiPart<Region>. It differs from the InternshipCard in that it does not have the tips button. The implementation is very similar to the original InternshipCard from AB3 with minor styling changes.
The WideInternshipListPanel has a TipsPanel beside the ListView that extends UiPart<Region>. The TipsPanel is contained inside a HBox tipsPanelContainer which is a member of the WideInternshipListPanel.
A listener setInternshipSelectedEventHandlers() is implemented in the WideInternshipListPanel class that listens to to which NarrowInternshipCard is currently selected. It will call the tipPanelBuilder() method which takes in a Stage and creates a TipsPanel object and populates it with tips.
For more details on the implementation of the tips button, tips window and tips panel, refer to the Tips section of the DG.
{more aspects and alternatives to be added}
[Proposed] Data archiving
{Explain here how the data archiving feature will be implemented}
Documentation, logging, testing, configuration, dev-ops
Appendix: Requirements
Product scope
Target user profile:
- is a Computing student
- is looking and applying for internships
- likes to organize his/her data in one place
- prefer desktop apps over other types
- can type fast
- prefers typing to mouse interactions
- is reasonably comfortable using CLI apps
Value proposition: This app aims to be a unified platform that helps the user manage all their internship applications
User stories
Priorities: High (must have) - * * *, Medium (nice to have) - * *, Low (unlikely to have) - *
| Priority | As a … | I want to … | So that I can… |
|---|---|---|---|
* * * |
student | add an internship company and role that I have applied to | keep track of which company and which roles I have applied for, especially when I have many applications |
* * * |
student | update an internship position that I have applied to | keep the tracker updated on the current state of my internship application |
* * * |
student | add an interview date and time to an internship application | track when my interview for that particular internship application is coming up |
* * * |
student | view the list of commands for use | familiarize myself with them and increase efficiency when performing operations on the application |
* * * |
student | keep track of the stage of my application | know which stages I am at for each application and thereafter what to prepare for it |
* * * |
student | delete an internship that I am not interested in anymore | get rid of internship applications that are not relevant to me anymore |
* * * |
forgetful student | sort the list of internship applications by dates | see and remember which interviews are upcoming to better prepare for them in case I have forgotten about them |
* * * |
student who got rejected by all the companies | clear the list of internship applications | I can start anew |
* * * |
student | add an expiry date and time to an application that is in the “Online Assessment” stage | keep track of when I have to complete the Online Assessment by |
* * * |
student who constantly changes my mind | redo an undone command | revert back the changes I had originally made |
* * |
easily confused student | prevent myself from adding the same internship application twice | I don’t get distracted by duplicate internships |
* * |
forgetful student | easily access tips specific to each application based on the current stage | quickly see a list of things to prepare for an upcoming interview or deadline |
* * |
student | filter my internship applications according to position | view all my internship applications for that particular position that I am interested in |
* * |
student preparing for technical interviews | conveniently do practice questions | be better prepared for my technical interviews |
* * |
broke student | sort the internships based on pay | determine which applications are more worth it in this current economic state |
* |
student | rank all my internship applications | decide which applications that I have to focus on more |
* |
student | move an existing application to the “Rejection” stage and provide a reason why I got rejected | keep track of common trends or reasons for my failed applications |
* |
less experienced student | view some helpful resources | understand the hiring process and tech landscapes better |
* |
anxious student | switch to a calender view | easily see all my upcoming interviews/OAs/expiring offers |
* |
student | create a todo list for each internship entry | keep track of what I’ve done and what I’ve yet to do to prepare |
Use cases
(For all use cases below, the System is the WorkBook and the Actor is the user, unless specified otherwise)
Use case: UC01 - Add an internship application
Main Success Scenario (MSS)
- User requests to add an internship.
- WorkBook adds the internship.
-
WorkBook displays internship addition is successful.
Use case ends.
Extensions
-
1a. The internship already exists.
-
1a1. WorkBook shows an error message.
Use case ends.
-
-
1b. The format of given command is invalid.
-
1b1. WorkBook shows an error message.
Use case ends.
-
Use case: UC02 - Delete an internship application
Main Success Scenario (MSS)
- User requests to delete an internship.
- WorkBook deletes the internship.
-
WorkBook displays list of internships remaining when successful.
Use case ends.
Extensions
-
1a. The list is empty.
Use case ends.
-
1b. The given index is invalid.
-
1b1. WorkBook shows an error message.
Use case ends.
-
Use case: UC03 - Edit an internship application
Main Success Scenario (MSS)
- User requests to edit an internship.
- WorkBook edits the internship.
-
WorkBook displays list of internships when successful.
Use case ends.
Extensions
-
1a. The list is empty.
-
1a1. WorkBook shows an error message.
Use case ends.
-
-
1b. The given field is invalid.
-
1b1. WorkBook shows an error message.
Use case ends.
-
-
1c. The edited internship is identical to one in the list.
-
1c1. WorkBook shows an error message.
Use case ends.
-
Use case: UC04 - Undo a command
Main Success Scenario (MSS)
- User requests to undo the latest command they have executed.
-
Workbook reverts any changes made by the command and displays the previous state of the list of internship applications.
Use case ends.
Extensions
-
1a. There is no previous command executed and the list is empty.
-
1a1. WorkBook displays an error message that no previous command has been entered.
Use case ends.
-
Use case: UC05 - Redo a command
Main Success Scenario (MSS)
- User requests to redo the latest command they have undone.
-
Workbook reverts any changes made by the undo command and displays the previous state of the list of internship applications.
Use case ends.
Extensions
-
1a. There is no previous command executed and the list is empty.
-
1a1. WorkBook displays an error message that no commands can be redone.
Use case ends.
-
Use case: UC06 - Clear list of internship applications
Main Success Scenario (MSS)
- User requests to clear list.
-
List is cleared.
Use case ends.
Extensions
-
1a. The list is empty.
-
1a1. WorkBook shows an error message.
Use case ends.
-
Use case: UC07 - Display help message
Main Success Scenario (MSS)
- User requests for help.
-
Help message is shown.
Use case ends.
Use case: UC08 - Exit application
Main Success Scenario (MSS)
- User requests to exit program.
-
WorkBook exits and closes.
Use case ends.
Use case: UC09 - View preparatory tips based on internship stage
- User requests to view preparatory tips.
- User chooses internship stage to view preparatory tips for.
-
The preparatory tips for the internship stage is shown to the user.
Use case ends.
Non-Functional Requirements
- Should work on any mainstream OS as long as it has Java
11or above installed. - Should have a startup time of at most 1 second.
- Should be able to hold up to 200 internship applications without any noticeable sluggishness in performance for typical usage.
- A user with above average typing speed for regular English text (i.e. not code, not system admin commands) should be able to accomplish most of the tasks faster using commands than using the mouse.
- Data should be persisted locally and be in a human-readable format, for e.g
json. - User interface and documentation should be intuitive enough so that new users can add an internship application within 15 minutes of installation.
Glossary
- Mainstream OS: Windows, Linux, Unix, OS-X
- OA/Online Assessment: A common stage in a Software Engineering related internship application, where applicants are required to solve several theory and/or algorithmic questions under a timed and controlled environment
Appendix: Instructions for manual testing
Given below are instructions to test the app manually.
Launch and shutdown
-
Initial launch
-
Download the jar file and copy into an empty folder
-
Double-click the jar file Expected: Shows the GUI with a set of sample internship applications. The window size may not be optimum.
-
-
Saving window preferences
-
Resize the window to an optimum size. Move the window to a different location. Close the window.
-
Re-launch the app by double-clicking the jar file.
Expected: The most recent window size and location is retained.
-
Deleting an internship application
-
Deleting an internship application while all applications are being shown
-
Prerequisites: List all persons using the
listcommand. Multiple persons in the list. -
Test case:
delete 1
Expected: First application is deleted from the list. Details of the deleted application shown in the status message. -
Test case:
delete 0
Expected: No application is deleted. Error details shown in the status message. -
Other incorrect delete commands to try:
delete,delete x(where x is larger than the list size)
Expected: Similar to previous.
-
Saving data
-
Dealing with missing data file.
-
Simulate a missing data file by deleting
data/workbook.json(if it exists). -
Start
WorkBookand it should be populated with sample data. -
Execute
exitcommand. -
data/workbook.jsonshould be saved with the sample data.
-
-
Dealing with corrupted data file.
-
Simulate a corrupted data file by manually editing
data/workbook.json.
Delete thecompanyfield from one of the internship applications. -
Start
WorkBookand it should have no data at all. -
Execute
exitcommand. -
data/workbook.jsonshould only contain:{ "internships" : [] }.
-