User Guide
- 1. Introducing WorkBook
- 2. Getting started
- 3. Exploring our guide
- 4. Things to note
-
5. What you can do
- 5.1. Adding your internship application
- 5.2. Editing your internship application
- 5.3. Listing all existing internship applications
- 5.4. Viewing tips for your applications:
- 5.5. Finding your internships
- 5.6. Deleting your internship application
- 5.7. Clearing your existing internship applications
- 5.8. Undoing your previous command
- 5.9. Redoing your previous command
- 5.10. Viewing help
- 5.11. Exiting the program
- 6. Managing your data
- 7. Frequently asked questions
- 8. Prefix summary
- 9. Glossary
1. Introducing WorkBook
Welcome to WorkBook! ![]()
WorkBook is an internship application tracker that helps Computing students prepare sufficiently for their upcoming interviews to secure that internship. This minimalistic tool allows you to effortlessly collate and easily manage all of your internship applications’ progress. Furthermore, tips are given for relevant stages of your internship applications to give you an edge over other applicants!
This guide provides a step-by-step guide on how you can get started using WorkBook, gives an overview of what you can do in WorkBook and how you can best utilise it to transform your internship hunt positively. Each documented feature introduces a potential problem you face, how it can be resolved and examples on using the feature.
No time to waste, let’s start Working! ![]()
2. Getting started
This section helps you get started with WorkBook.
It consists of a step-by-step installation guide and an explanation of the key GUI elements.
2.1 Installation
-
Ensure you have Java 11 or above installed on your computer.
-
Download the latest
WorkBook.jarfrom here. -
Copy the downloaded
WorkBook.jarto a folder of your choice. -
Using your command terminal:
- Navigate to the folder where you placed your WorkBook at.
- Run:
java -jar WorkBook.jar.
The GUI, as shown below in one of the two layouts, should appear within seconds.
| Wide Layout | Narrow Layout |
|---|---|
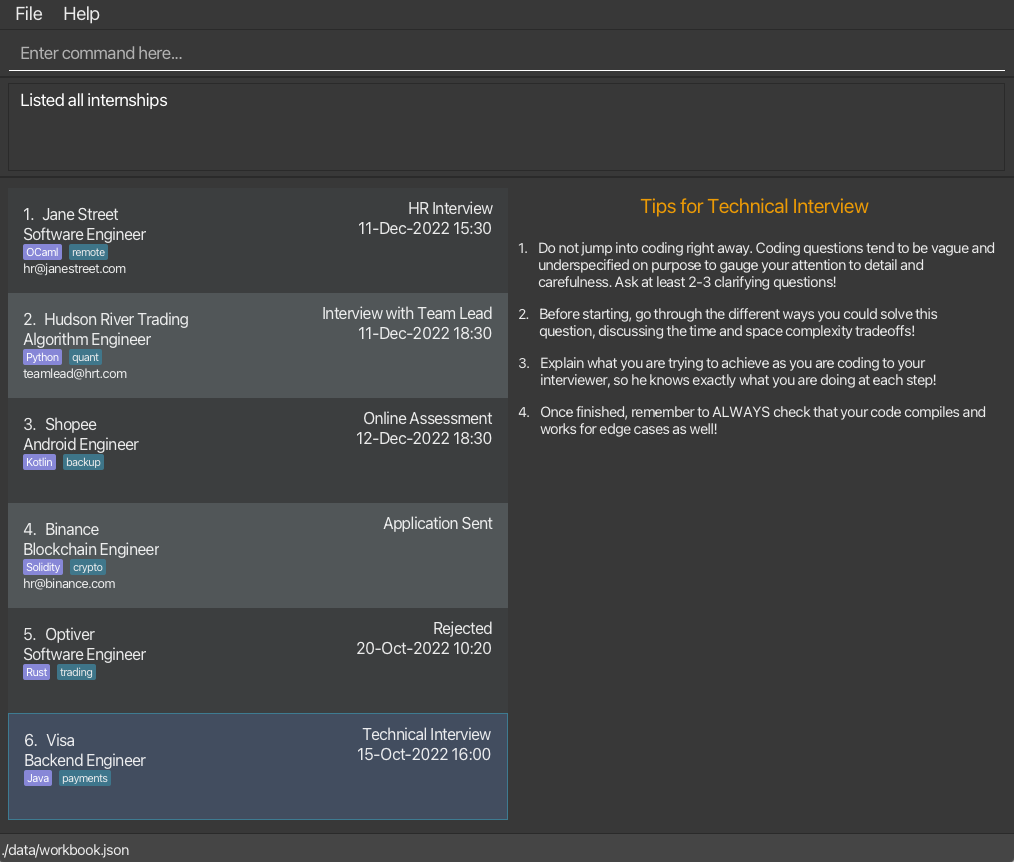 |
 |
-
Tell WorkBook what you want to do by typing your command in
Enter command here...at the top of the application and pressing Enter on your keyboard to execute it. -
Before diving right into using WorkBook, familiarise yourself with the things to note to not hinder your tracking process!
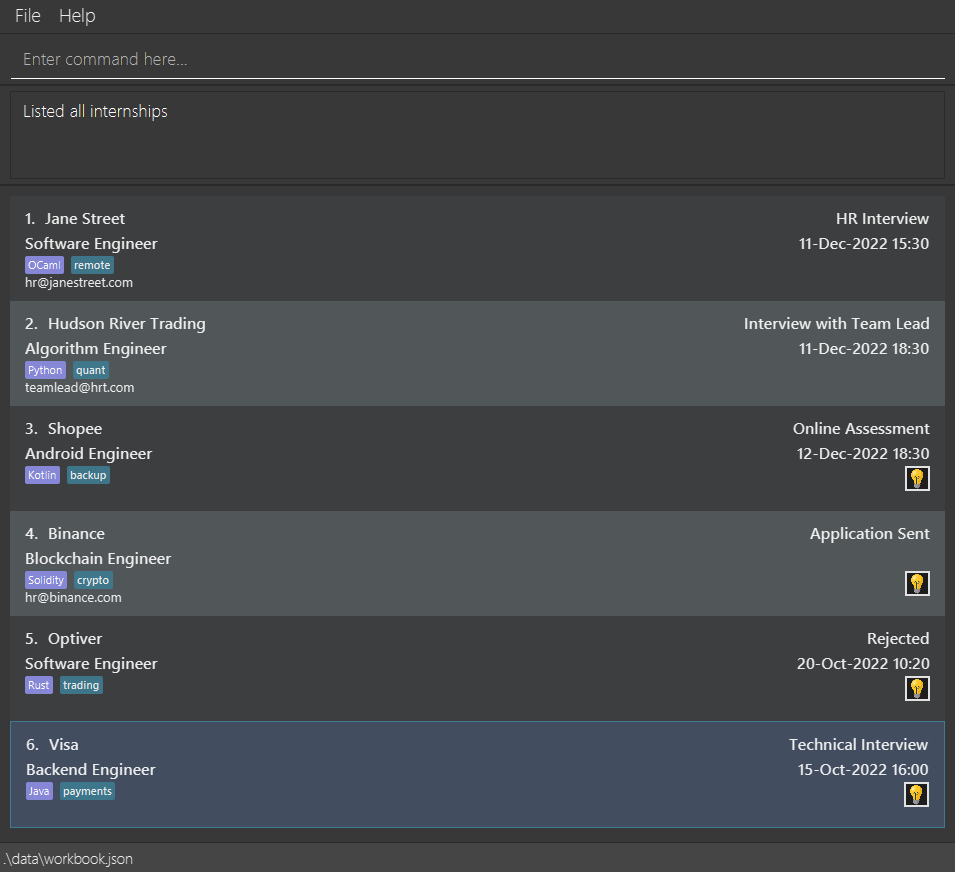
2.1 Understanding WorkBook’s GUI
Below shows the main elements of WorkBook’s GUI, in wide and narrow layouts.
For the narrow layout, everything else is the same except for the labelled light bulb icon, which displays tips.
| Wide Layout |
|---|
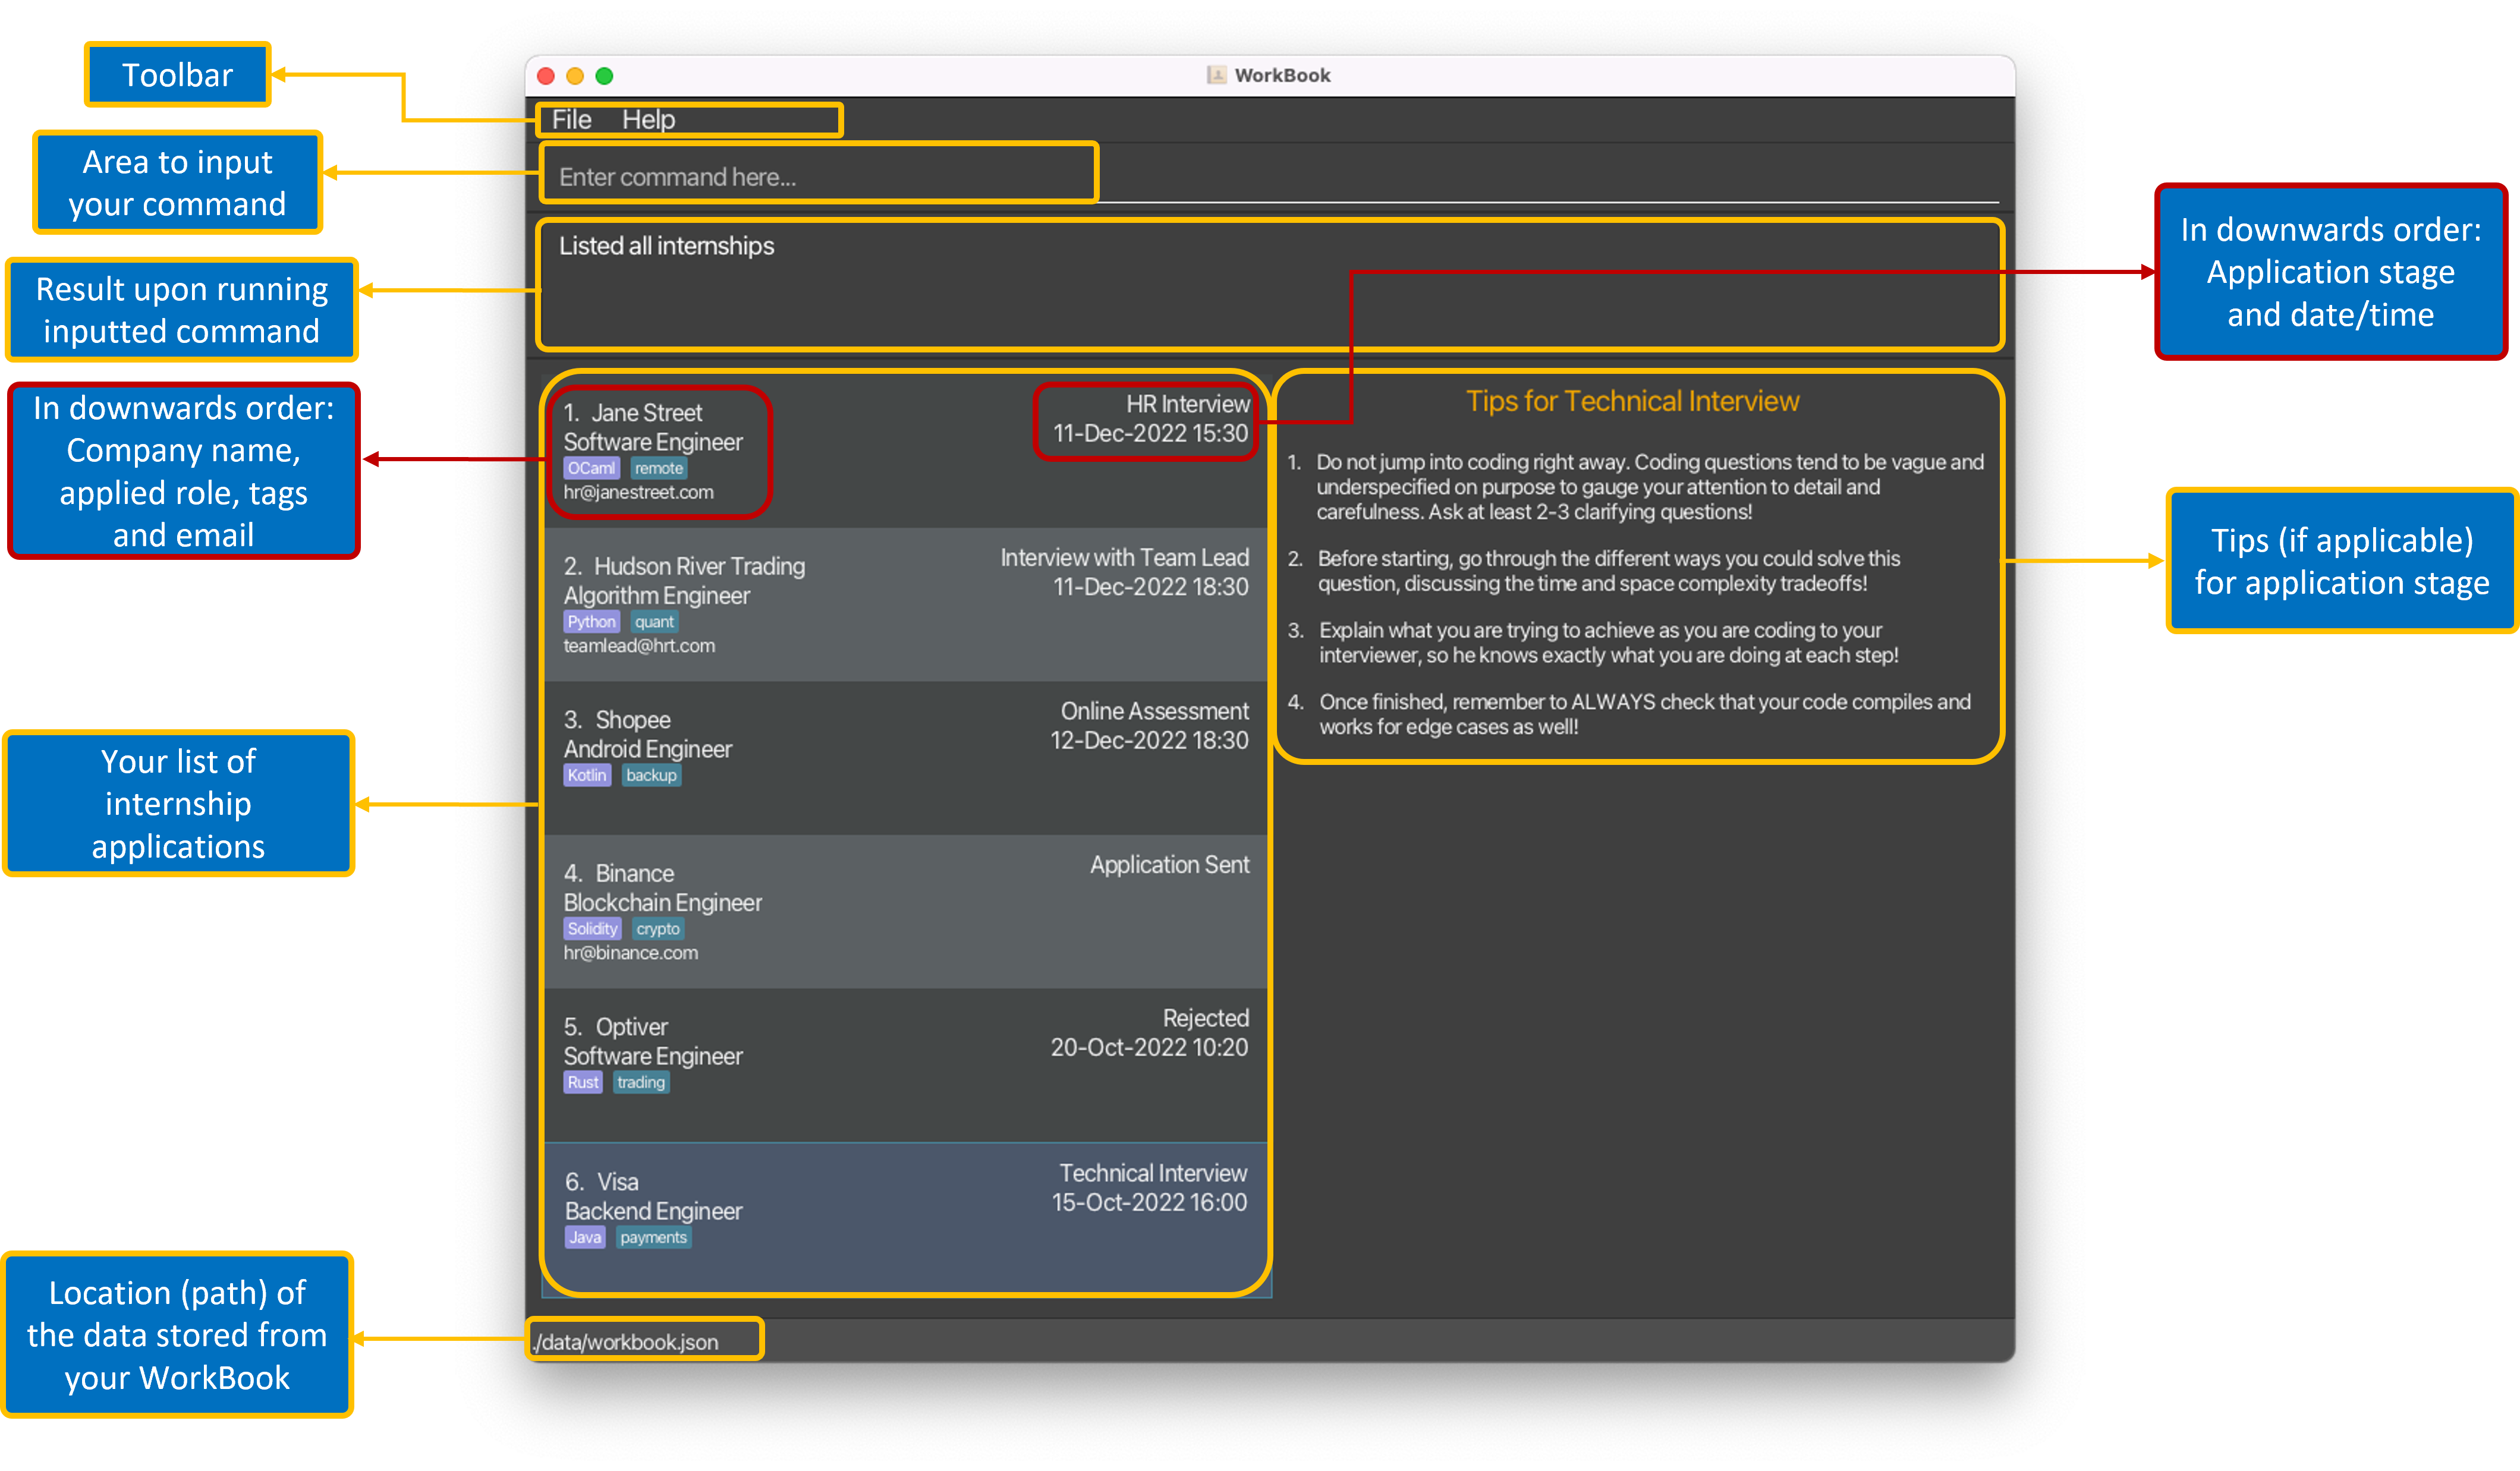 |
| Narrow Layout |
|---|
 |
3. Exploring our guide
Information Box
![]() Info: Provides extra information that is useful
Info: Provides extra information that is useful
Warning Box
![]() Warning: Important messages
Warning: Important messages
Tip Box
![]() Tip: Provides pointers to enhance your experience using the application
Tip: Provides pointers to enhance your experience using the application
Highlights
commands or PARAMETERS
4. Things to note
This section describes important information for you to take note of before and while using WorkBook. In order to make WorkBook work best for you, do familiarise yourself with the items in this section.
4.1 Notes about the command format:
-
Words in
UPPER_CASEare the parameters to be supplied by the user.
e.g. inadd c/COMPANY,COMPANYis a parameter which can be used asadd c/Meta. -
Items in square brackets are optional.
e.gc/COMPANY [t/TAG]can be used asc/Meta t/unattainableor asc/Meta. -
Items with
… after them can be used multiple times including zero times.
e.g.[t/TAG]…can be omitted, used once:t/unattainable, or multiple times:t/unattainable t/AWS. -
Parameters can be in any order.
e.g. if the command specifiesc/COMPANY s/STAGE,s/STAGE c/COMPANYis also acceptable. -
If a parameter is expected only once in the command, but you specified it multiple times, only the last occurrence of the parameter will be taken.
e.g. if you specifyr/Frontend r/Backend, onlyr/Backendwill be taken. -
Extraneous parameters for commands that do not take in parameters (such as
help,list,exitandclear) will be ignored.
e.g. if the command specifieshelp 123, it will be interpreted ashelp.
4.2 Parameter-specific behaviour
- Whenever
[d/DATETIME]is specified as a parameter, you should input it in the formatdd-MMM-yyy hh:mmwhereyis year,Mis month,dis day,his hour in the 24-hour format andmis minutes.
e.g. October 2 2022 5:00pm should be inputted as02-Oct-2022 17:00.- Month is not case-sensitive
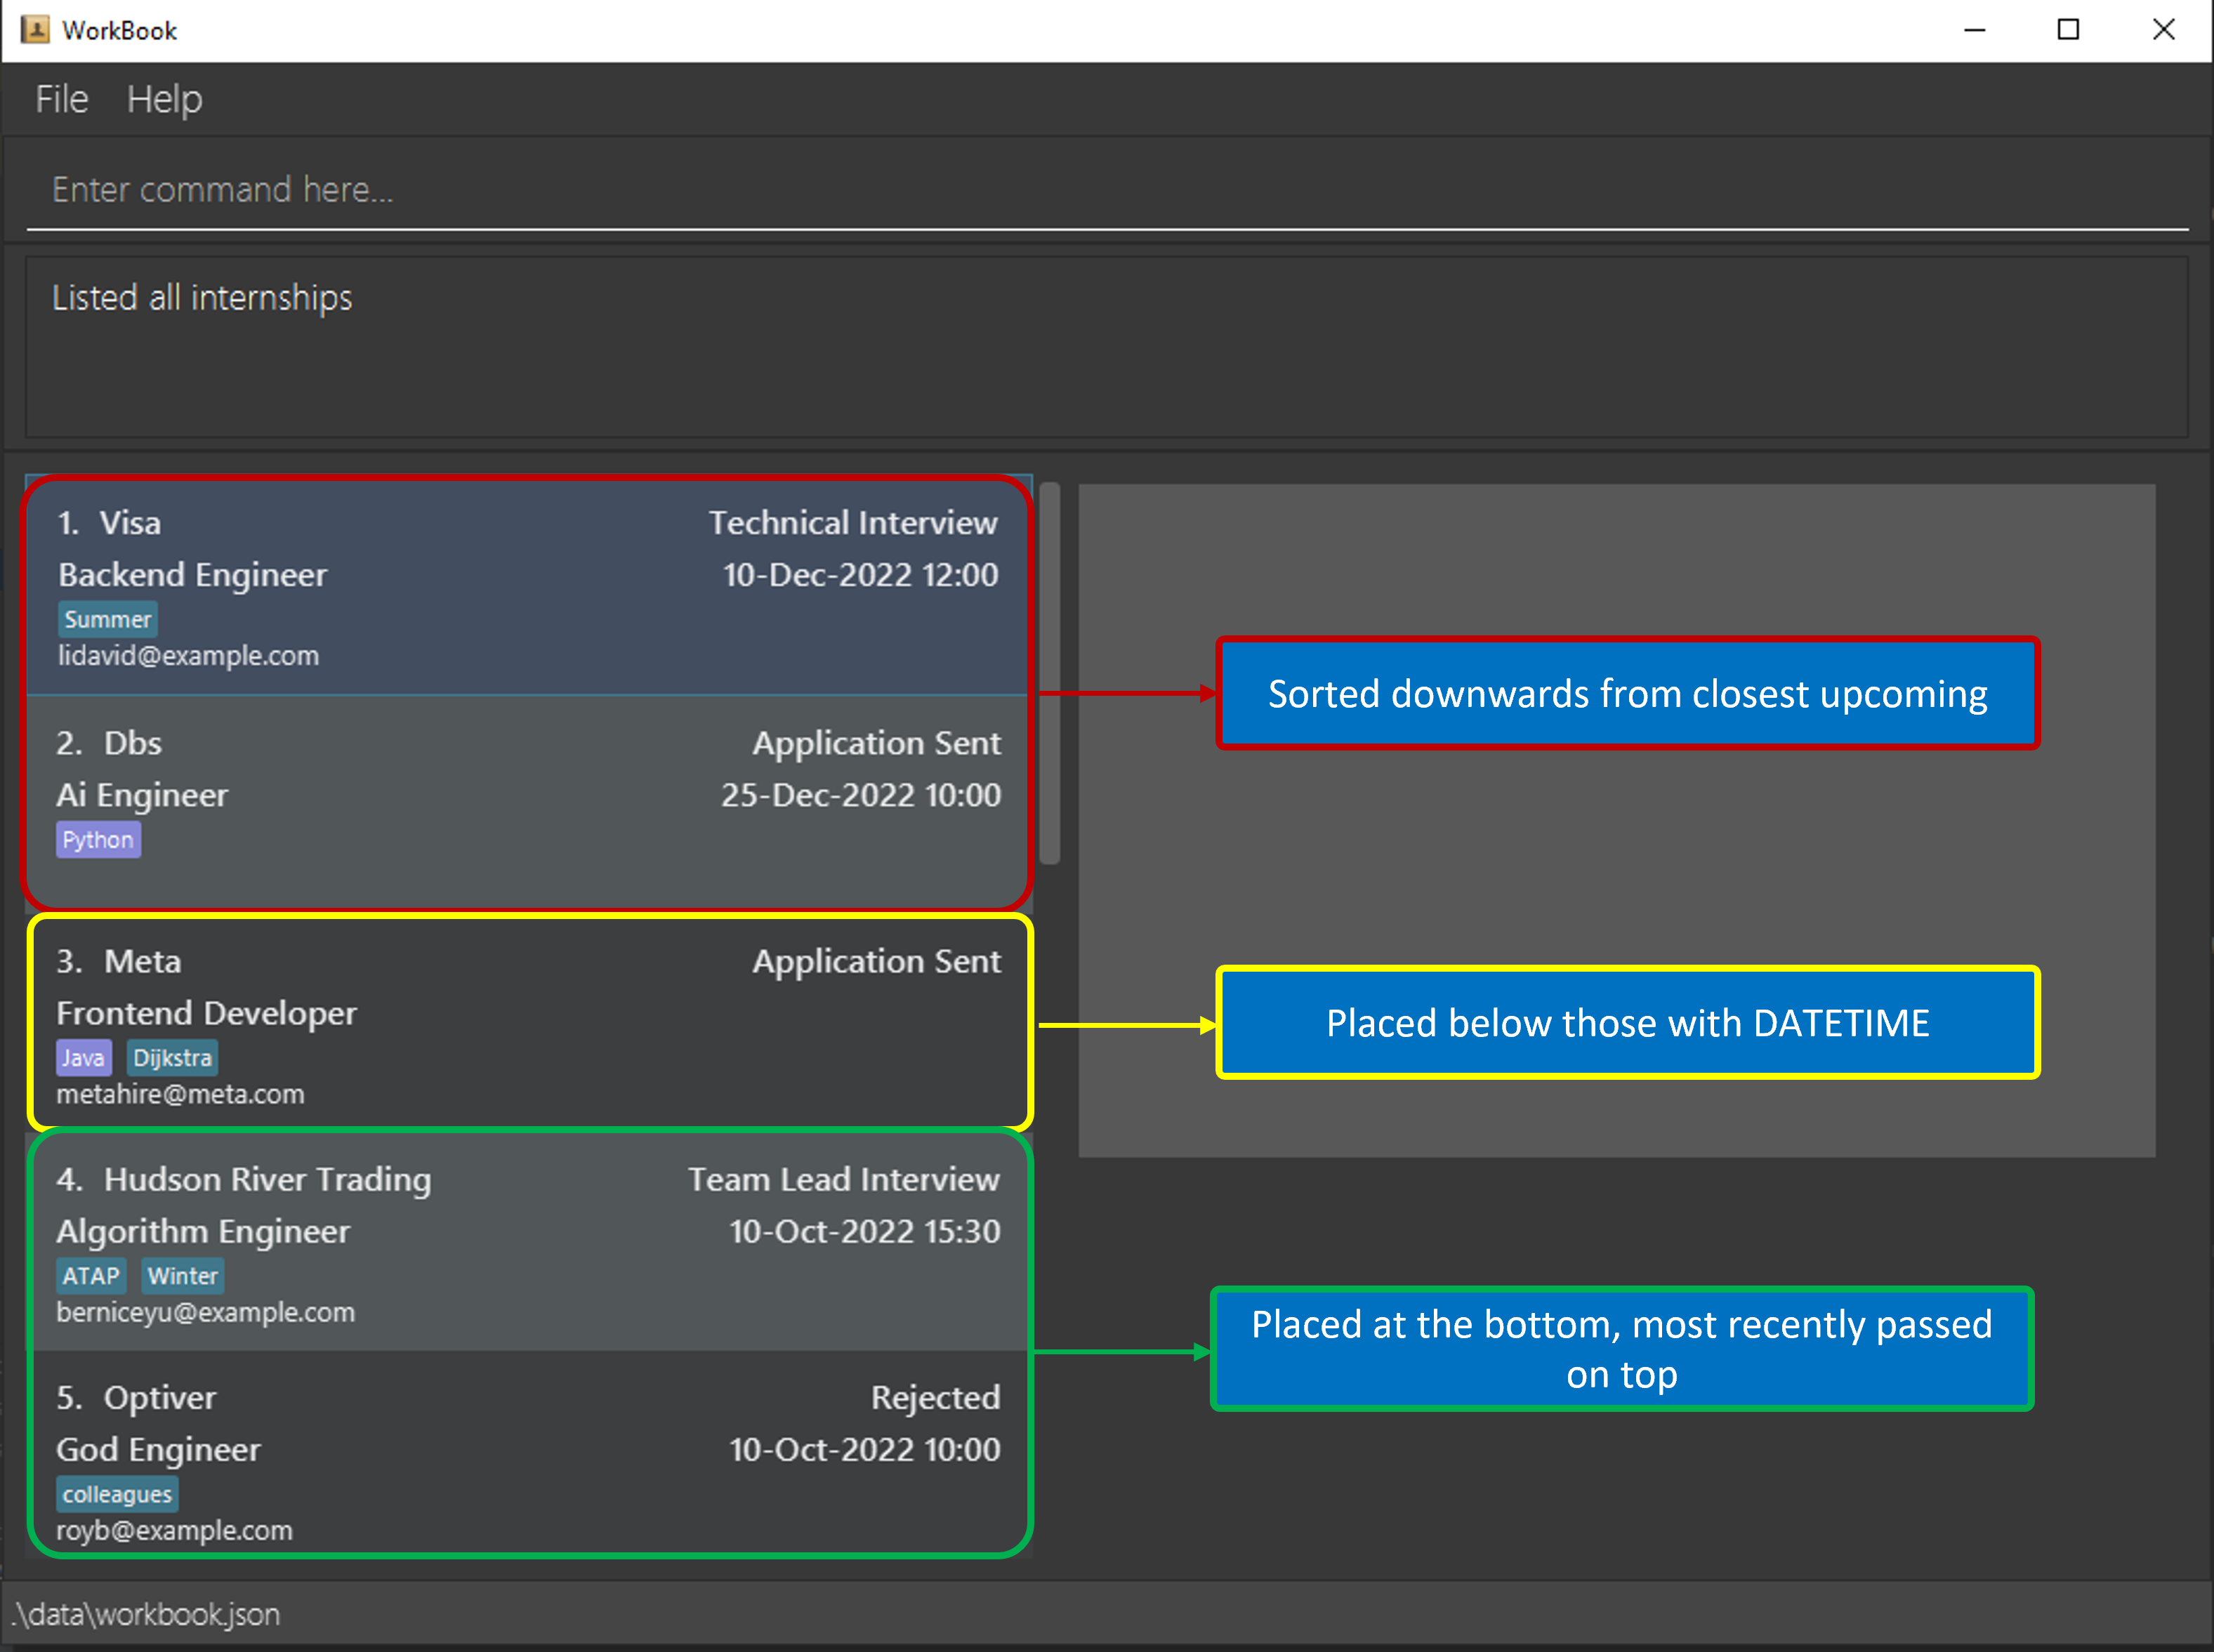
4.3 Behaviour of sorted internship applications
- The list of applications are sorted downwards from the closest upcoming application to furthest.
- Those with no
DATETIMEattached to it will be placed below those with upcoming dates. - Applications in the past (i.e.
DATETIMEis past current time) will be placed at the bottom of the list, sorted downwards as well from the most recently passed. - An example is shown below:
4.4 Responsive UI when resizing window
-
The UI will change dynamically depending on the window width.
-
If the window width is too small, WorkBook will switch to a narrow layout for a better UX.
-
Otherwise, WorkBook will be in the wide layout which has an extra right panel for displaying tips.
| Wide Layout |
|---|
| Resize the window to a wider width to get this layout |
|
| Narrow Layout |
|---|
| Resize the window to a narrower width to get this layout |
|
5. What you can do
| Your action | Command format e.g. Example command (If applicable) |
|---|---|
| Add |
add c/COMPANY r/ROLE s/STAGE [d/DATETIME] [e/COMPANY_EMAIL] [l/LANGUAGE TAG]… [t/TAG]… e.g., add c/Bytedance r/Backend Engineer s/Online Assessment d/24-Sep-2022 15:00 t/high pay l/Javascript
|
| Edit |
edit INDEX [c/COMPANY] [d/DATETIME] [e/COMPANY_EMAIL] [r/ROLE] [l/LANGUAGE TAG]… [t/TAG]…e.g., edit 2 c/Meta e/hr@meta.com
|
| Find |
find [c/COMPANY] [r/ROLE] [s/STAGE]e.g., find c/Meta
|
| Delete |
delete INDEXe.g., delete 3
|
| List | list |
| Undo | undo |
| Redo | redo |
| Clear | clear |
| Help | help |
| Exit | exit |
![]() Note:
Note:
- Commands without examples are considered trivial and can be executed by inputting the command without additional parameters.
- Commands are case-sensitive!
5.1. Adding your internship application
Have you taken the first step to apply for that internship you’ve always wanted?
Or do you want to start keeping track of the different internship applications you have?
This command satisfies the above, allowing you to add your internship applications to the list and track all of them. WorkBook also removes the hassle of sorting your internship applications manually by automating it for you!
Simply follow the command format below to add the relevant details into WorkBook!
Format: add c/COMPANY r/ROLE s/STAGE [d/DATETIME] [e/COMPANY_EMAIL] [l/LANGUAGE TAG]… [t/TAG]…
Example: add c/Meta r/Web Developer s/Application Sent d/20-Oct-2022 10:00 l/Java e/metaHires@meta.com
What you will see:
| What you will see |
|---|
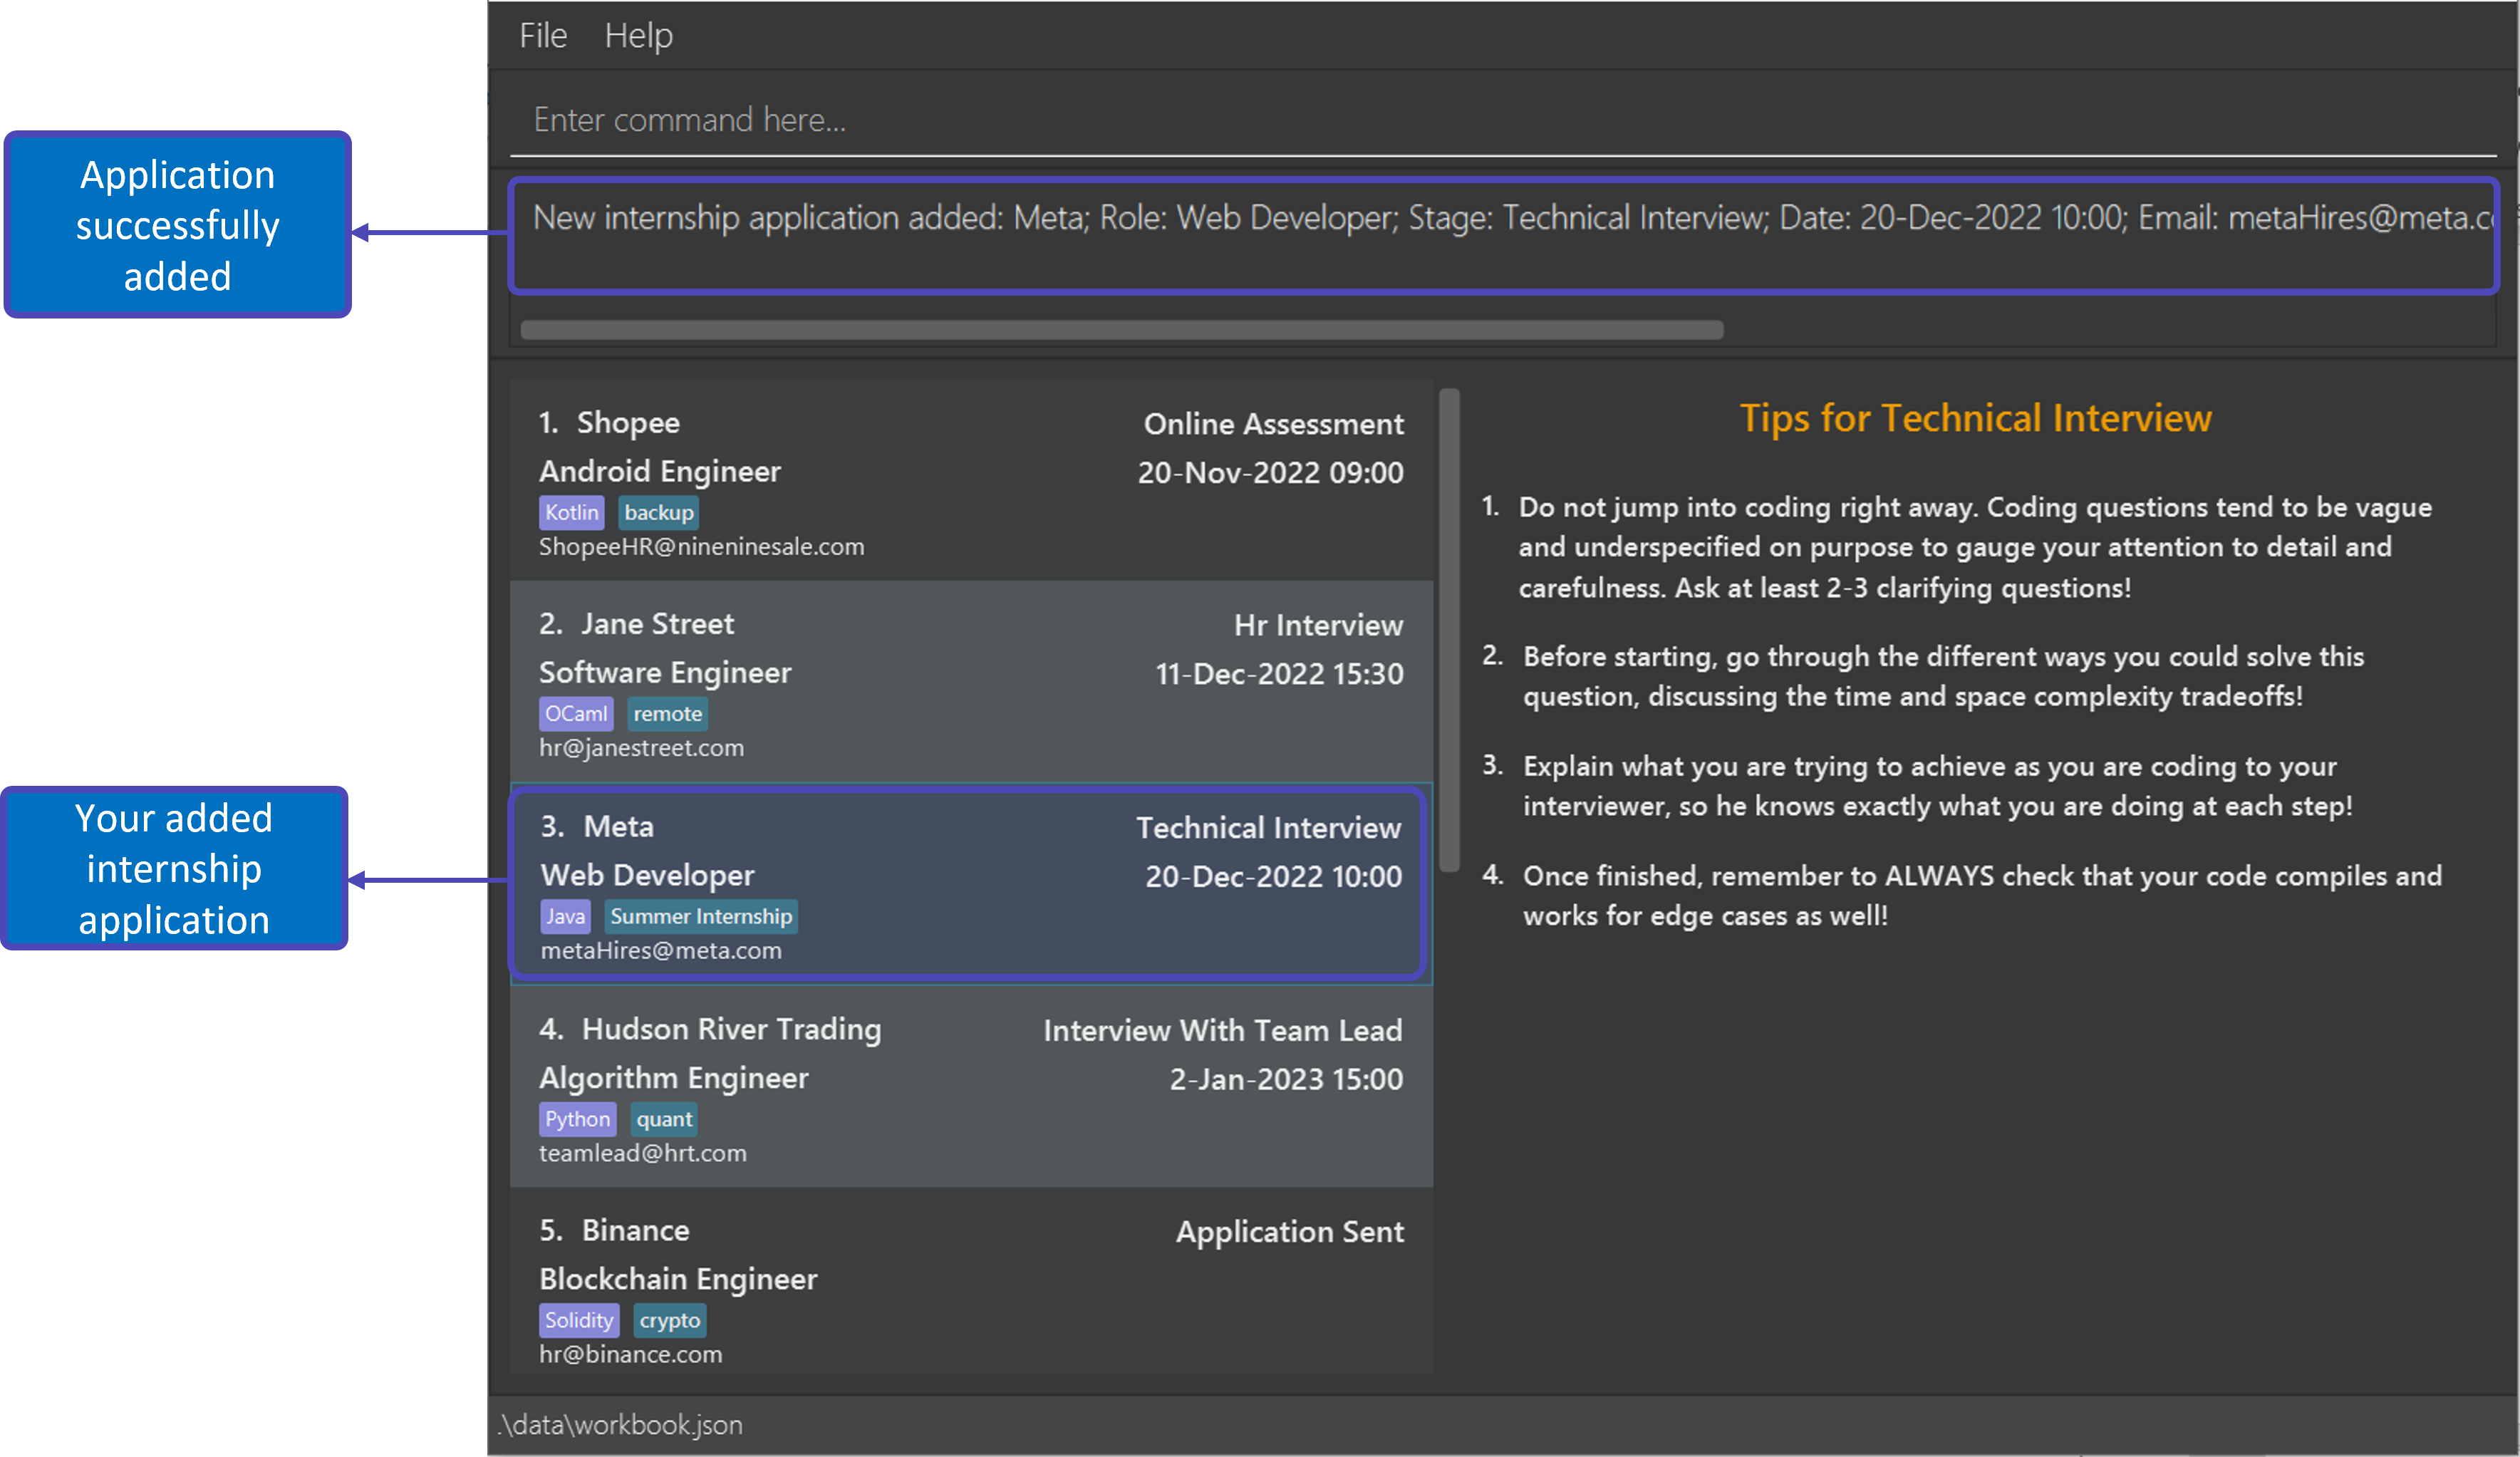 |
![]() Tip: The date and time you provide could represent multiple things:
Tip: The date and time you provide could represent multiple things:
- The date and time it happened
- The deadline of the corresponding
Stage
![]() Caution
Caution
- adding DateTime like
d/24-Sep-2022 24:00will be read asd/25-Sep-2022 00:00
Other examples:
add c/Shopback r/Blockchain Developer s/Technical Interviewadd c/Bytedance r/Backend Engineer s/Online Assessment d/24-Sep-2022 15:00 t/high pay l/Java l/Python
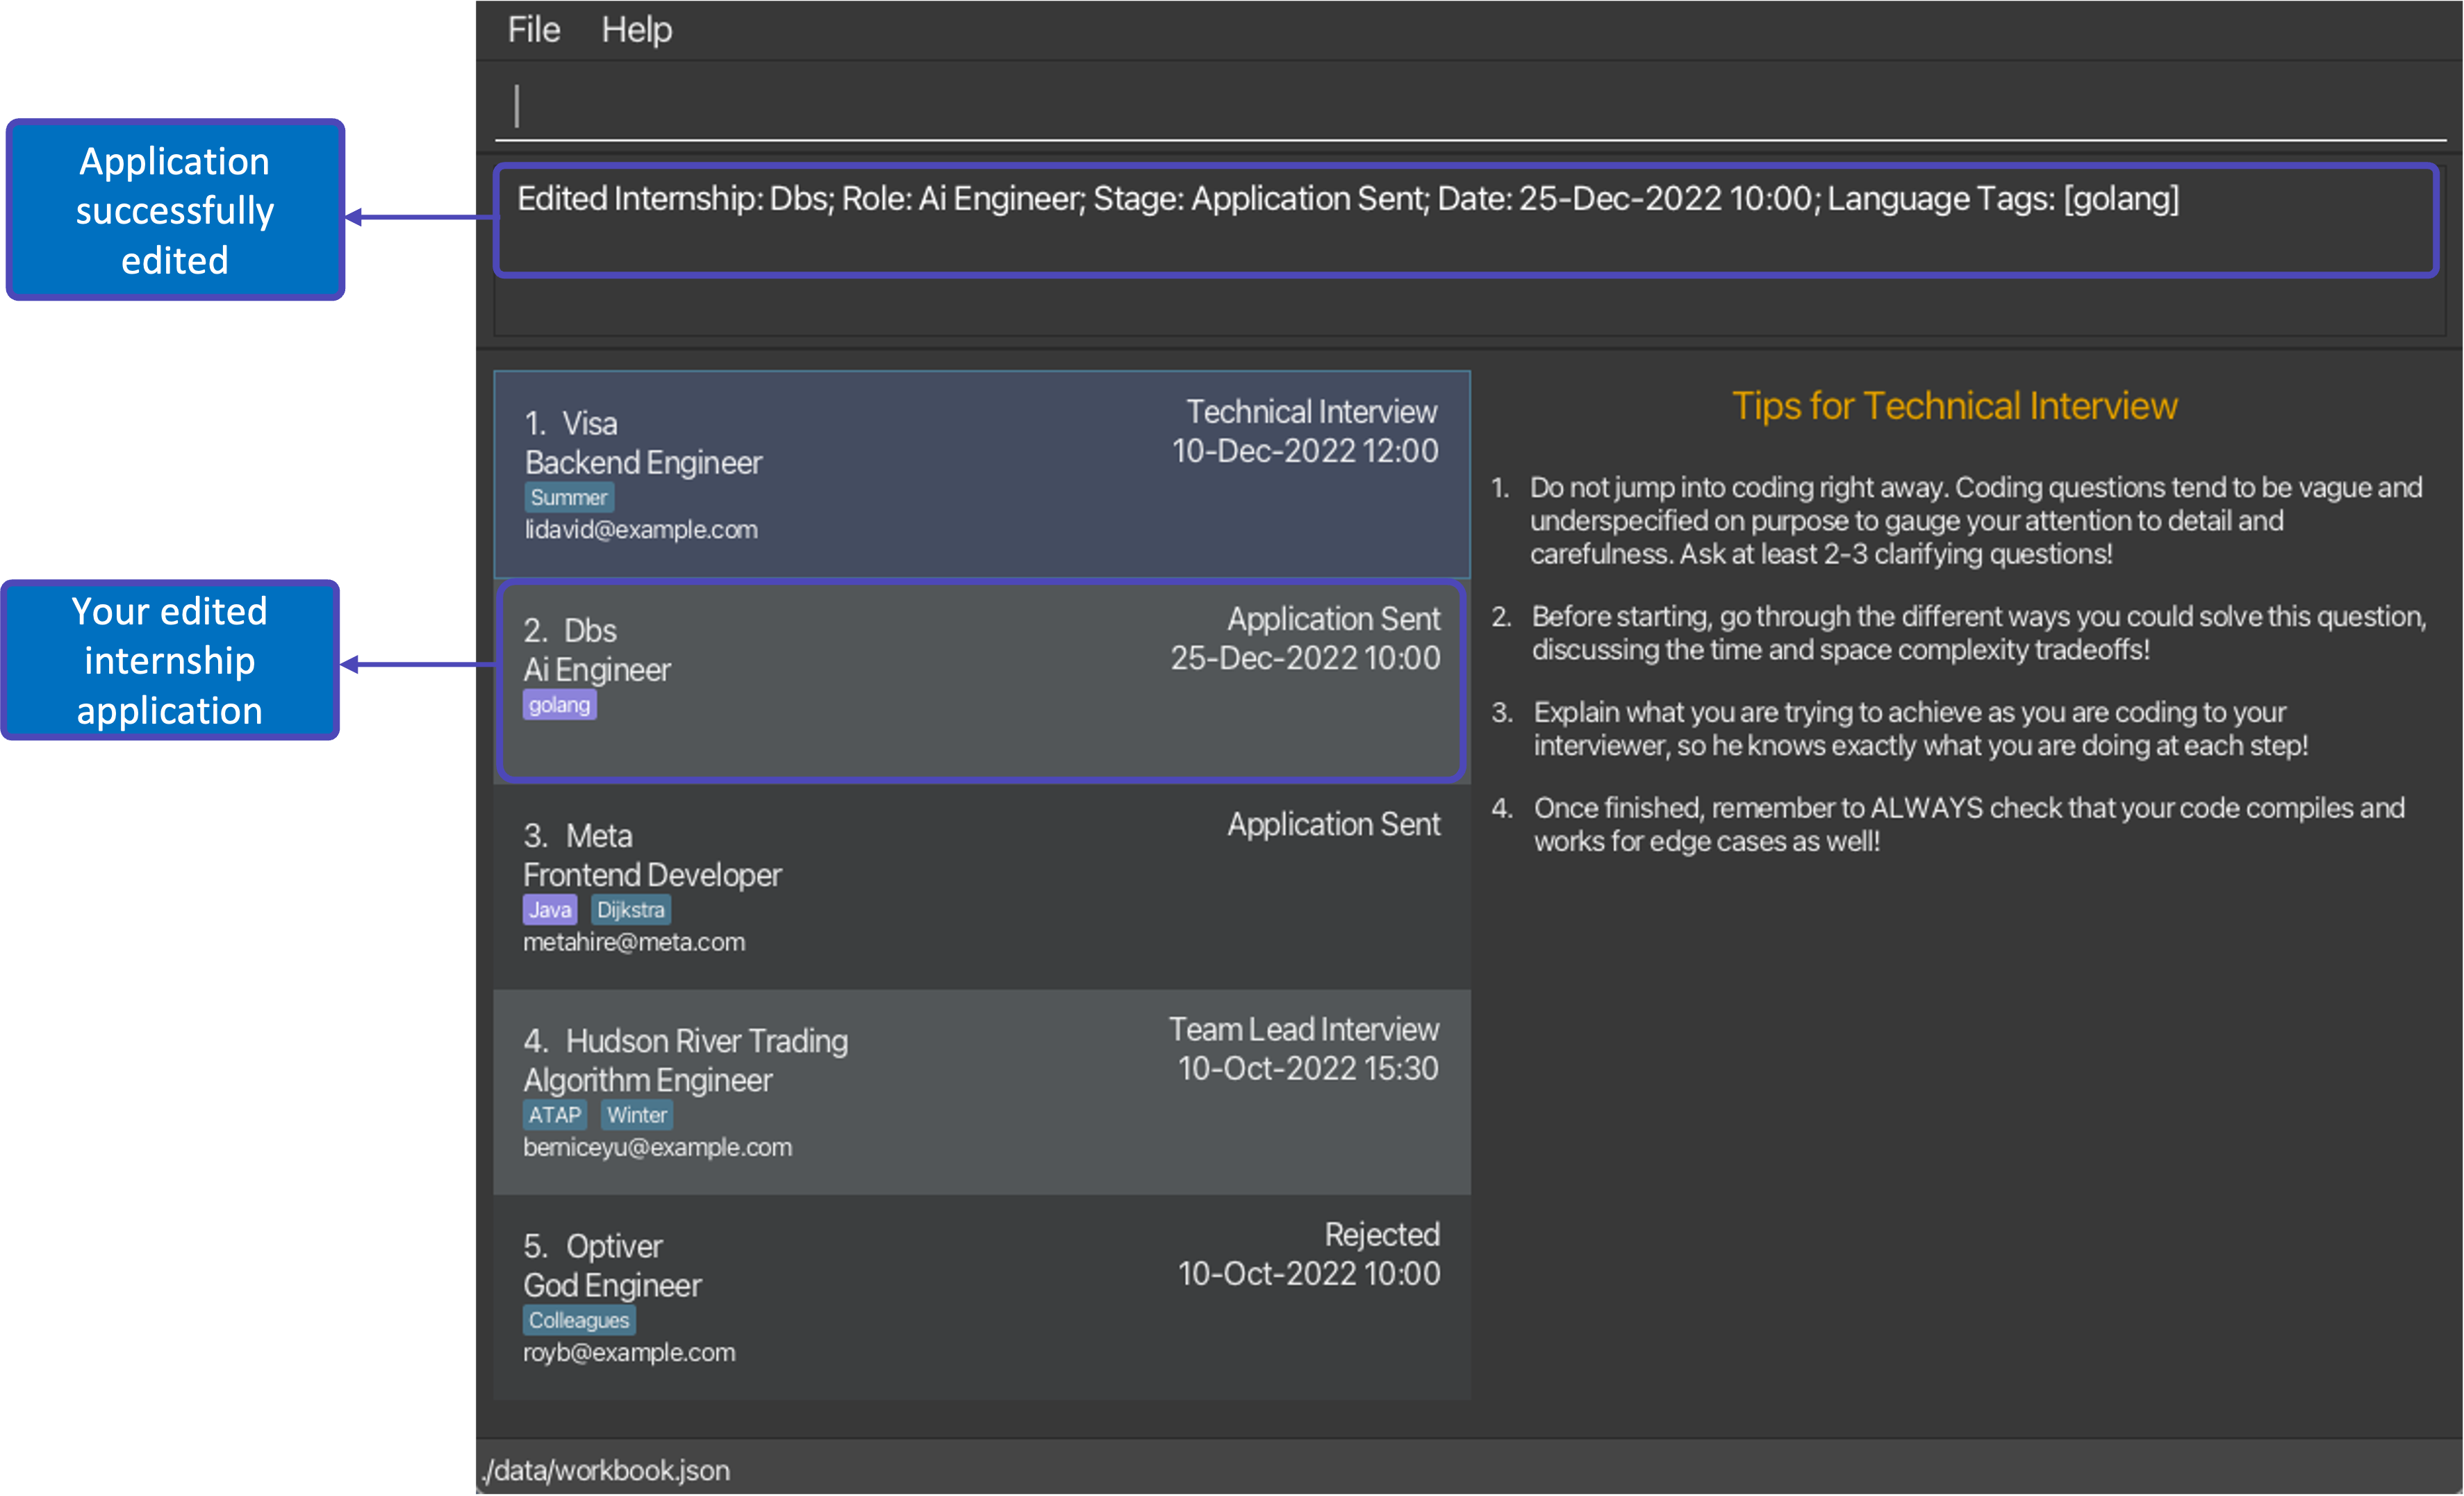
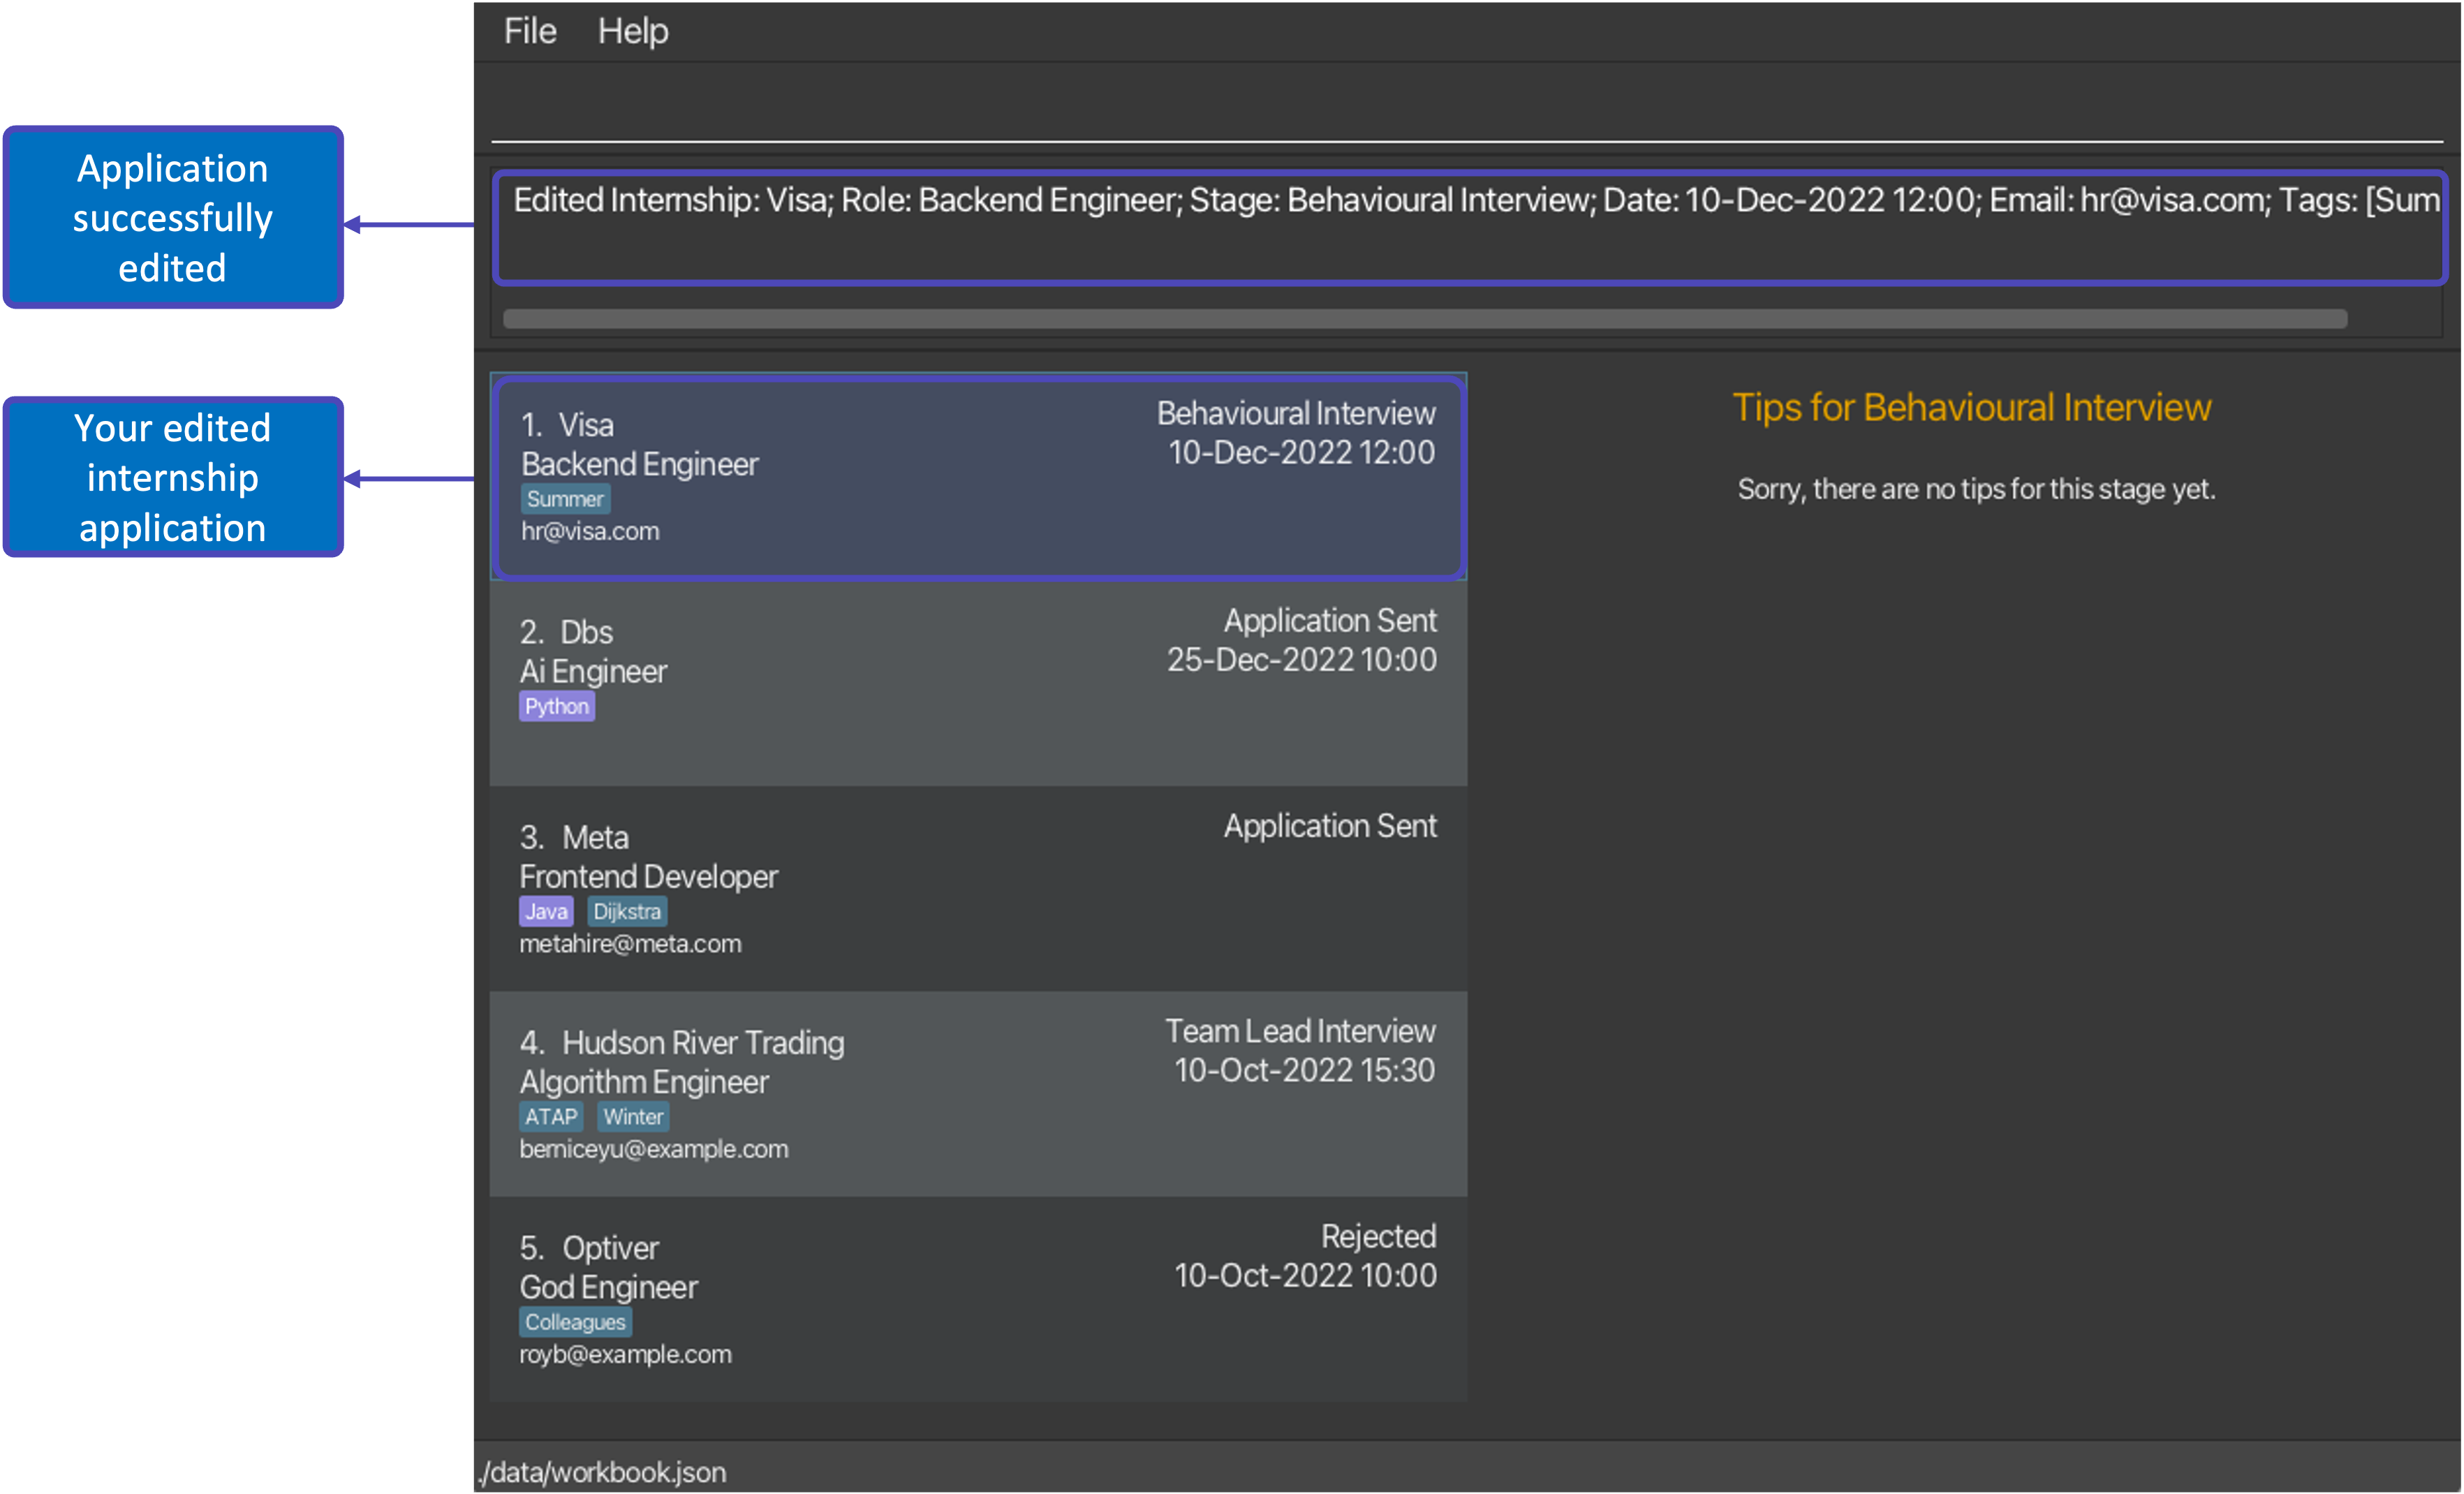
5.2. Editing your internship application
WorkBook allows you to seamlessly update fields of respective internship applications with this command.
A good time to use this command is to update the stage of your application so that WorkBook can give you relevant tips and reminders!
Format: edit INDEX [c/COMPANY] [r/ROLE] [s/STAGE] [d/DATETIME] [e/COMPANY_EMAIL] [l/LANGUAGE TAG] [t/TAG]…
- Edits the internship at the specified
INDEX, which must be:- A positive number (1, 2, 3, …).
- Within the number range of your list of internship applications.
- At least one of the optional fields must be provided.
Example: edit 2 s/Technical Interview d/28-Dec-2022 08:00
What you’ll see before and after executing the command:
| State | What you will see |
|---|---|
| Before | 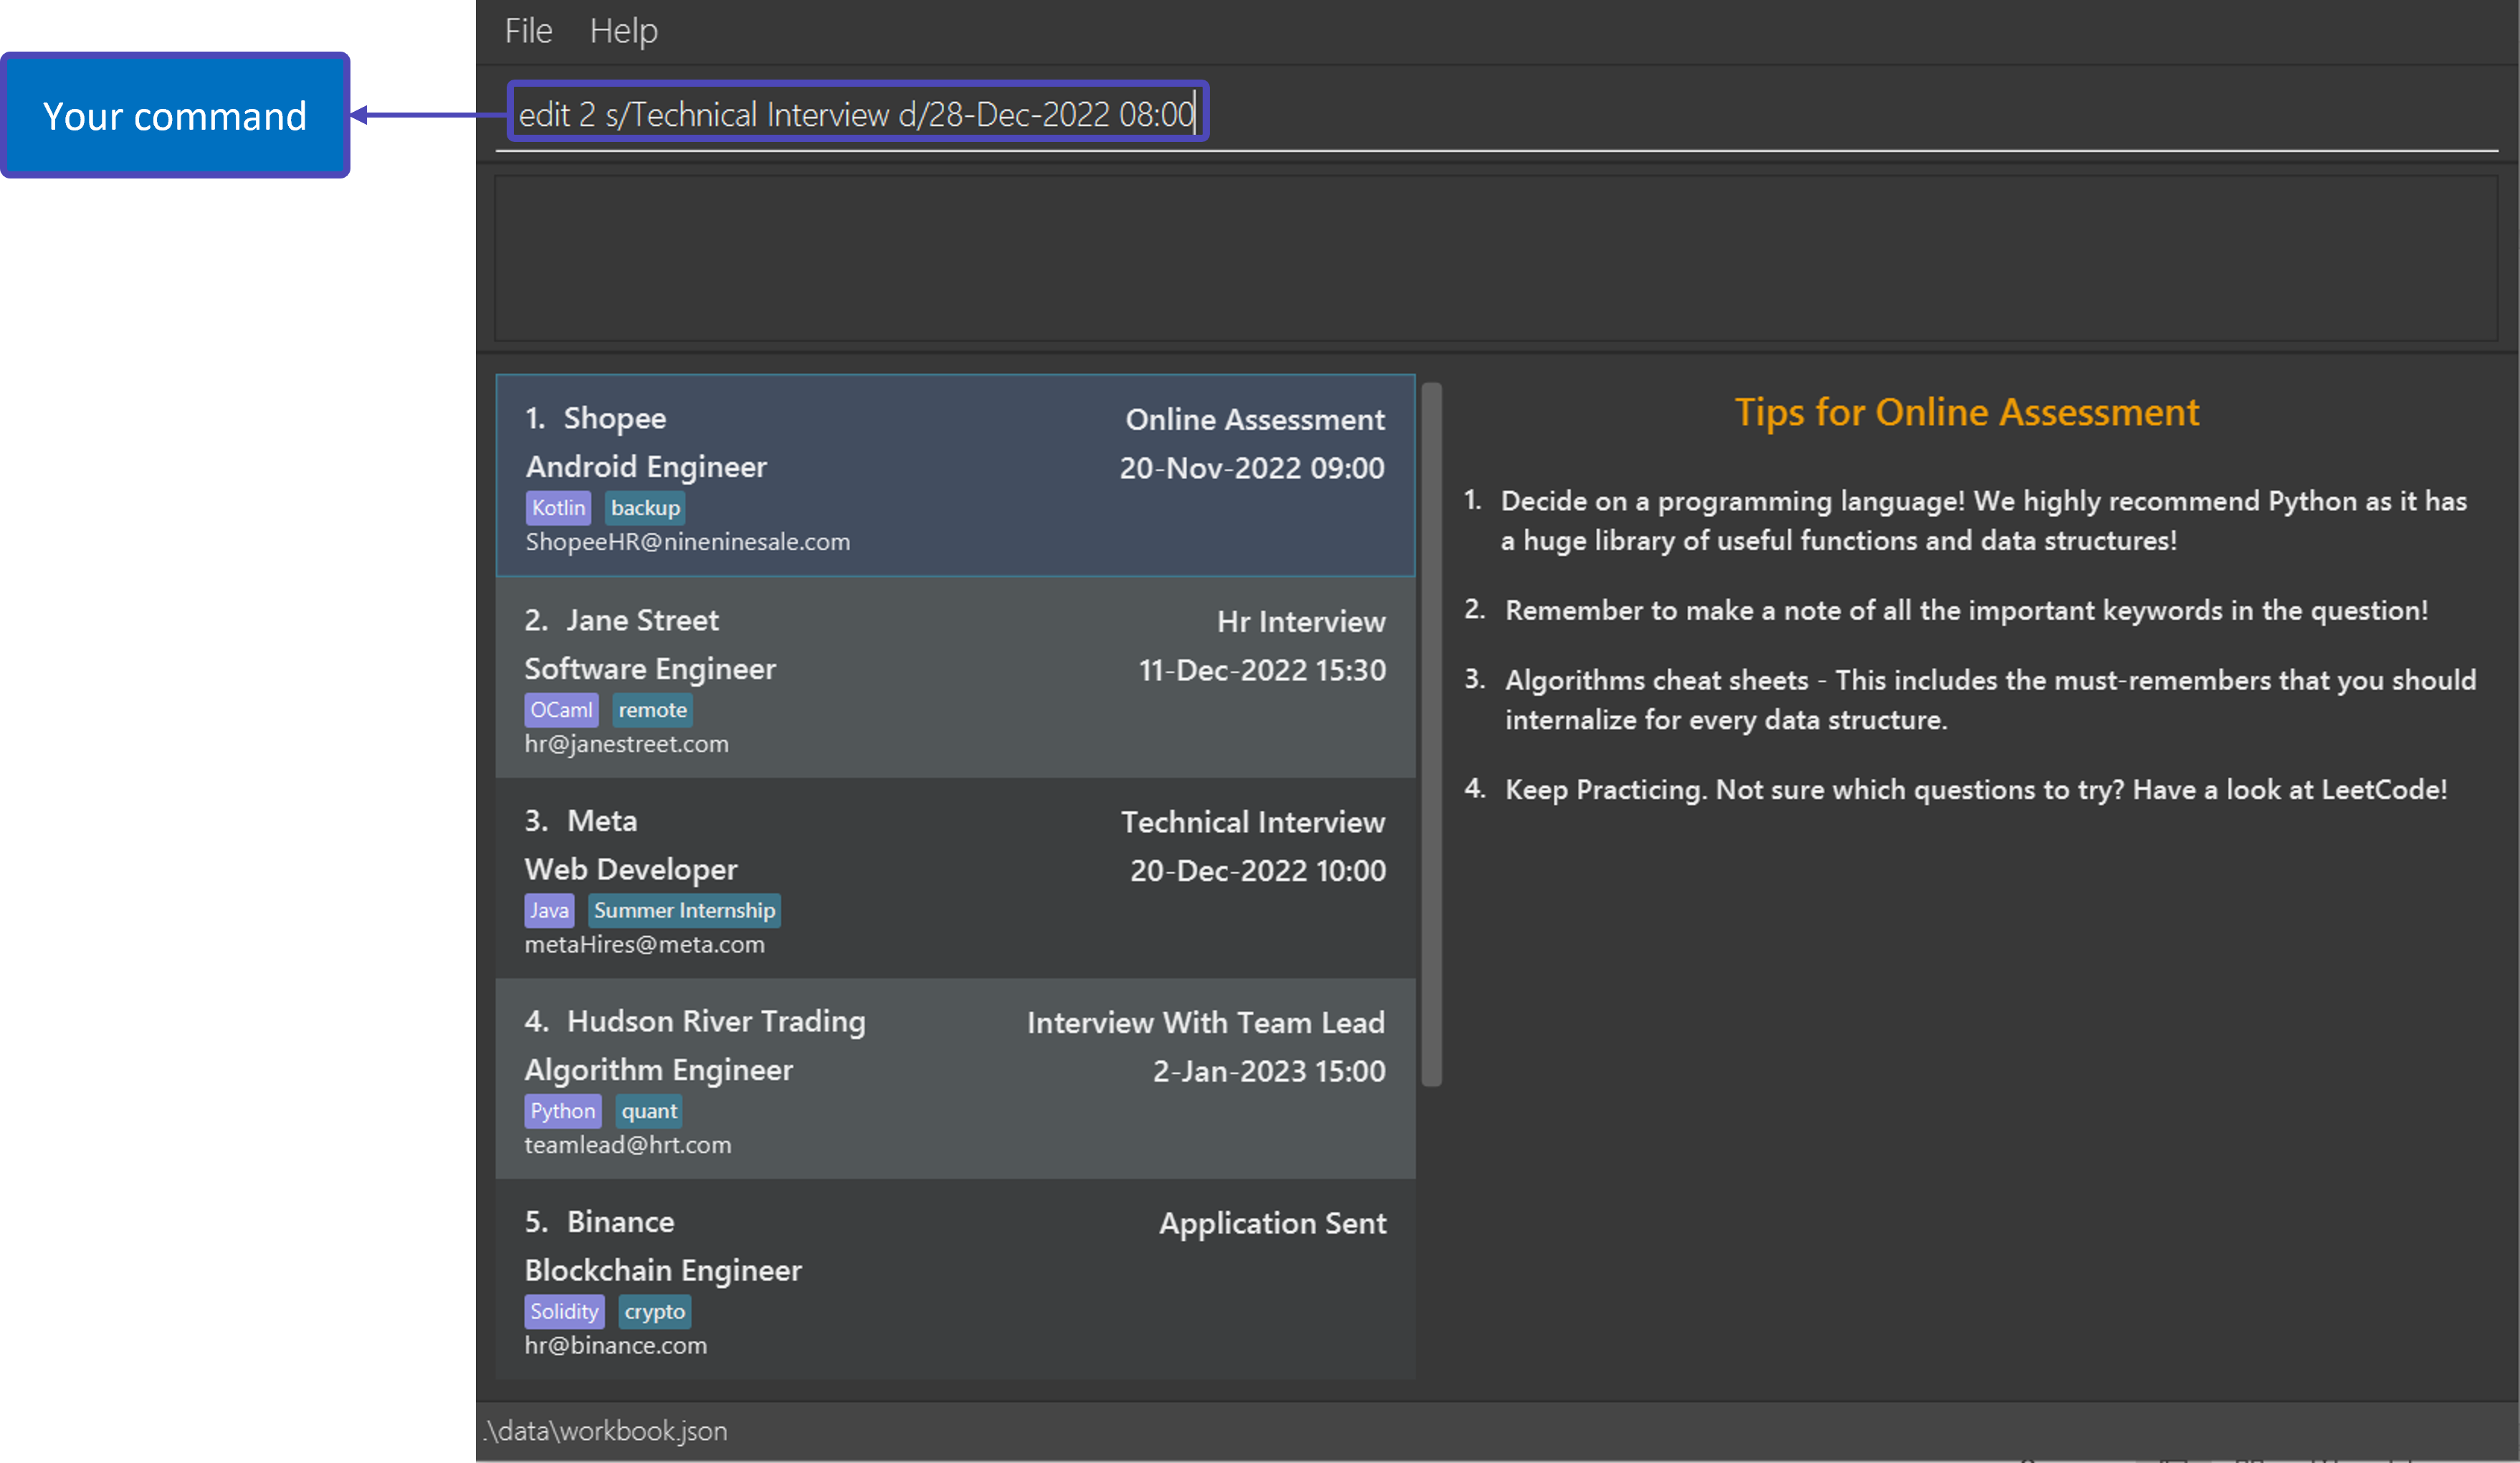 |
| After |  |
![]() Caution: Adding of tags is not cumulative: When editing tags, the existing tags of the internship will be removed.
Caution: Adding of tags is not cumulative: When editing tags, the existing tags of the internship will be removed.
![]() Tip: As adding of tags is not cumulative, you can remove all the internship’s tags by typing
Tip: As adding of tags is not cumulative, you can remove all the internship’s tags by typing t/ without
specifying any tags after it.
Other examples:
-
edit 2 l/golang t/: Addsgolangas the only language tag for the second internship and clears all existing tags.
5.3. Listing all existing internship applications
Lists all of your internship applications in WorkBook in a sorted order.
![]() Tip: Your most recent upcoming internship application will be at the top of the list!
Tip: Your most recent upcoming internship application will be at the top of the list!
Format: list
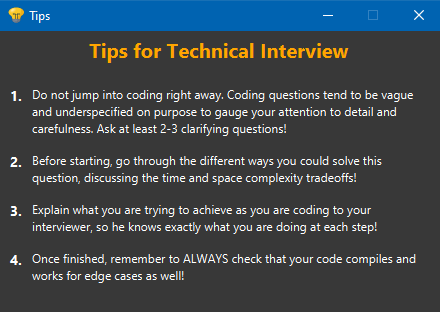
5.4. Viewing tips for your applications:
For some application stages, we have included a list of useful tips to help you prepare for and ace the deliverables.
Below are the application stages that we have included tips for.
| Application Stage |
|---|
Application Sent |
Online Assessment |
Technical Interview |
Behavioral Interview |
Phone Interview |
Rejected |
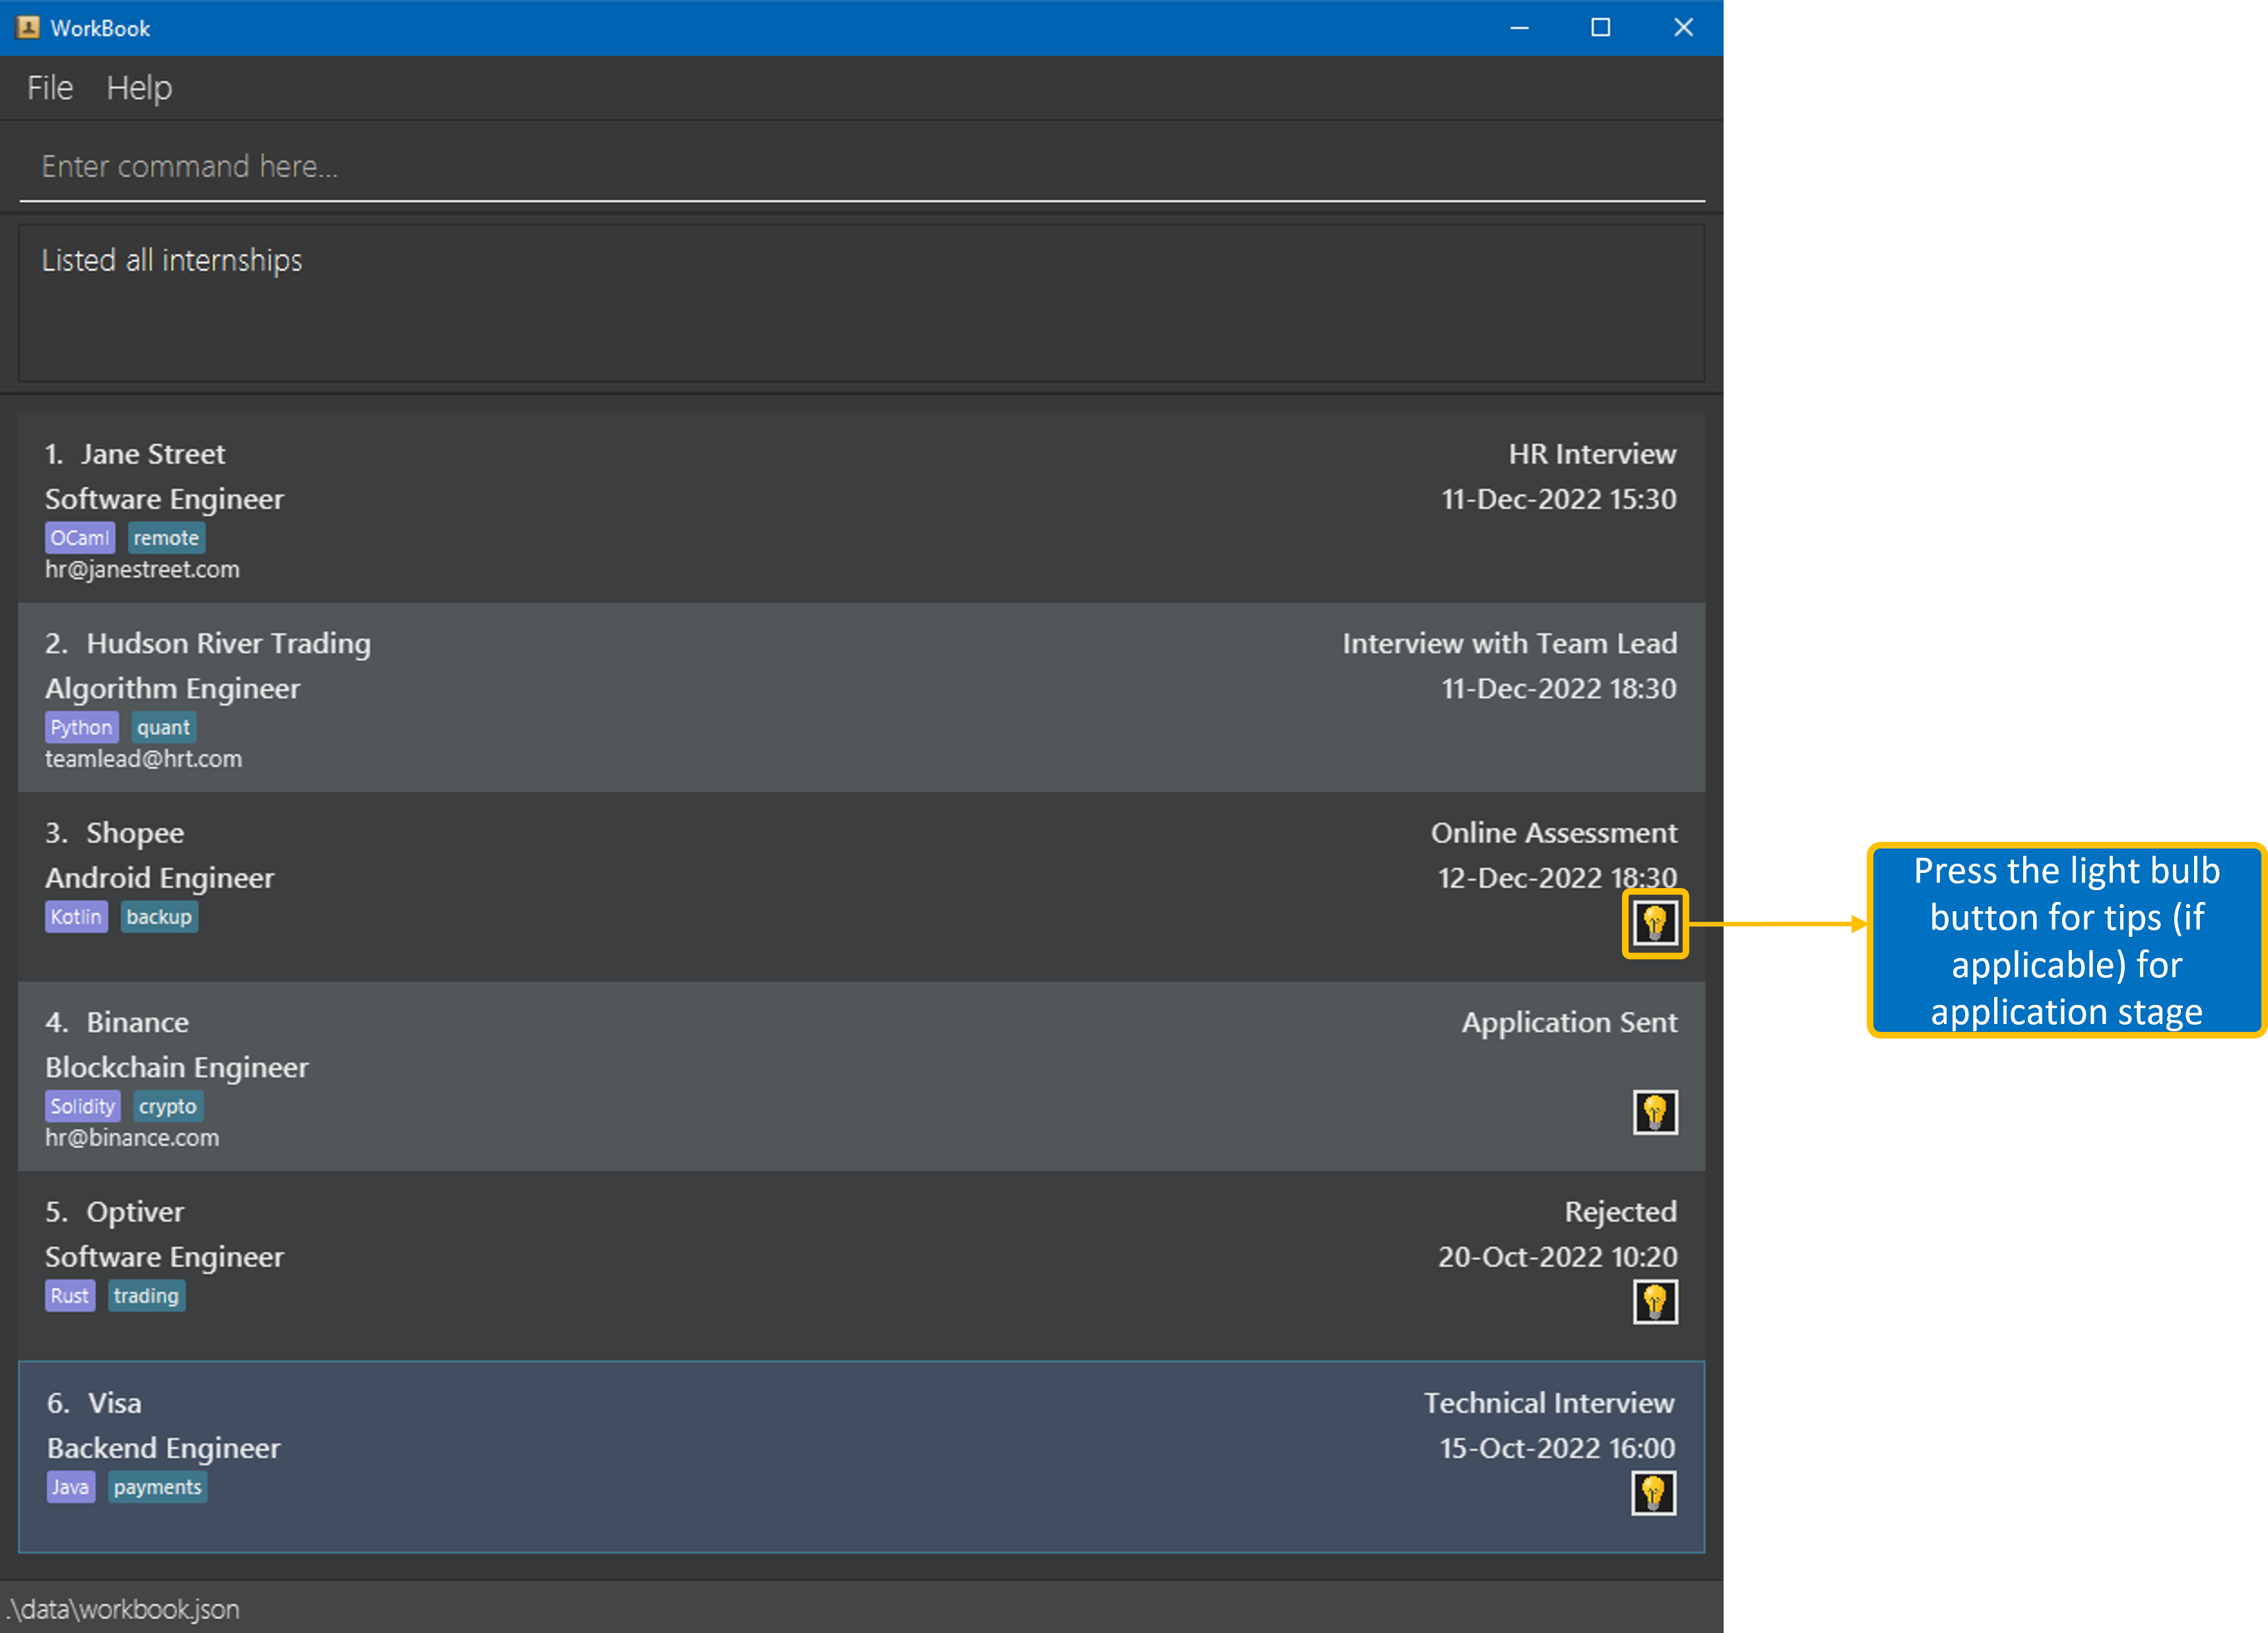
If WorkBook is in the narrow layout, simply click on the light bulb icon to view the tips for that application. A window will appear showing all the tips for that application.
| Light Bulb Button | Tips Window |
|---|---|
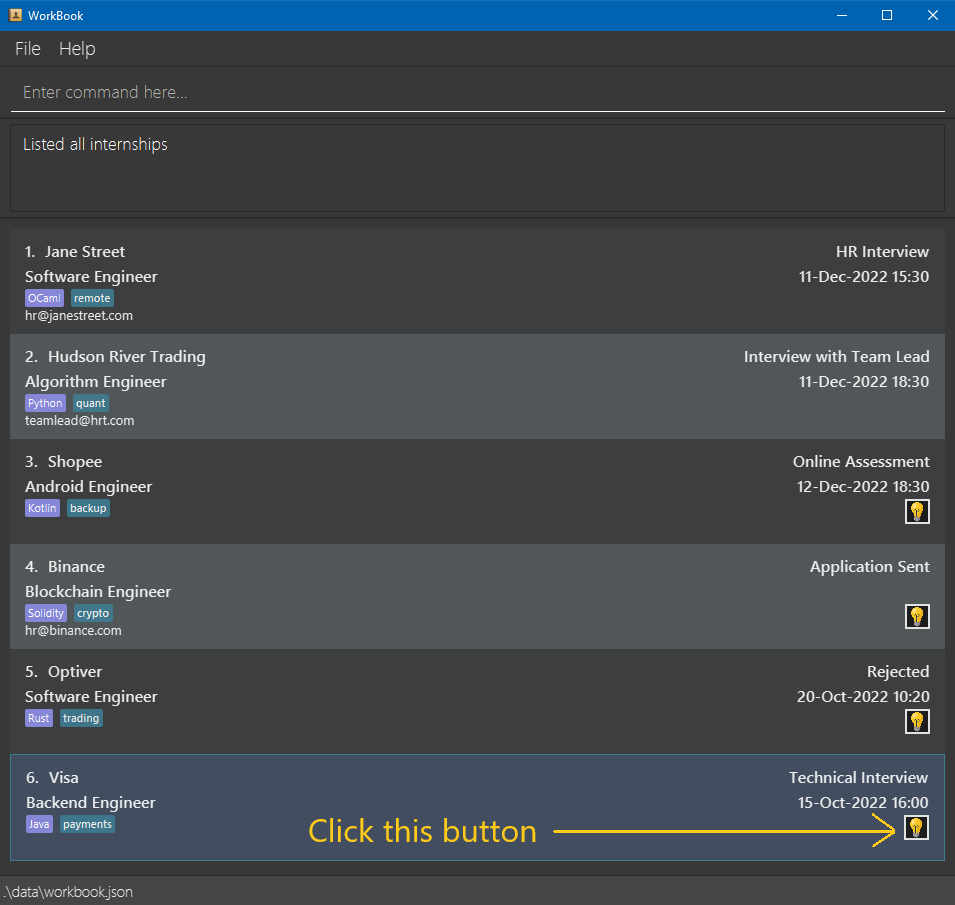 |
 |
To view the tips in the wide layout, simply click and select the application you would like to view the tips for. The tips will appear in the right panel.
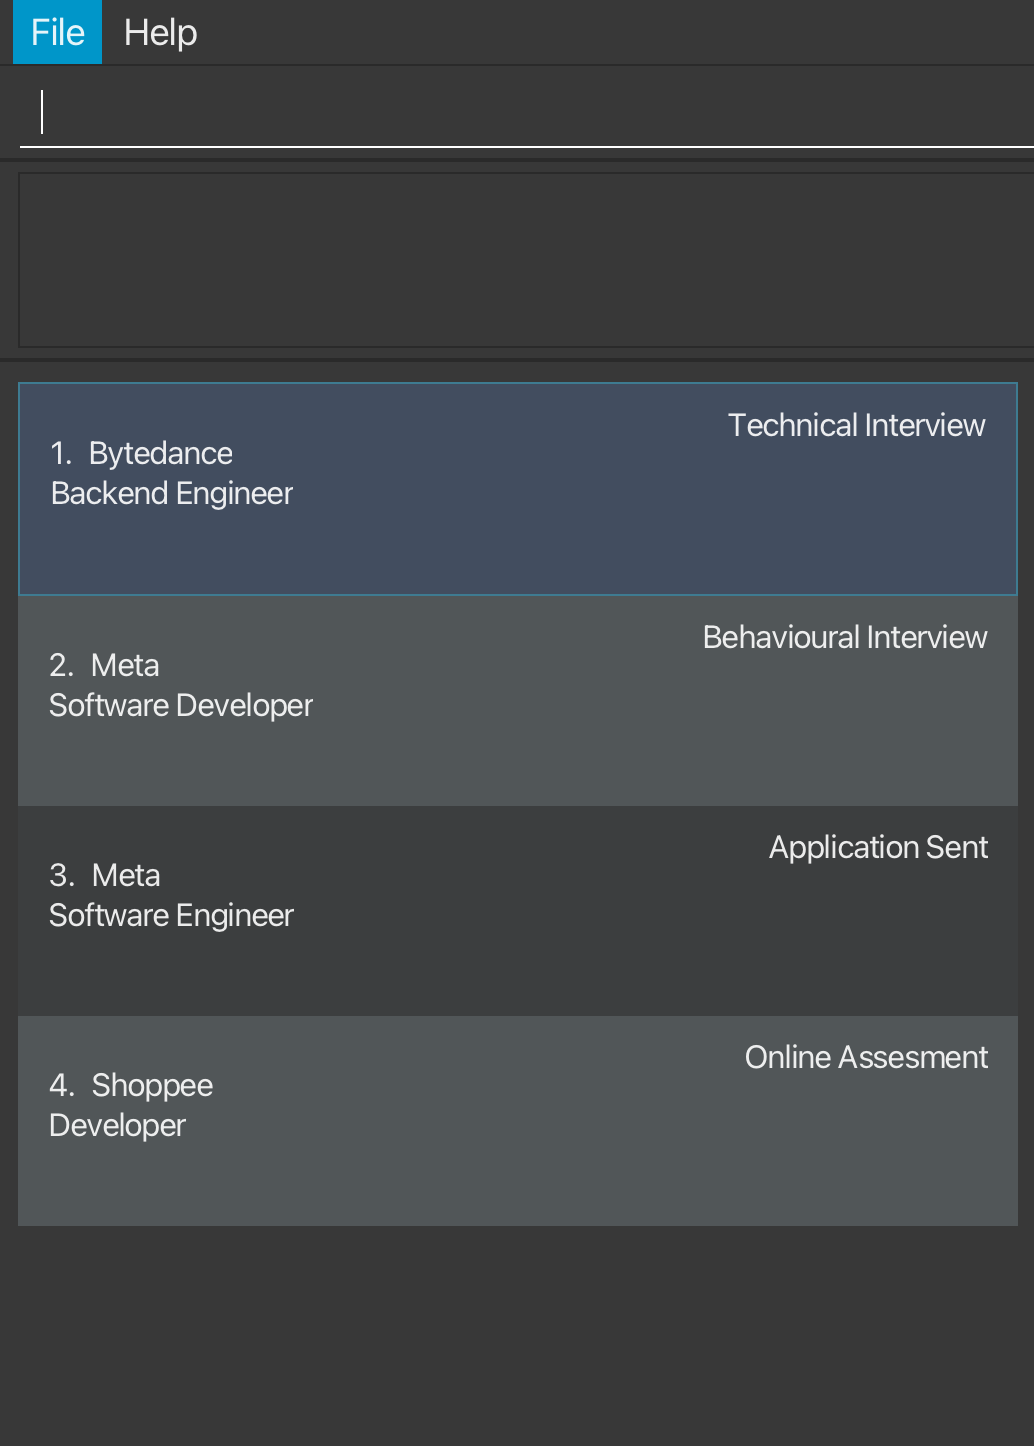
5.5. Finding your internships
If you wanted to view all your internship applications corresponding to a particular company, stage or role,
then this command is for you!
It can find internships whose company, role or stage names contain all the respective keywords.
Format: find c/COMPANY | r/ROLE | s/STAGE
- Displays a list of internships that match all the keywords.
![]() Tip:
Tip:
- Case does not matter e.g.
metawill matchMeta. - Order of the keywords does not matter e.g.
Jane Streetwill matchStreet Jane.
![]() Caution
Caution
- Only full words will be matched e.g.
metwill not matchMeta. - Exactly one attribute can be searched for either Company, Role or Stage.
- If you input keywords for more than one prefix it will result in an invalid command e.g.
find c/Meta s/Interviewwill not be accepted
Examples:
-
find r/EngineerreturnsSoftware EngineerandBackend Engineer:
| Before | After |
|---|---|
 |
 |
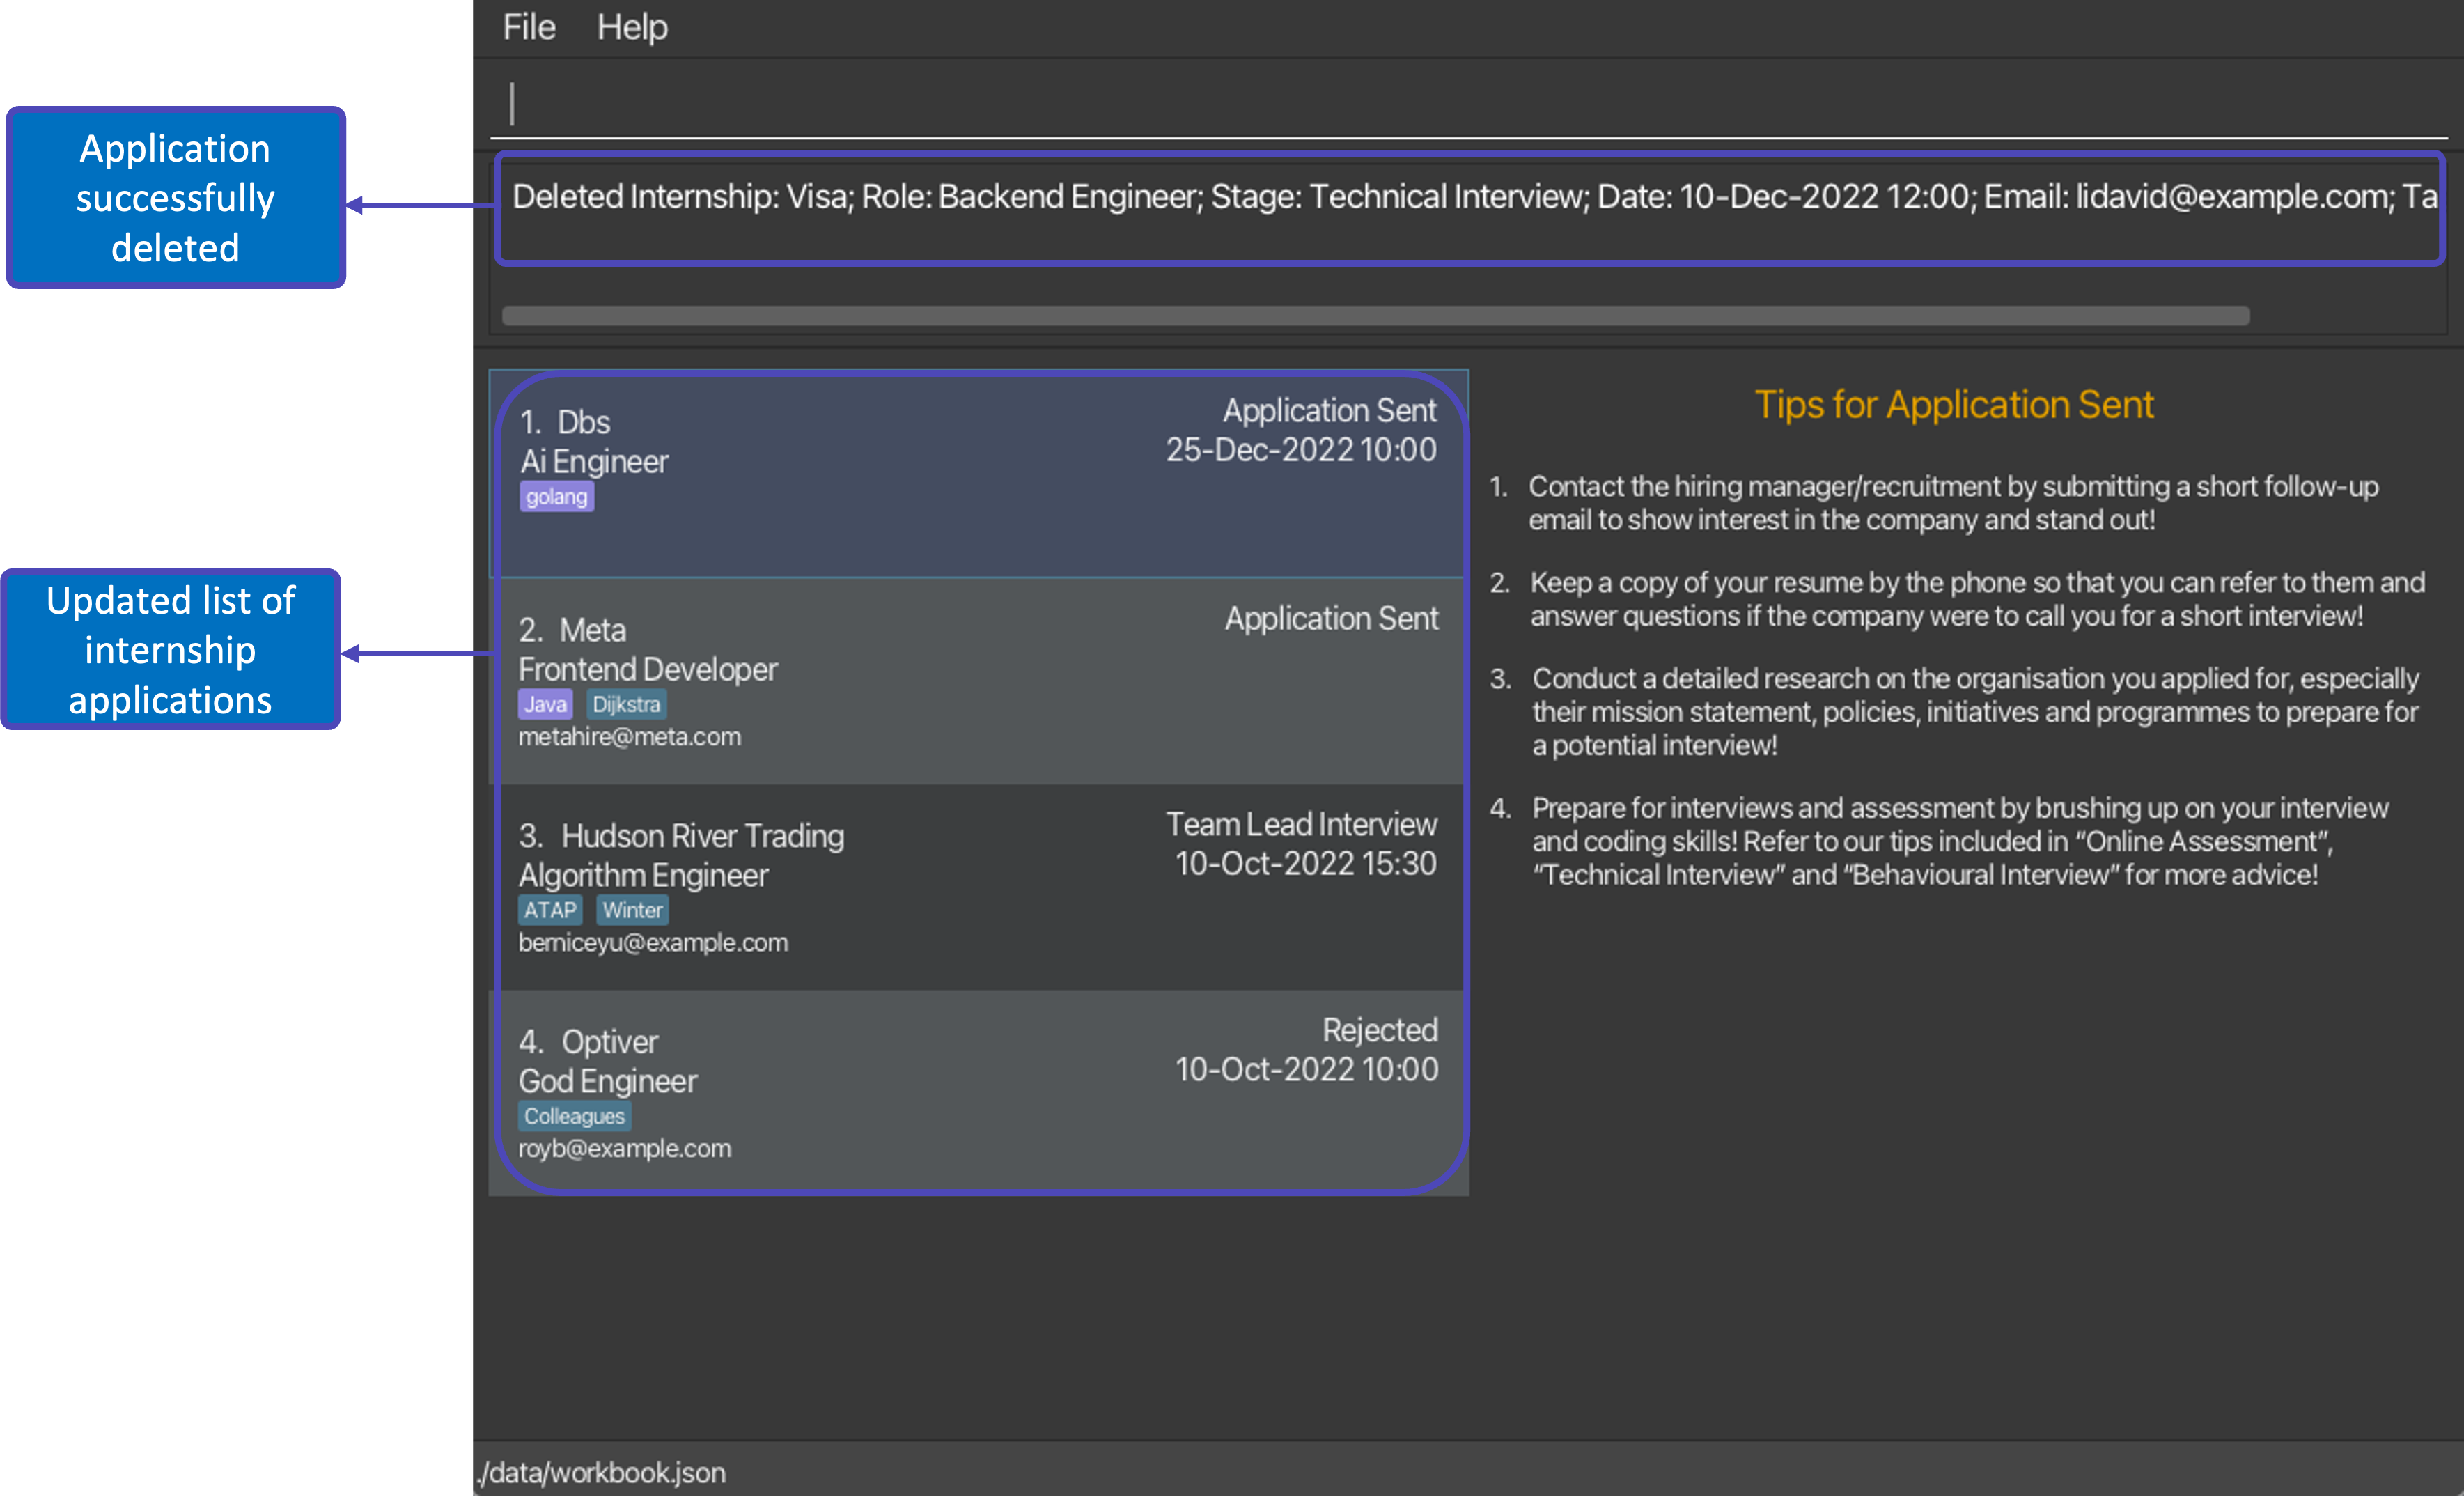
5.6. Deleting your internship application
If you want to remove an internship application then this command deletes the specified internship application from WorkBook.
Format: delete INDEX
- Deletes the internship at the specified
INDEX, which must be:- A positive number (1, 2, 3, …).
- Within the number range of your list of internship applications.
Examples:
-
listfollowed bydelete 2deletes the 2nd internship application in WorkBook. -
find Metafollowed bydelete 1deletes the 1st internship application within the results of thefindcommand.
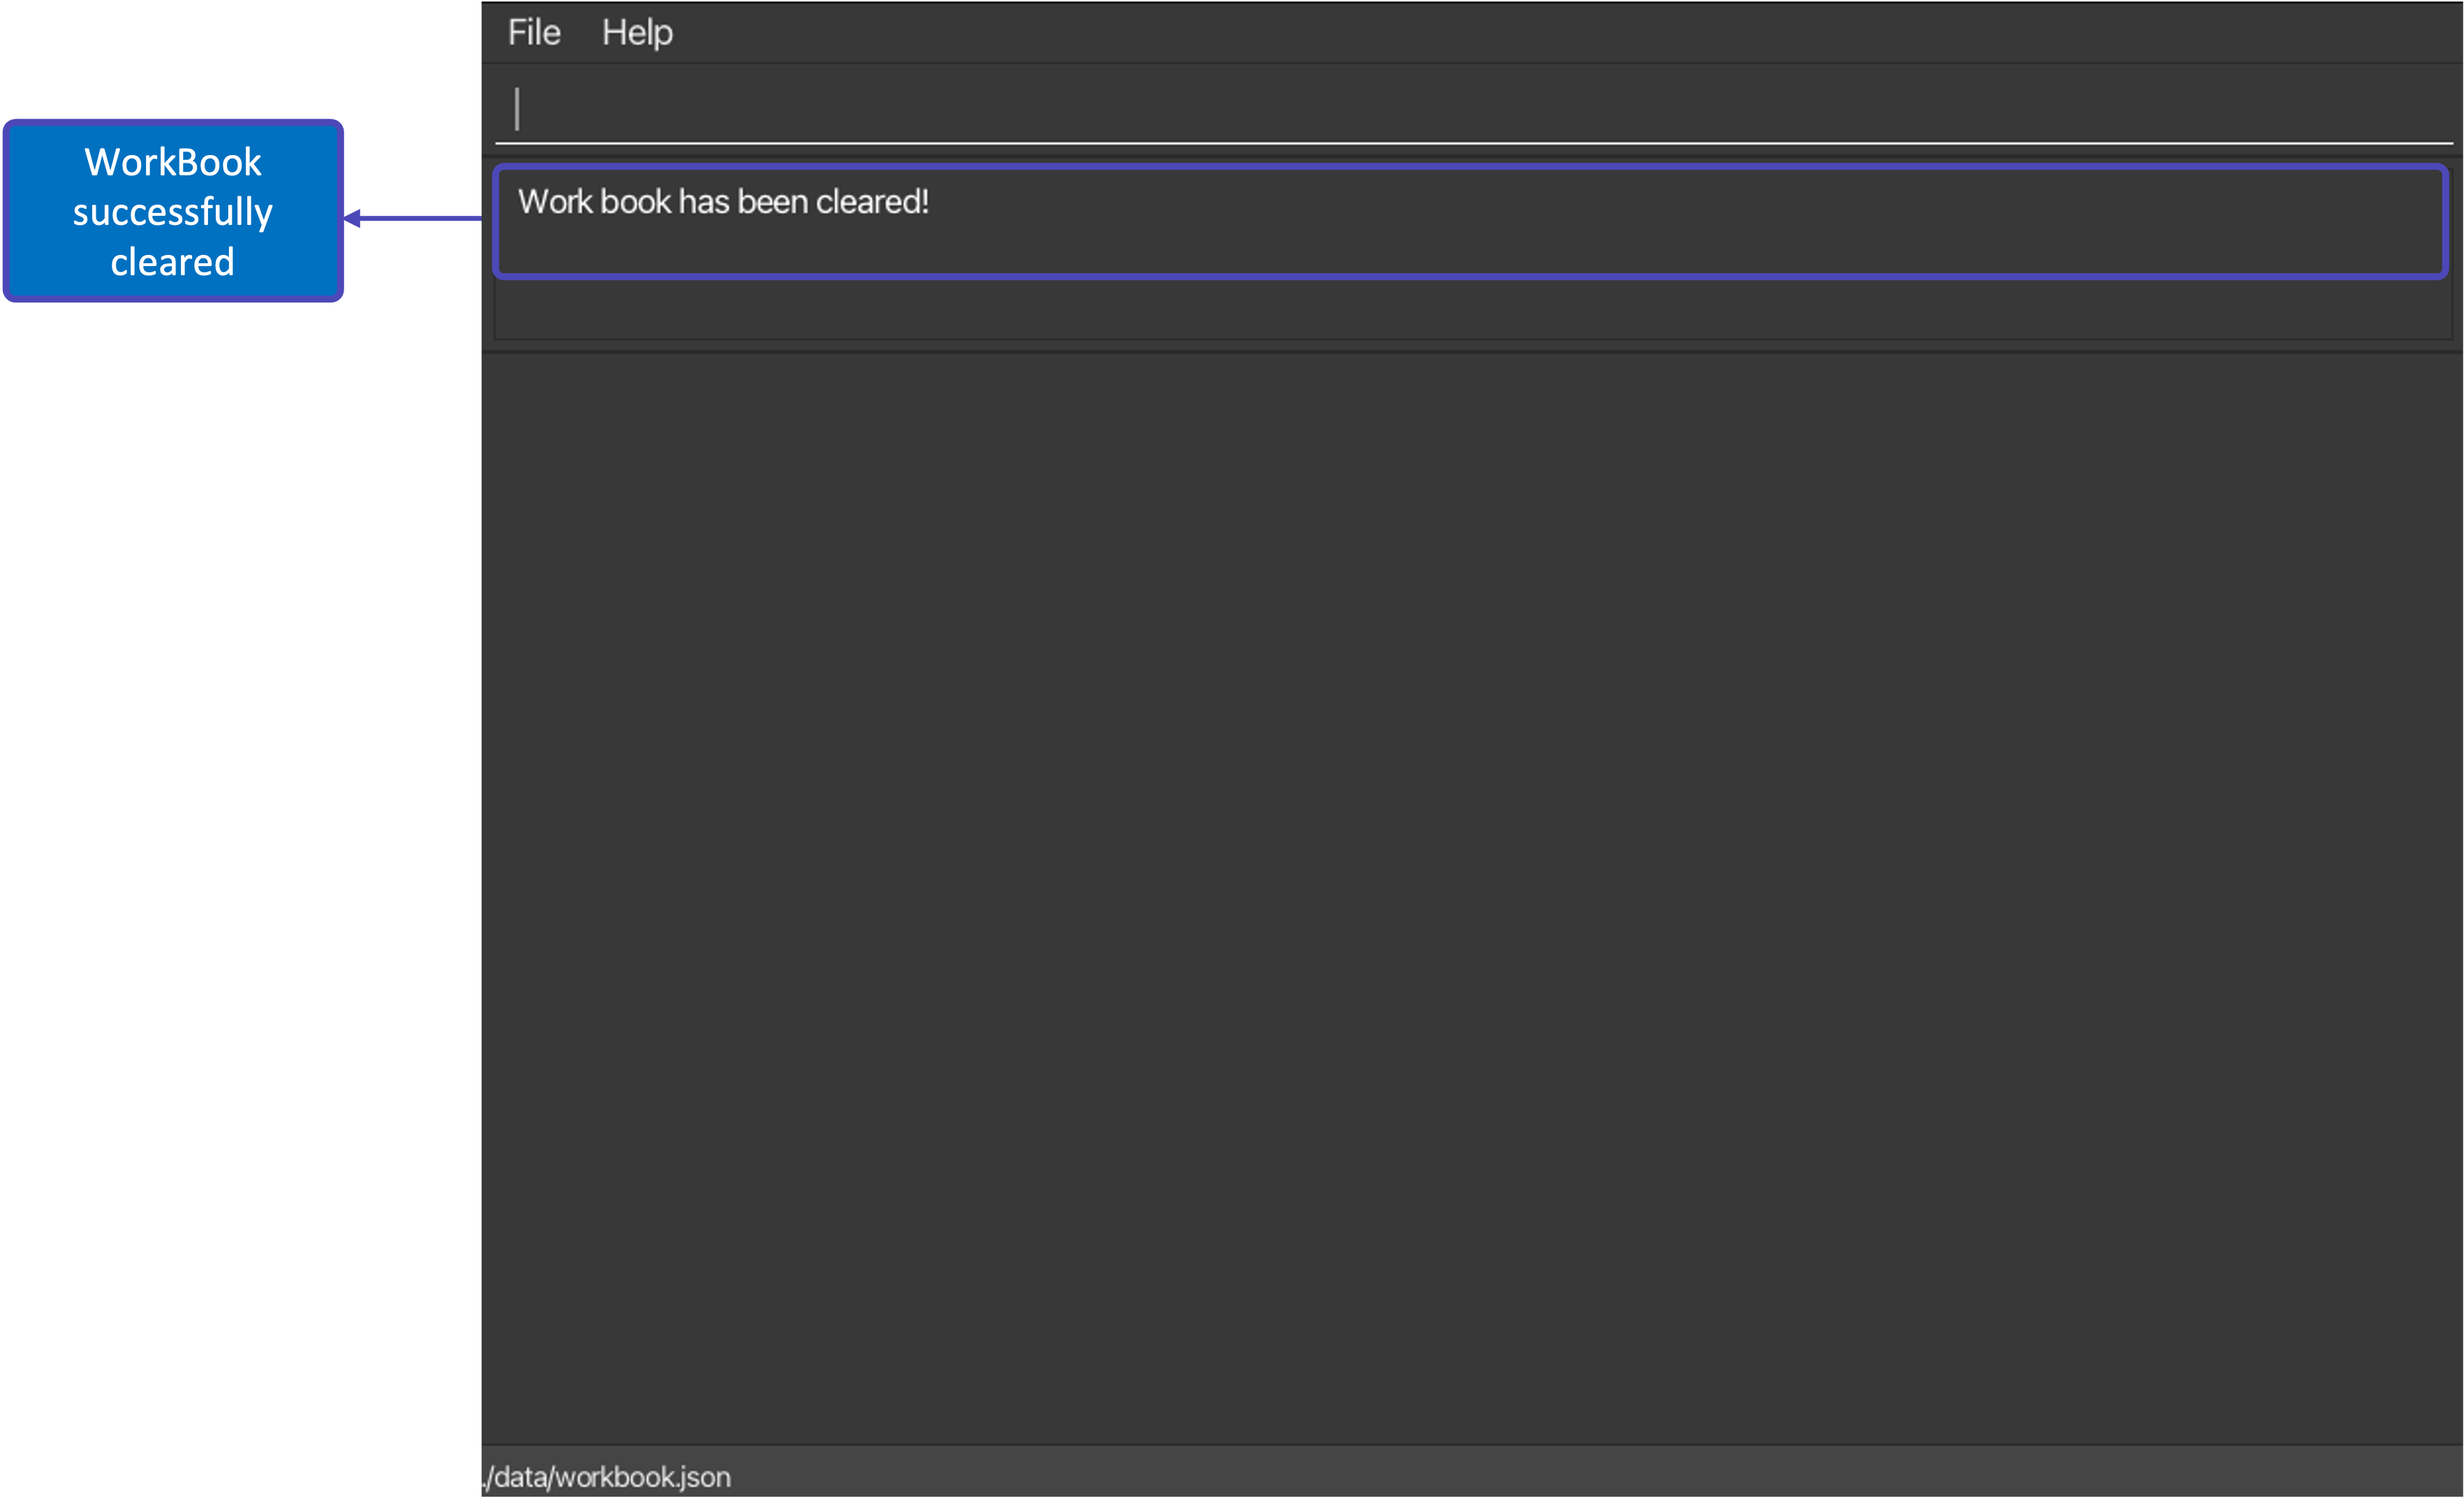
5.7. Clearing your existing internship applications
Be it getting ready for a new internship application cycle or wanting to do a general spring-cleaning of your list of internship applications in WorkBook, this command is the one for you!
Use this command to clear all the applications you’ve previously saved in WorkBook.
Format: clear
Example:
-
clearremoves all internship applications in the WorkBook.
![]() Tip: If you cleared your internship applications by mistake, fret not as you can easily undo this!
Tip: If you cleared your internship applications by mistake, fret not as you can easily undo this!
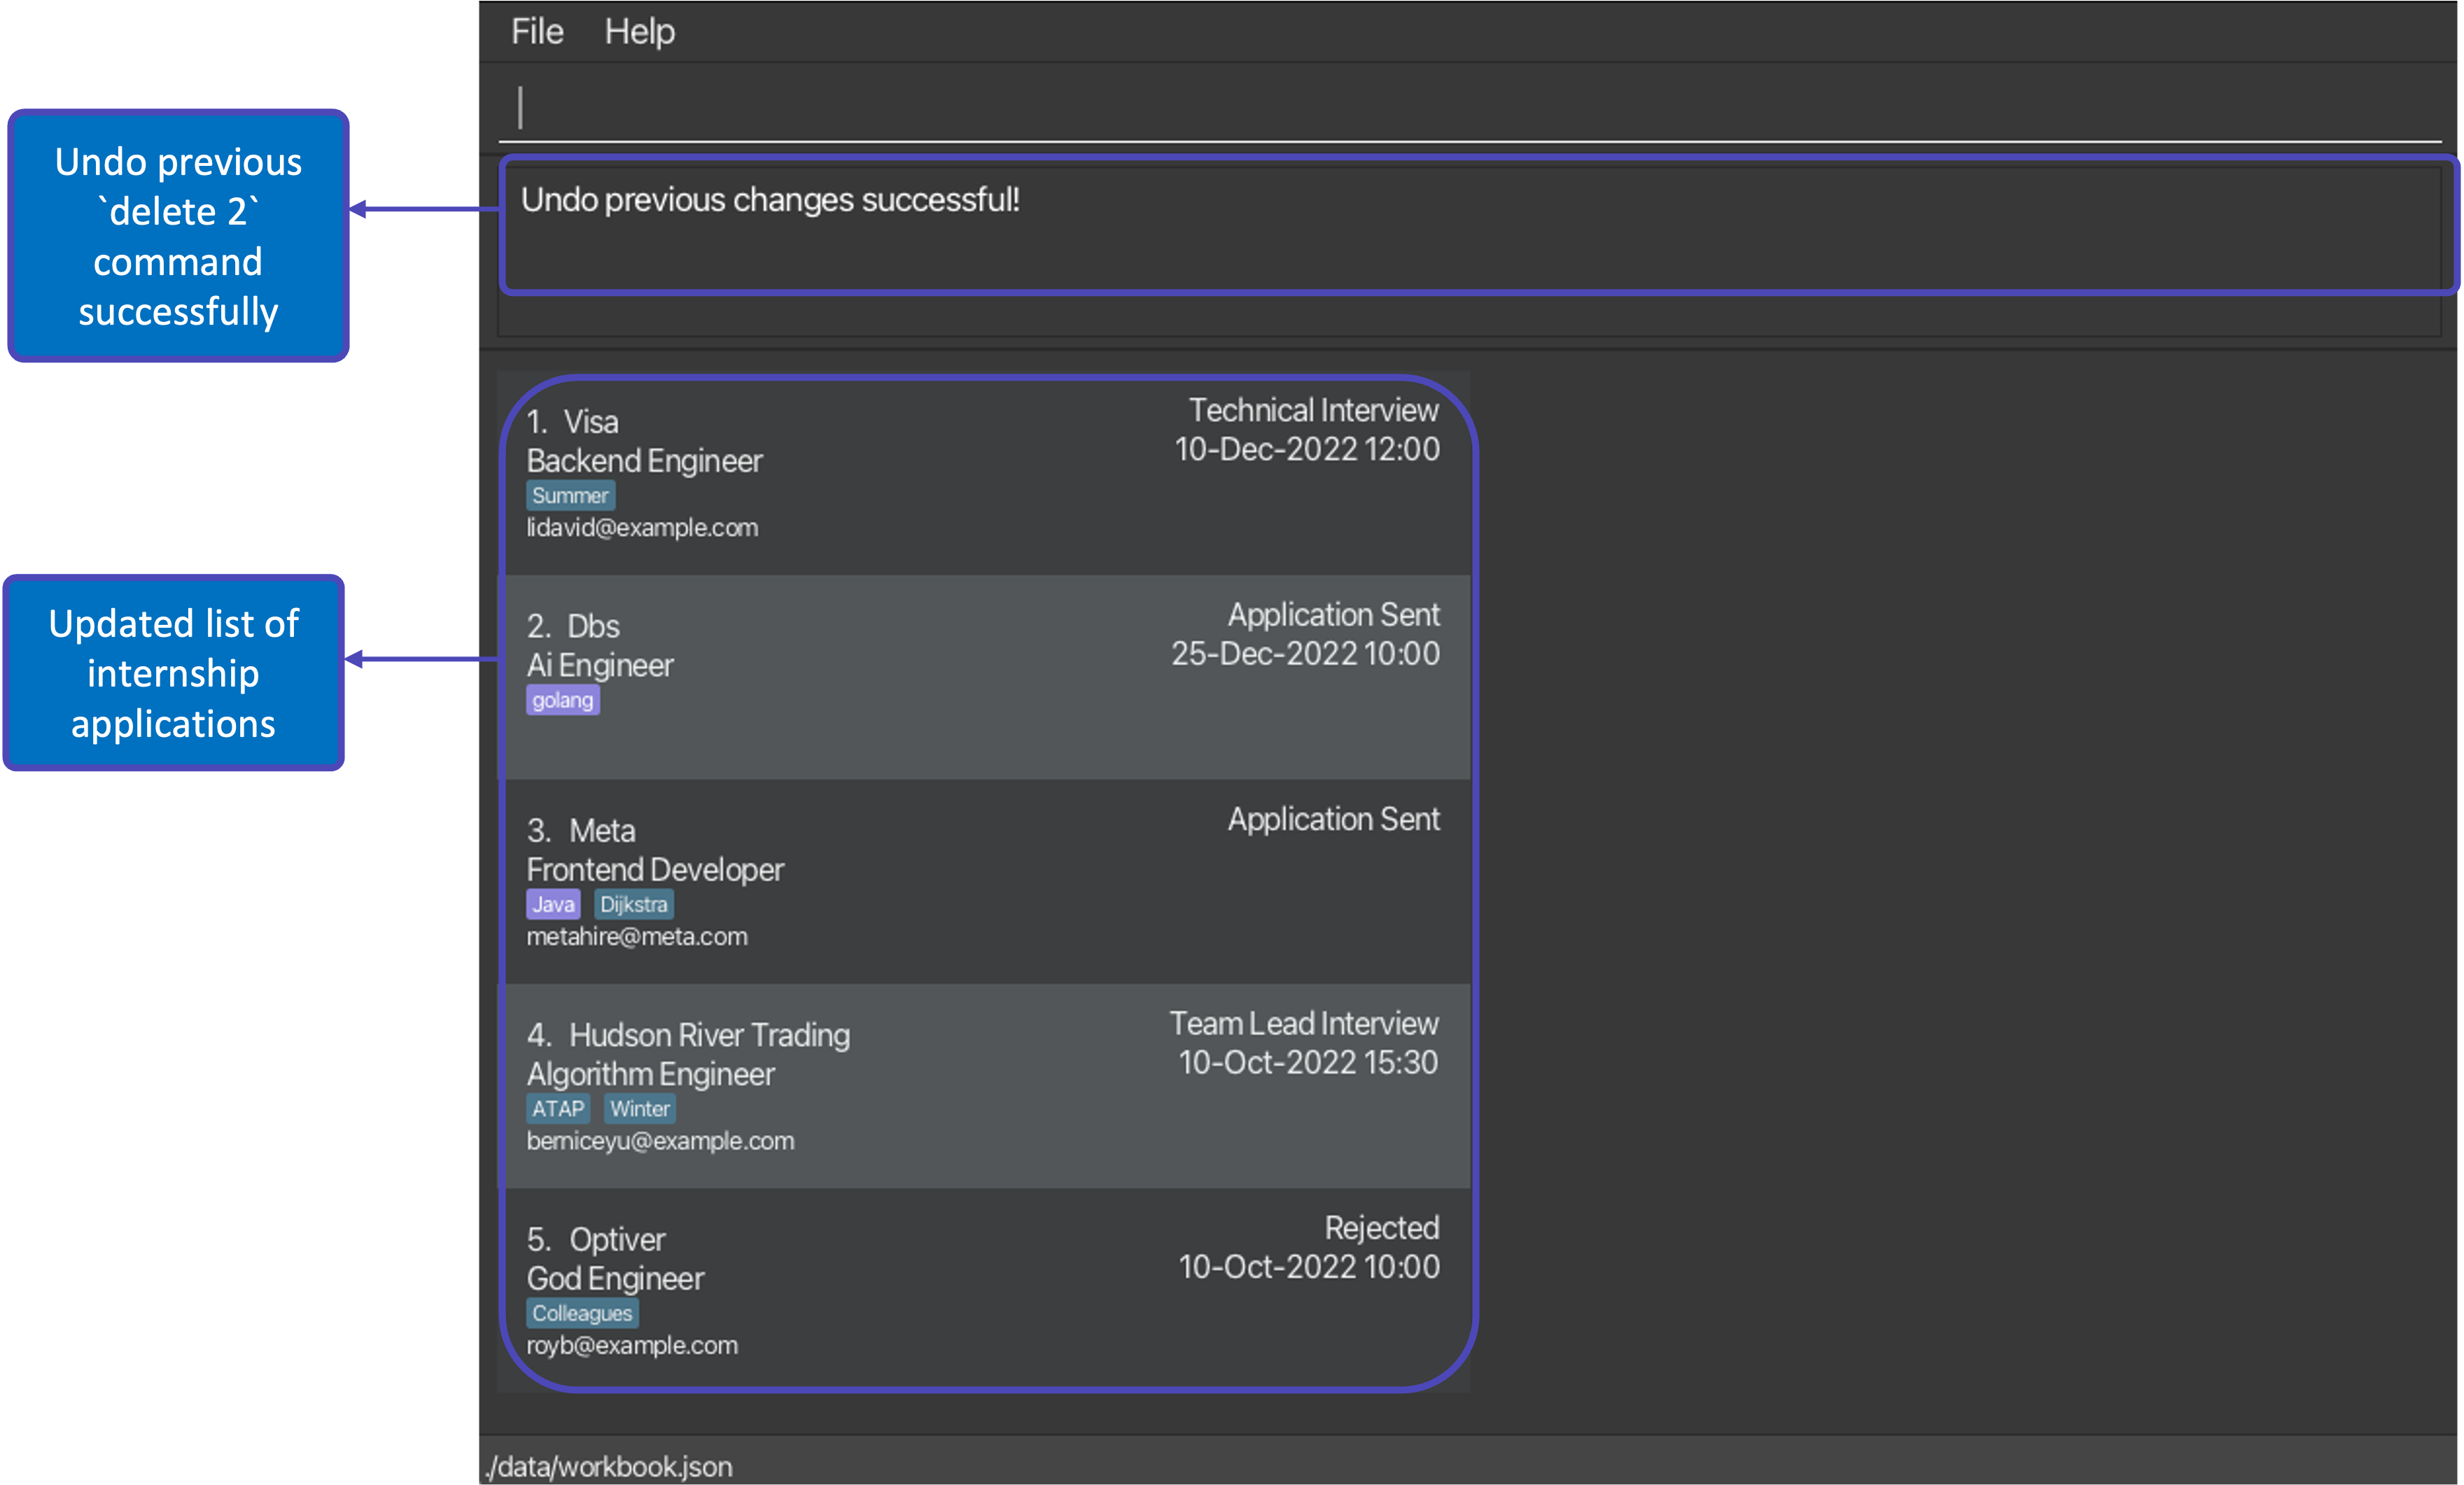
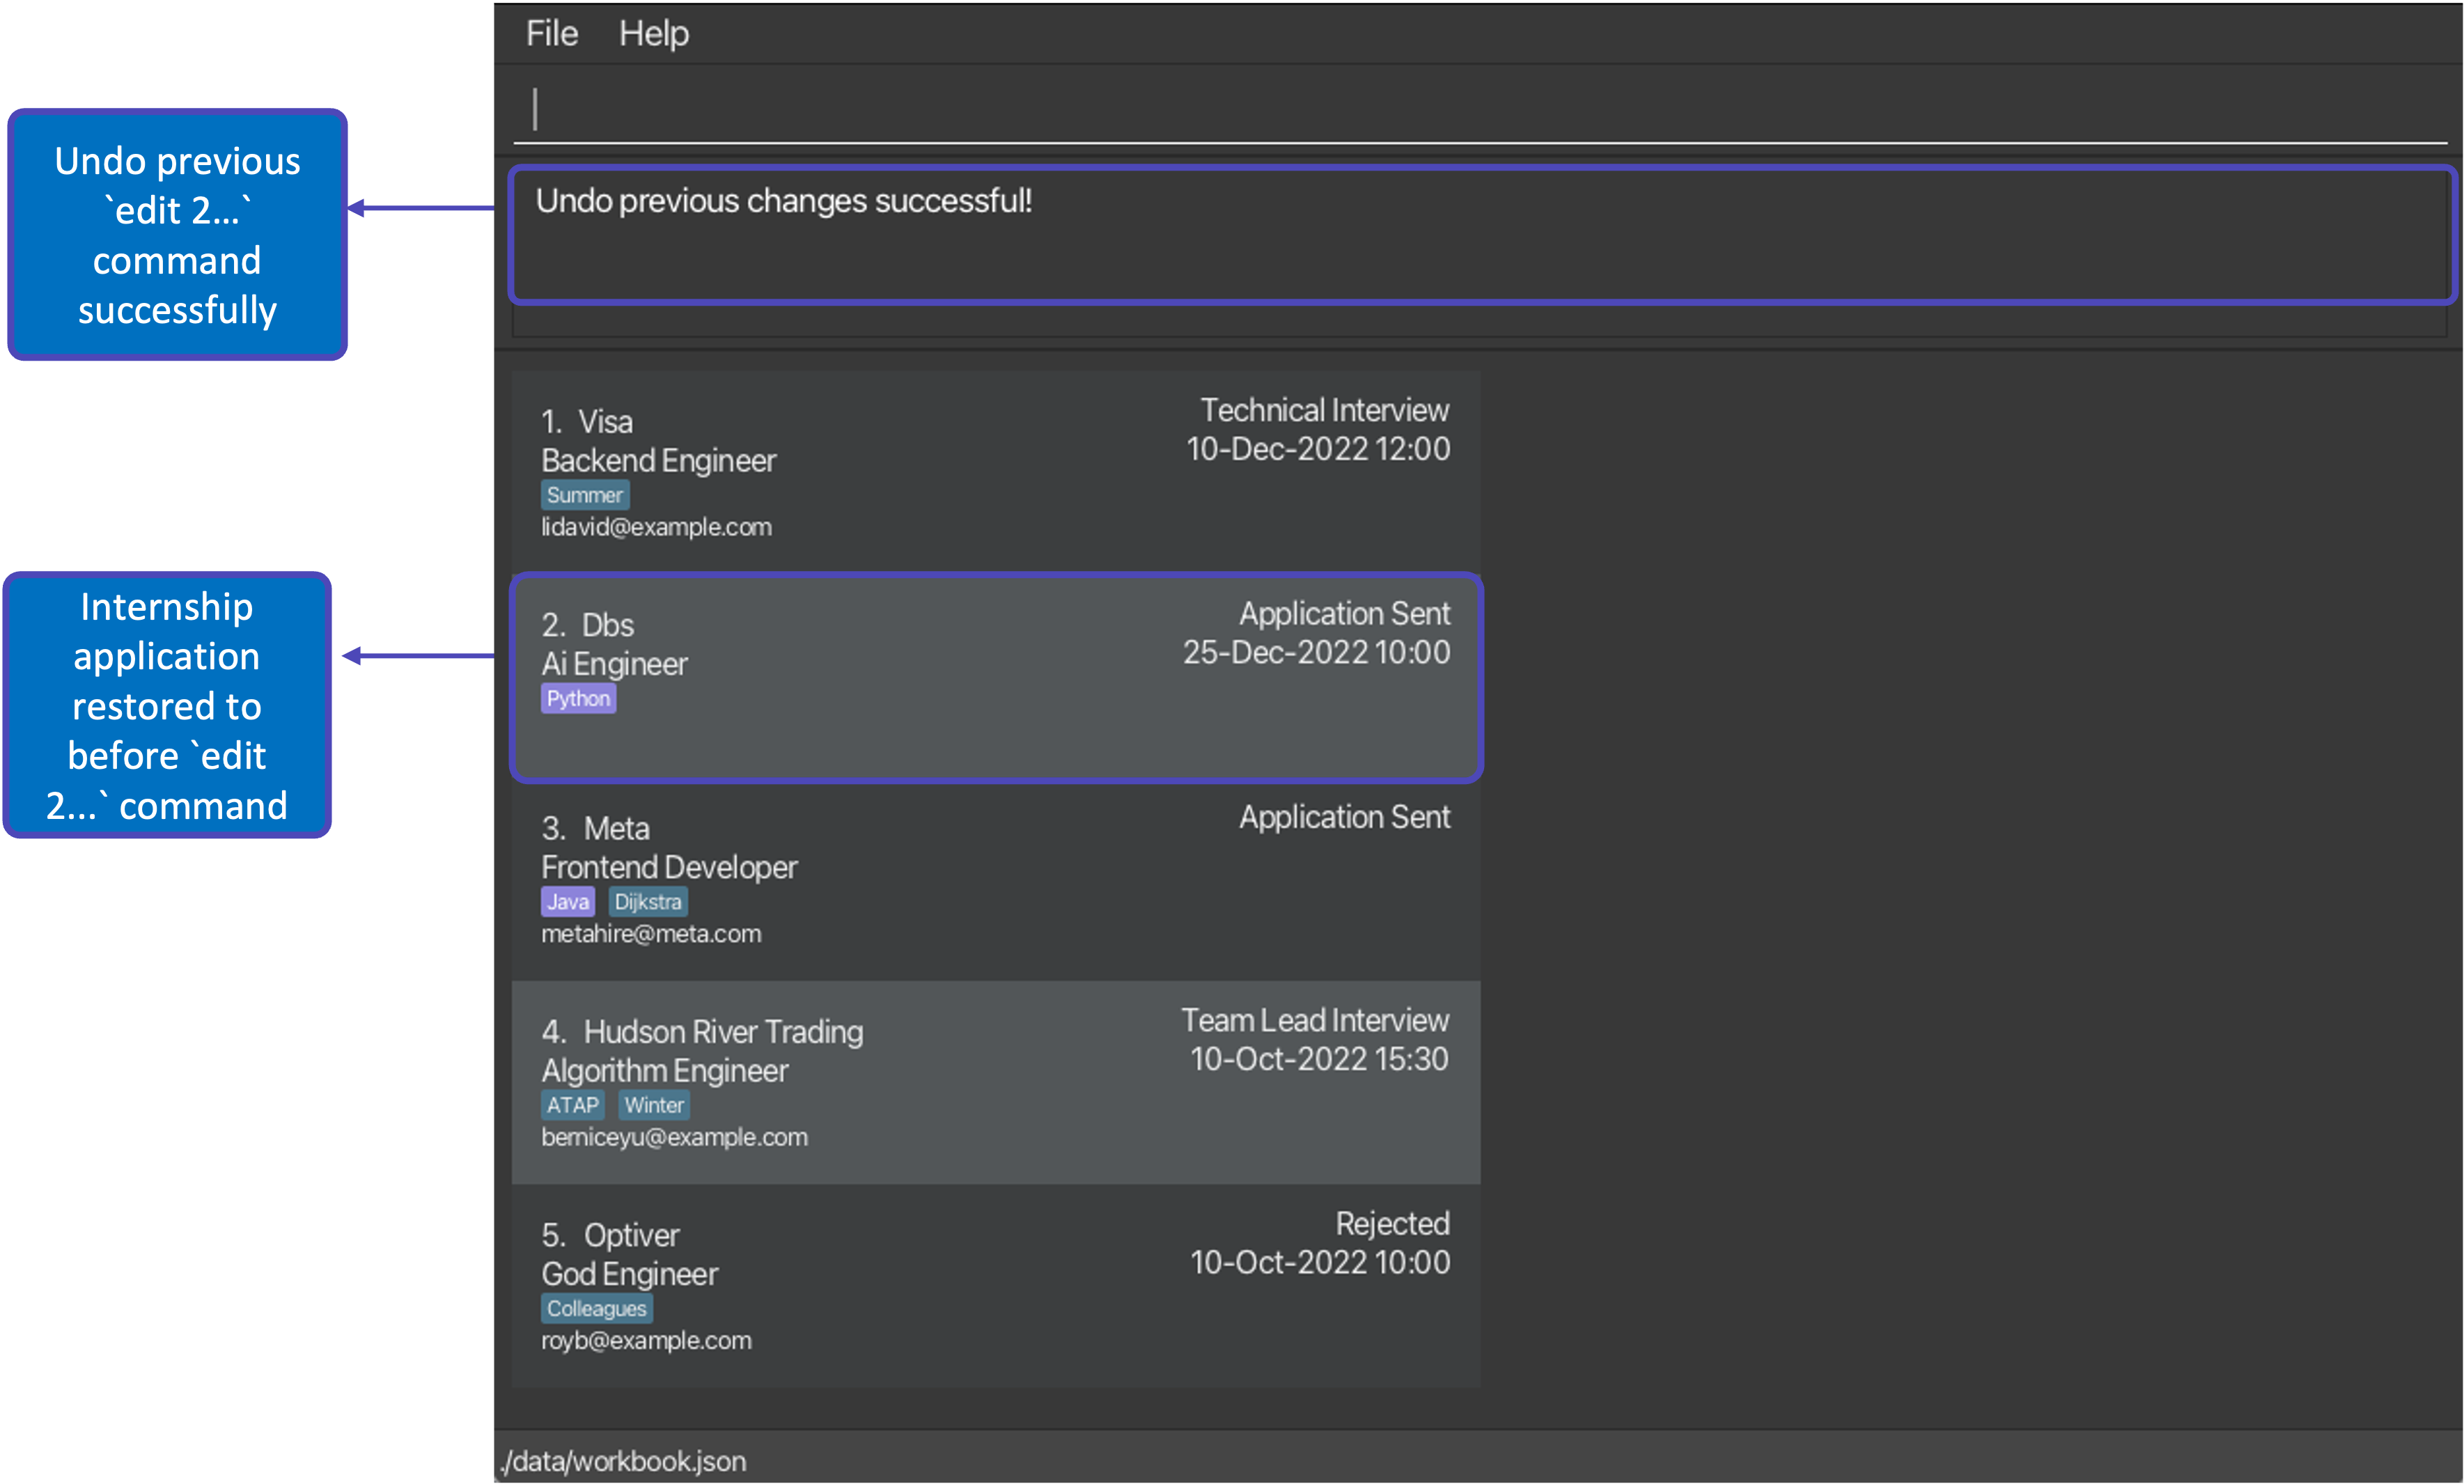
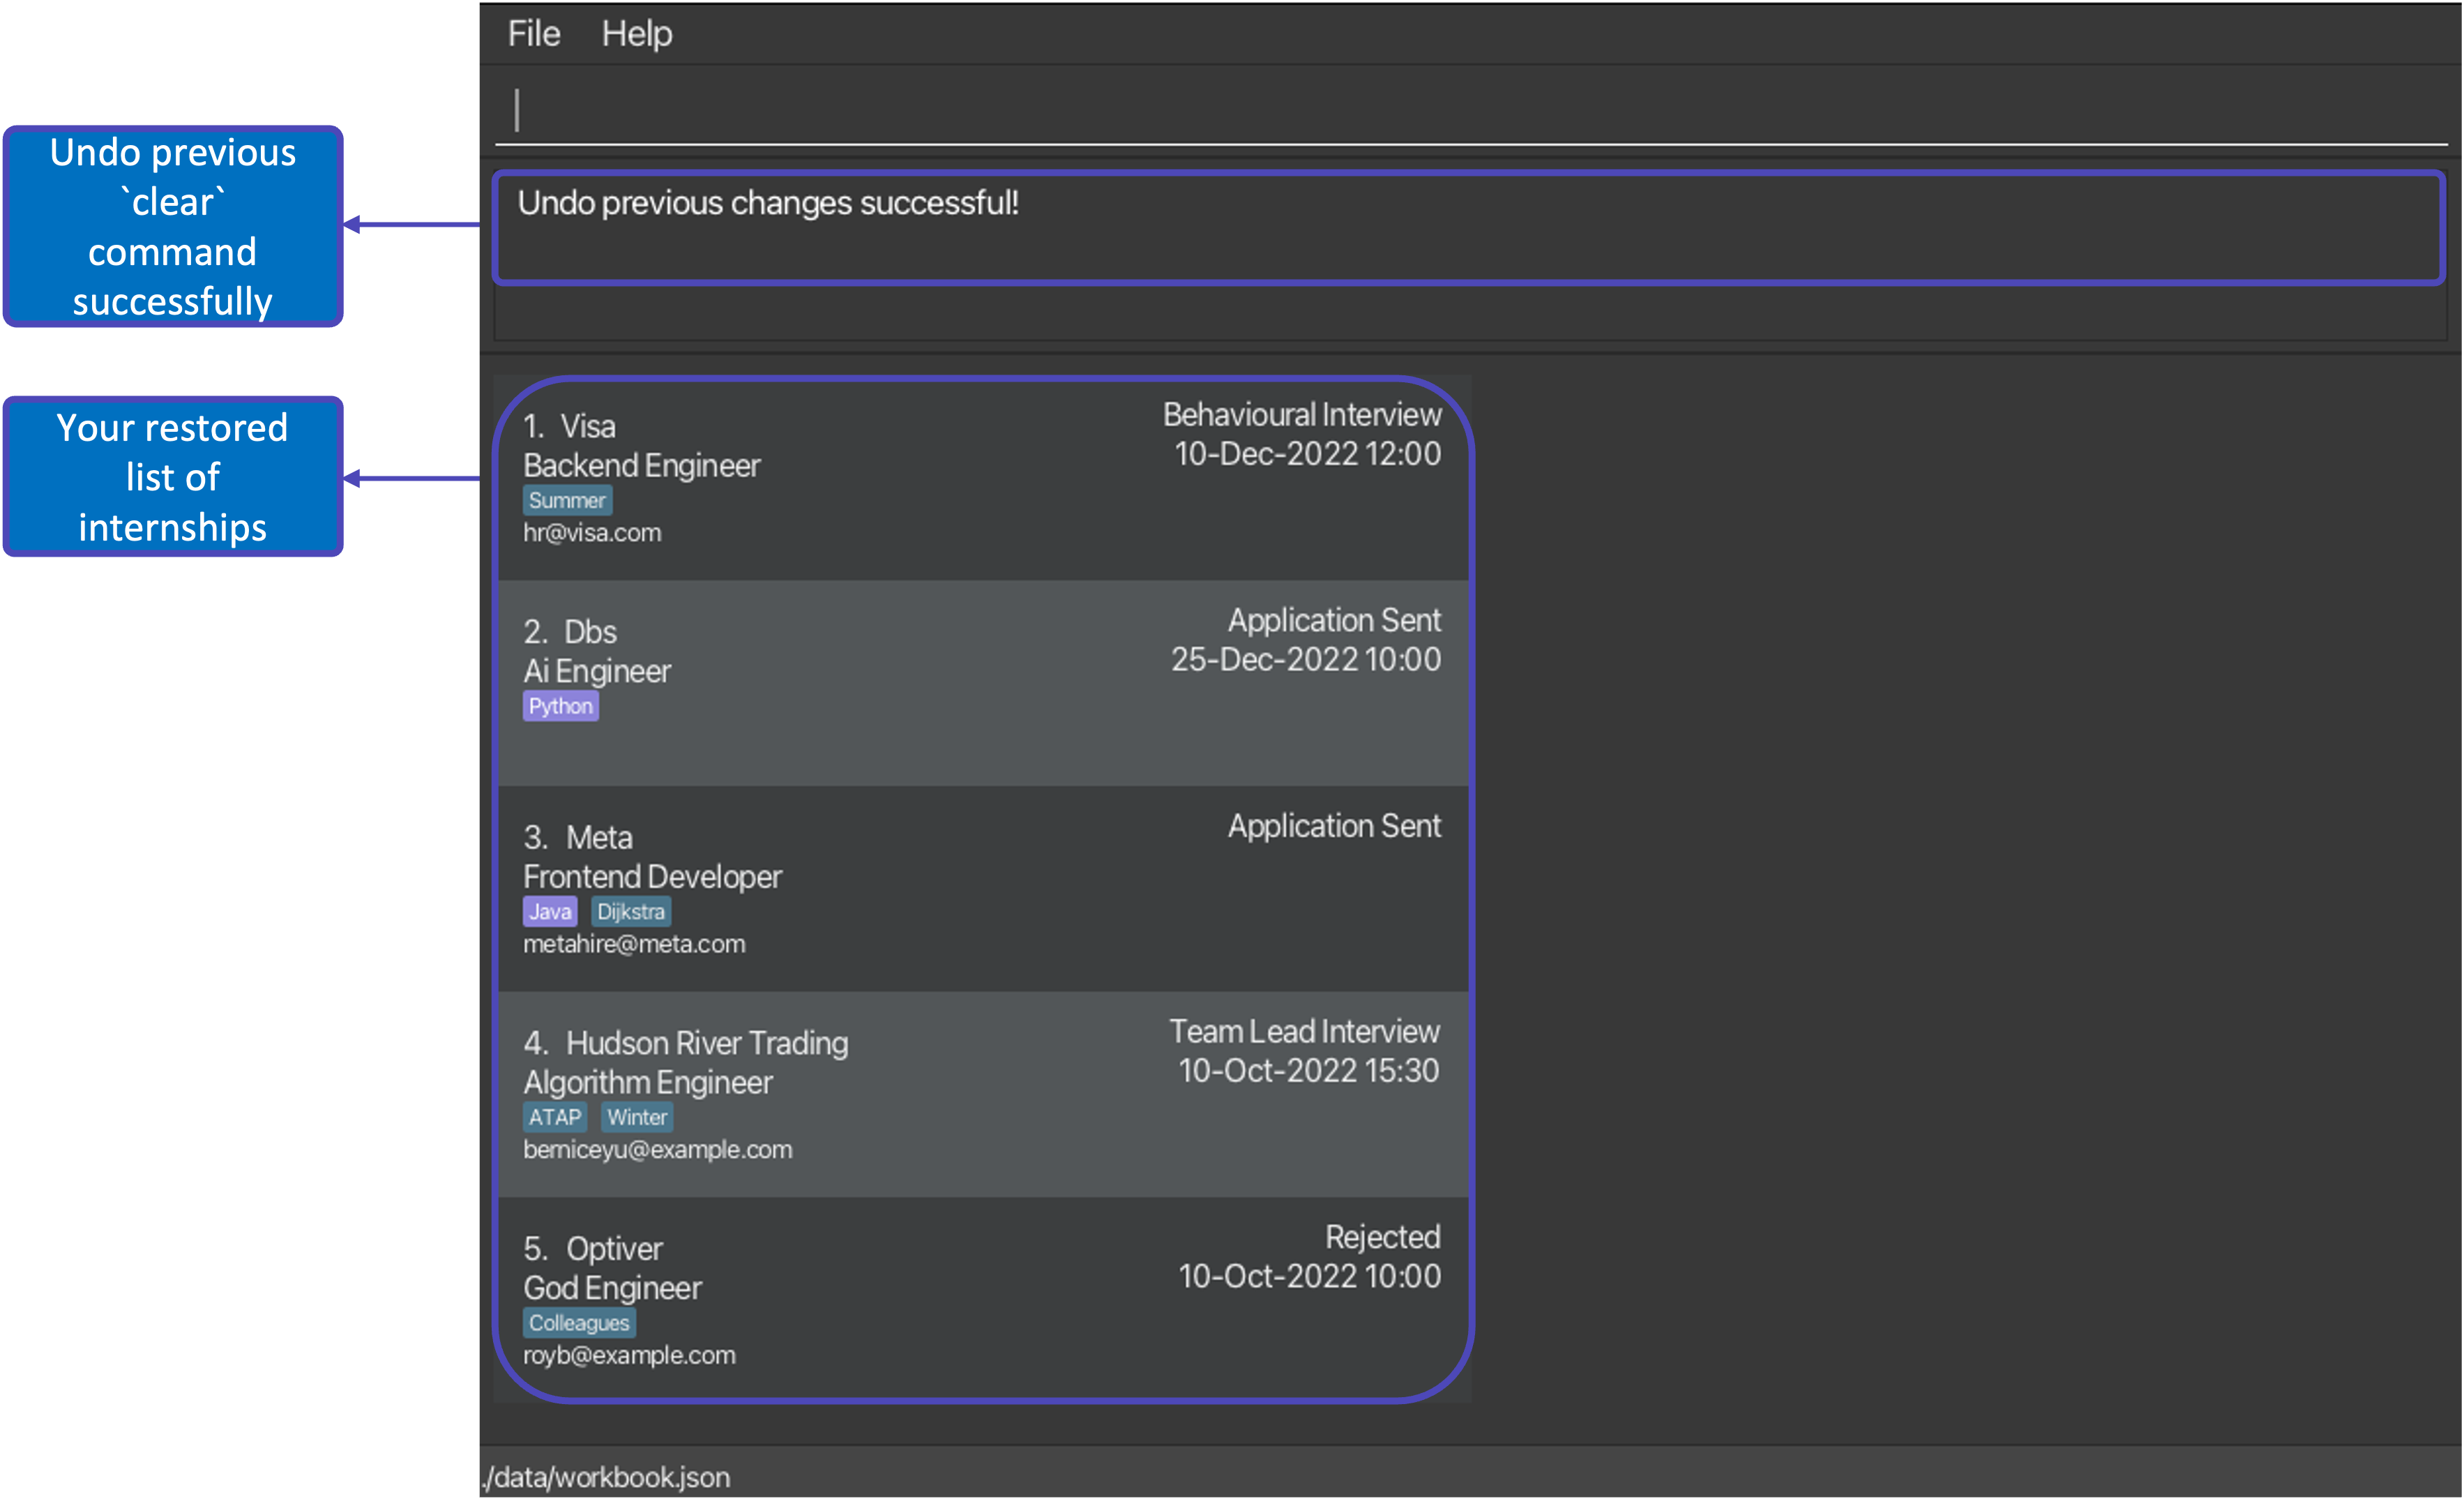
5.8. Undoing your previous command
What if you accidentally made a mistake and performed a wrong undoable command? Workbook can help you to undo your changes after performing an undesirable undoable command and restore itself to the previous version!
WorkBook keeps track of all your previous undoable commands and its current version, allowing you to undo as many times
to restore any desired state of your WorkBook.
Format: undo
- Undo the previous undoable command.
- You can perform the
undocommand as many times as the number of tracked Workbook versions i.e. stacking 2 undo commands sequentially will revert the WorkBook back 2 versions ago, assuming you performed at least 2 undoable commands previously! -
When you perform an undoable command, it will be stacked on top of the previous undoable command in the stack. The
undocommand will undo the first undoable command at the top of the stack. - If you have not executed an undoable command previously, the WorkBook will remain in its current version and return an error message: “No previous changes to undo!”.

![]() Note:
Note:
You can only undo undoable commands!
addeditdeleteclearredo
Examples:
-
add c/Meta r/Frontend Engineer s/Application Sent d/29-Oct-2022 12:00 e/hrmonkey@example.comfollowed byundowill display the WorkBook version without the added internship. -
edit 1 s/Behavioural Interview e/hr@meta.comfollowed byclearand thenundowill undo the clearing of the Workbook. The edited stage and email address of the first internship will remain in the displayed WorkBook version. -
delete 2followed bylistand thenundowill restore the WorkBook to its version prior to thedelete 2command as thelistcommand is not an undoable command and does not create a new version of the WorkBook. -
edit 2 l/golang t/followed bydelete 1and then 2 consecutiveundocommands will first restore the WorkBook to its version before thedelete 1command, and then the version before theeditcommand.
What you’ll see before and after executing the command:
| State | What you will see |
|---|---|
| Before | 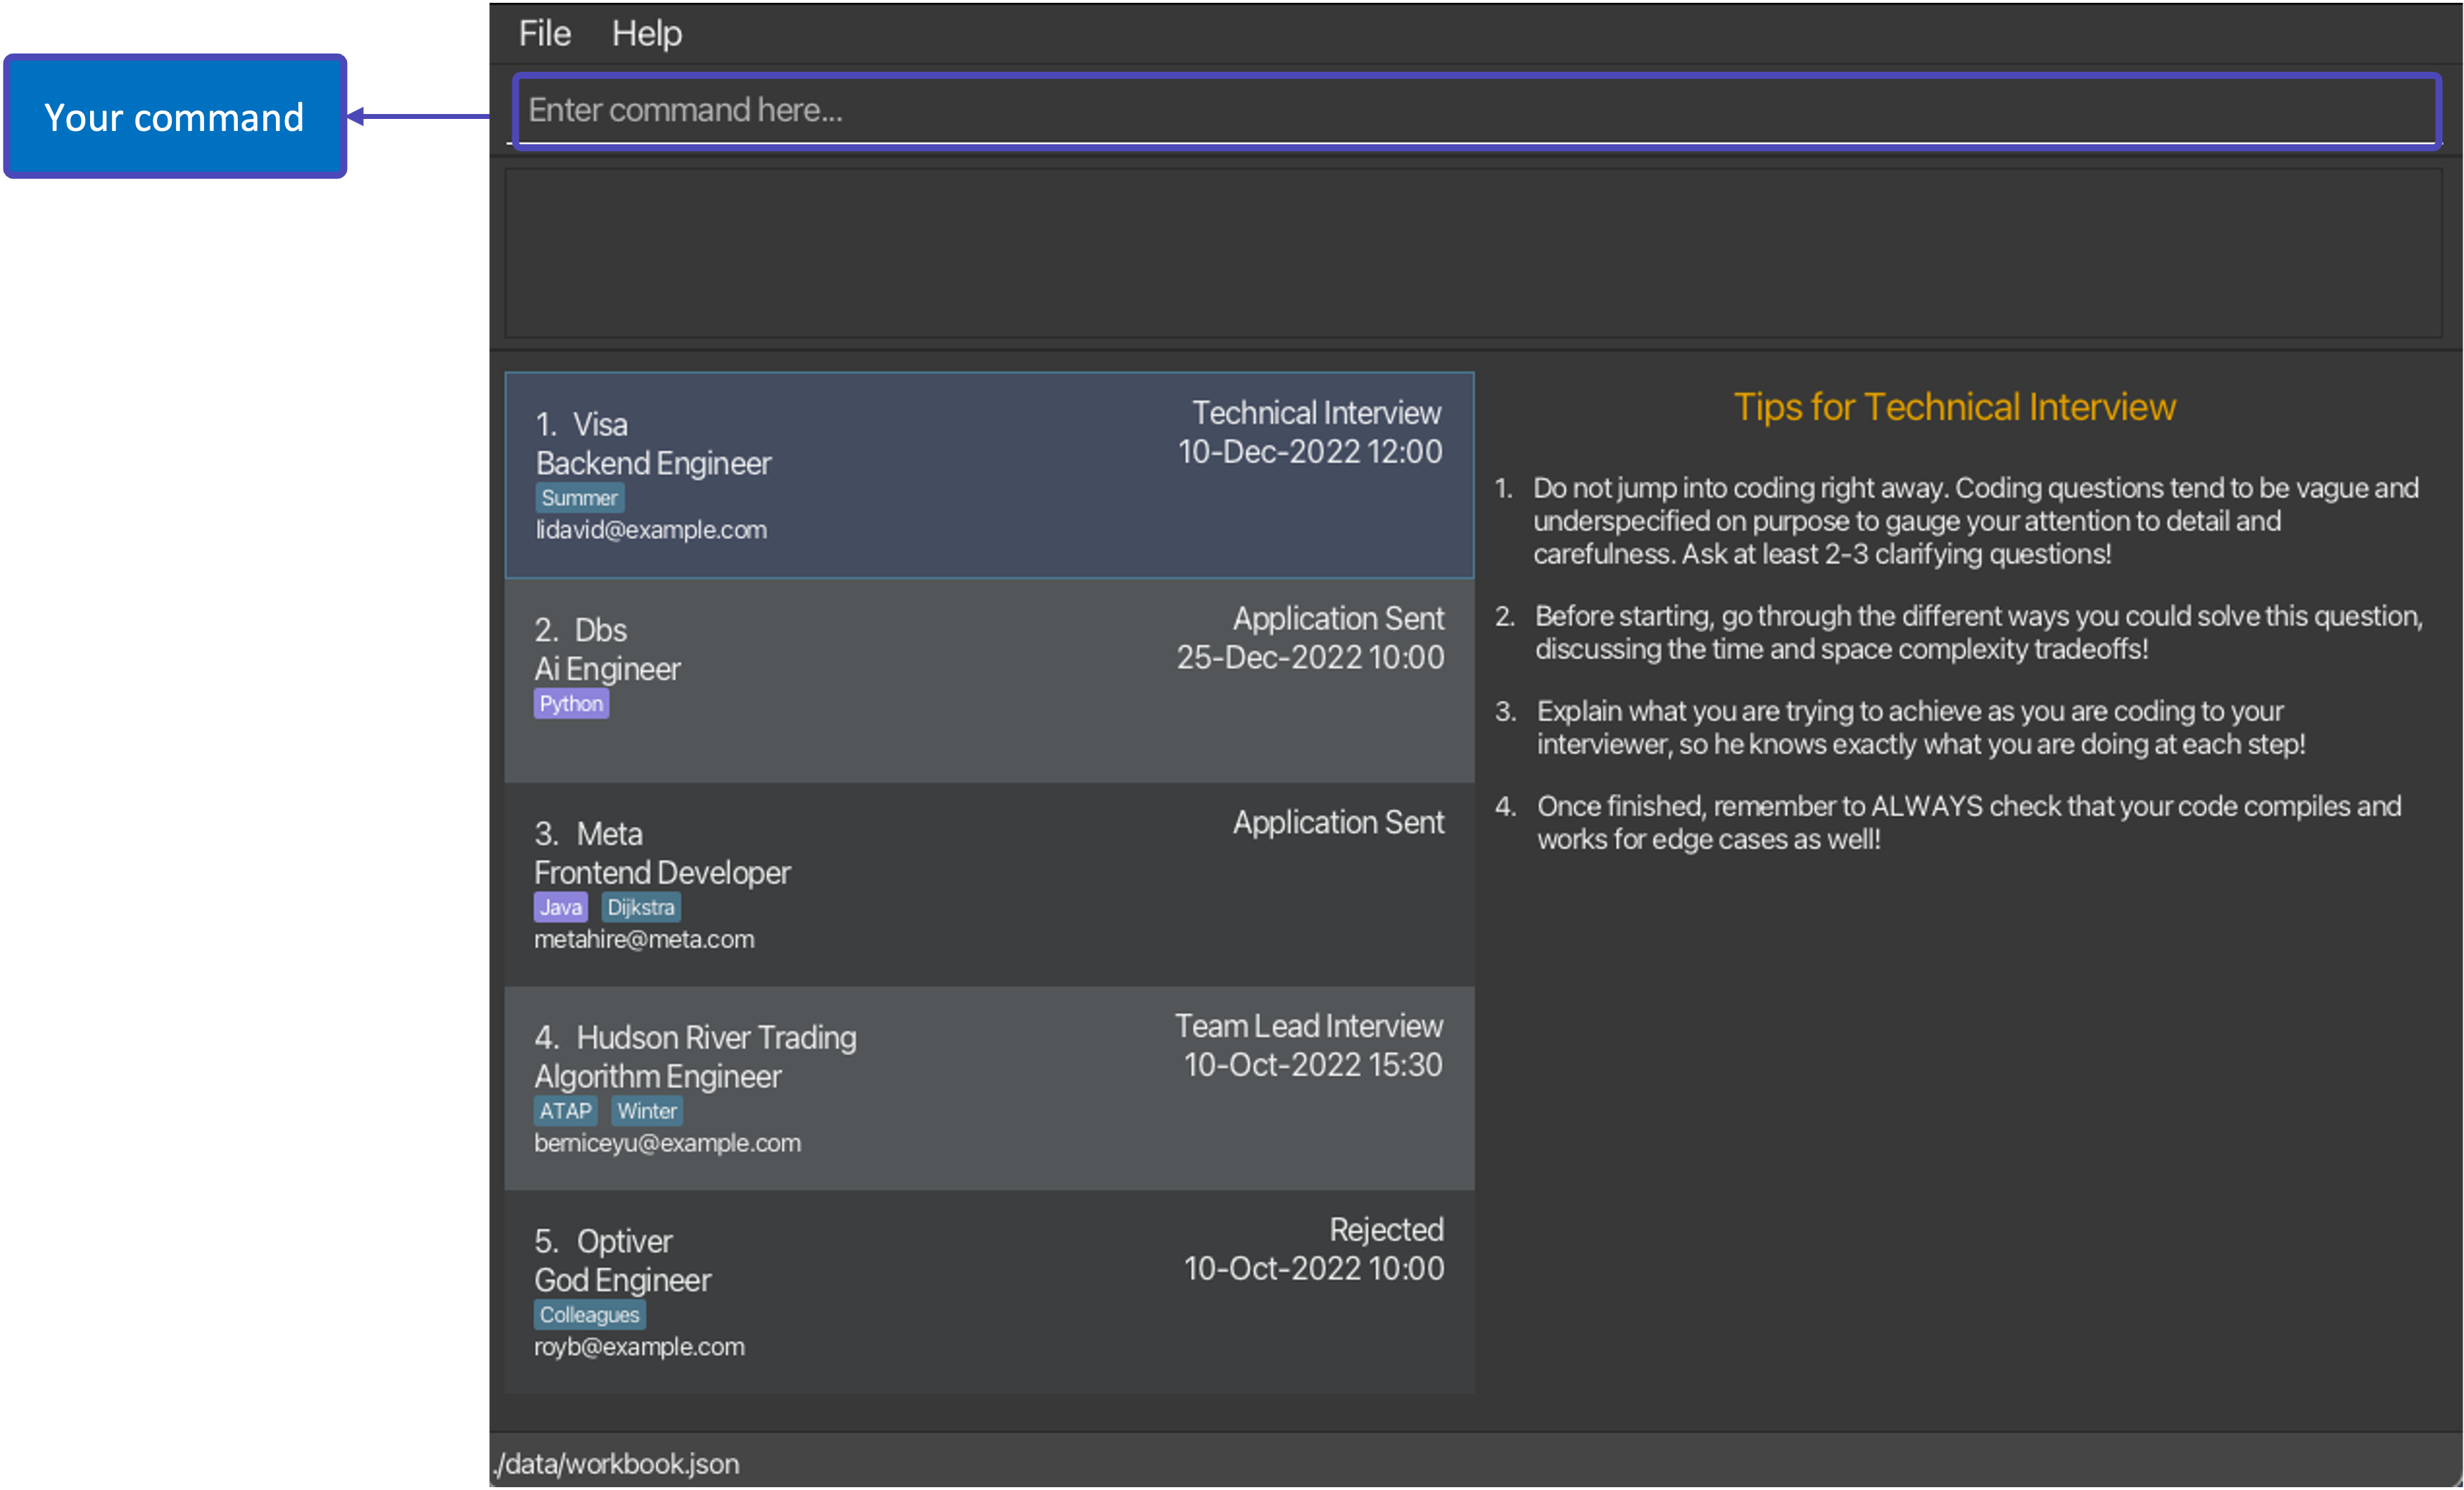 |
After executing command edit 2 l/golang t/ |
 |
After executing command delete 1 |
 |
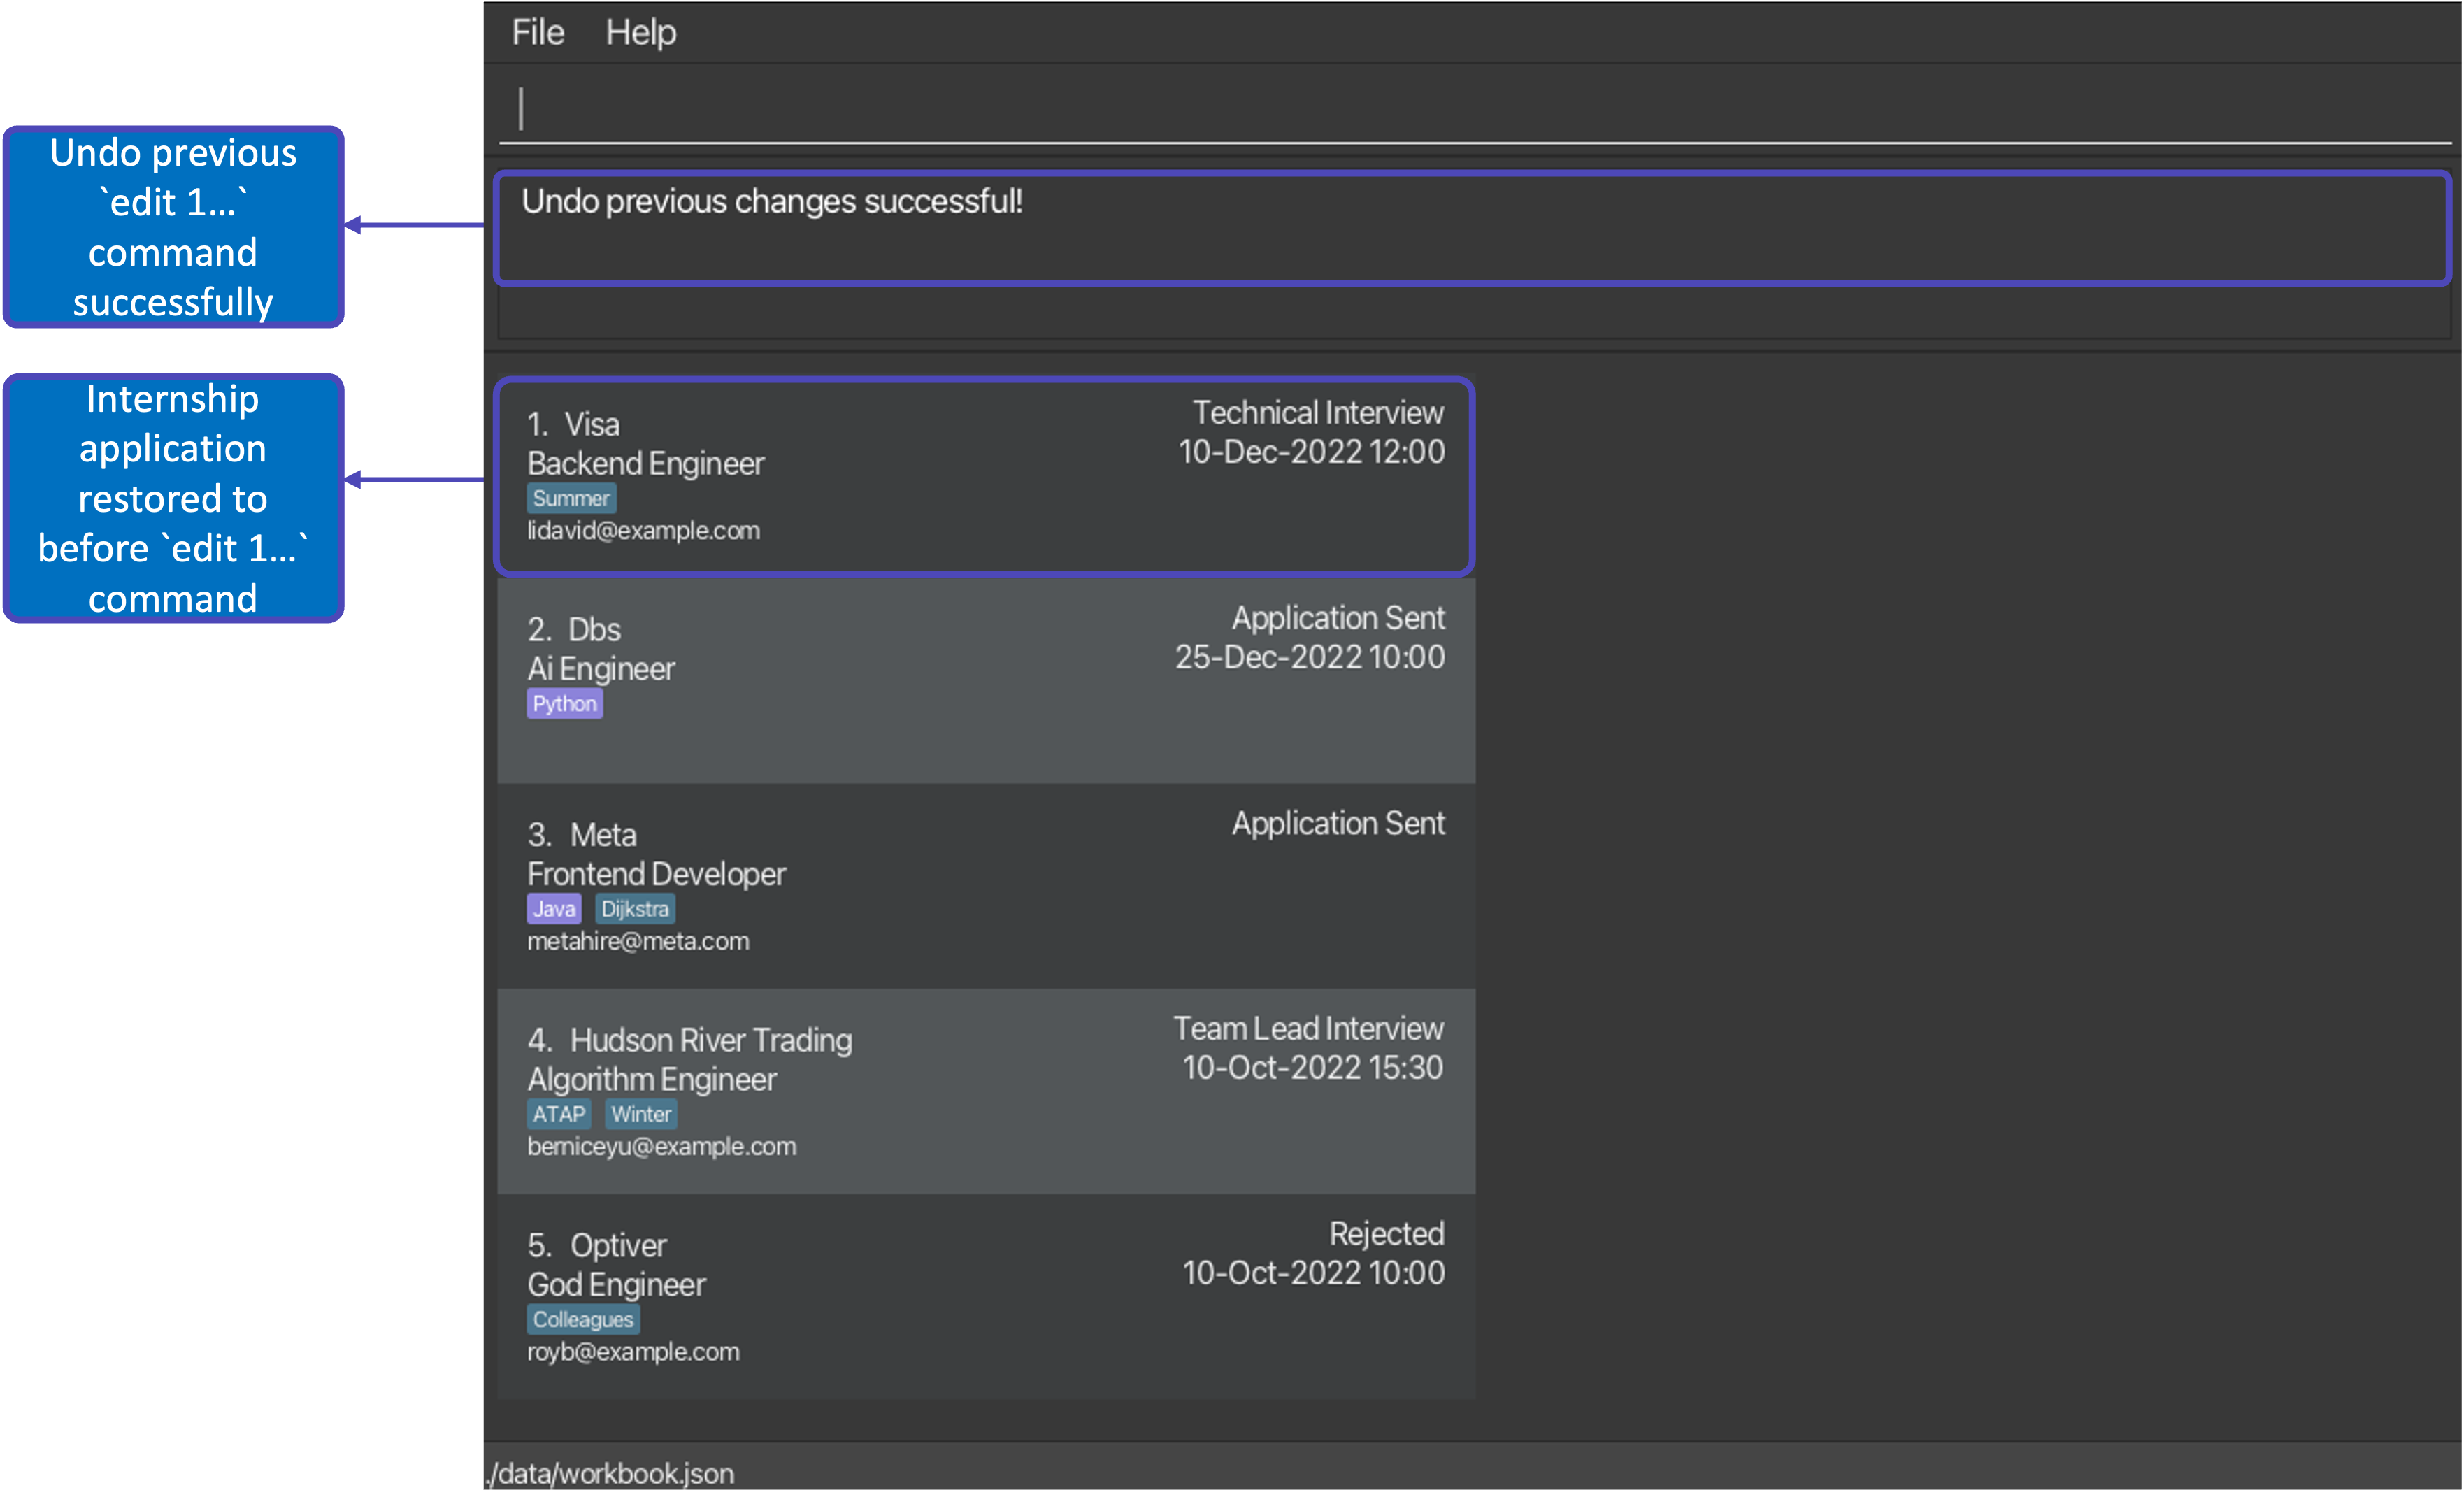
After executing command: undo |
 |
After executing command: undo |
 |
![]() Tip:
Tip:
- If you have undone your previous undoable command by mistake, fret not as you can easily redo this to reapply the initial changes!
- Performing multiple
undocommands may confuse you as to which undoable command you are undoing and how your WorkBook currently looks like! - Tracked WorkBook versions will reset once you
exitthe application!
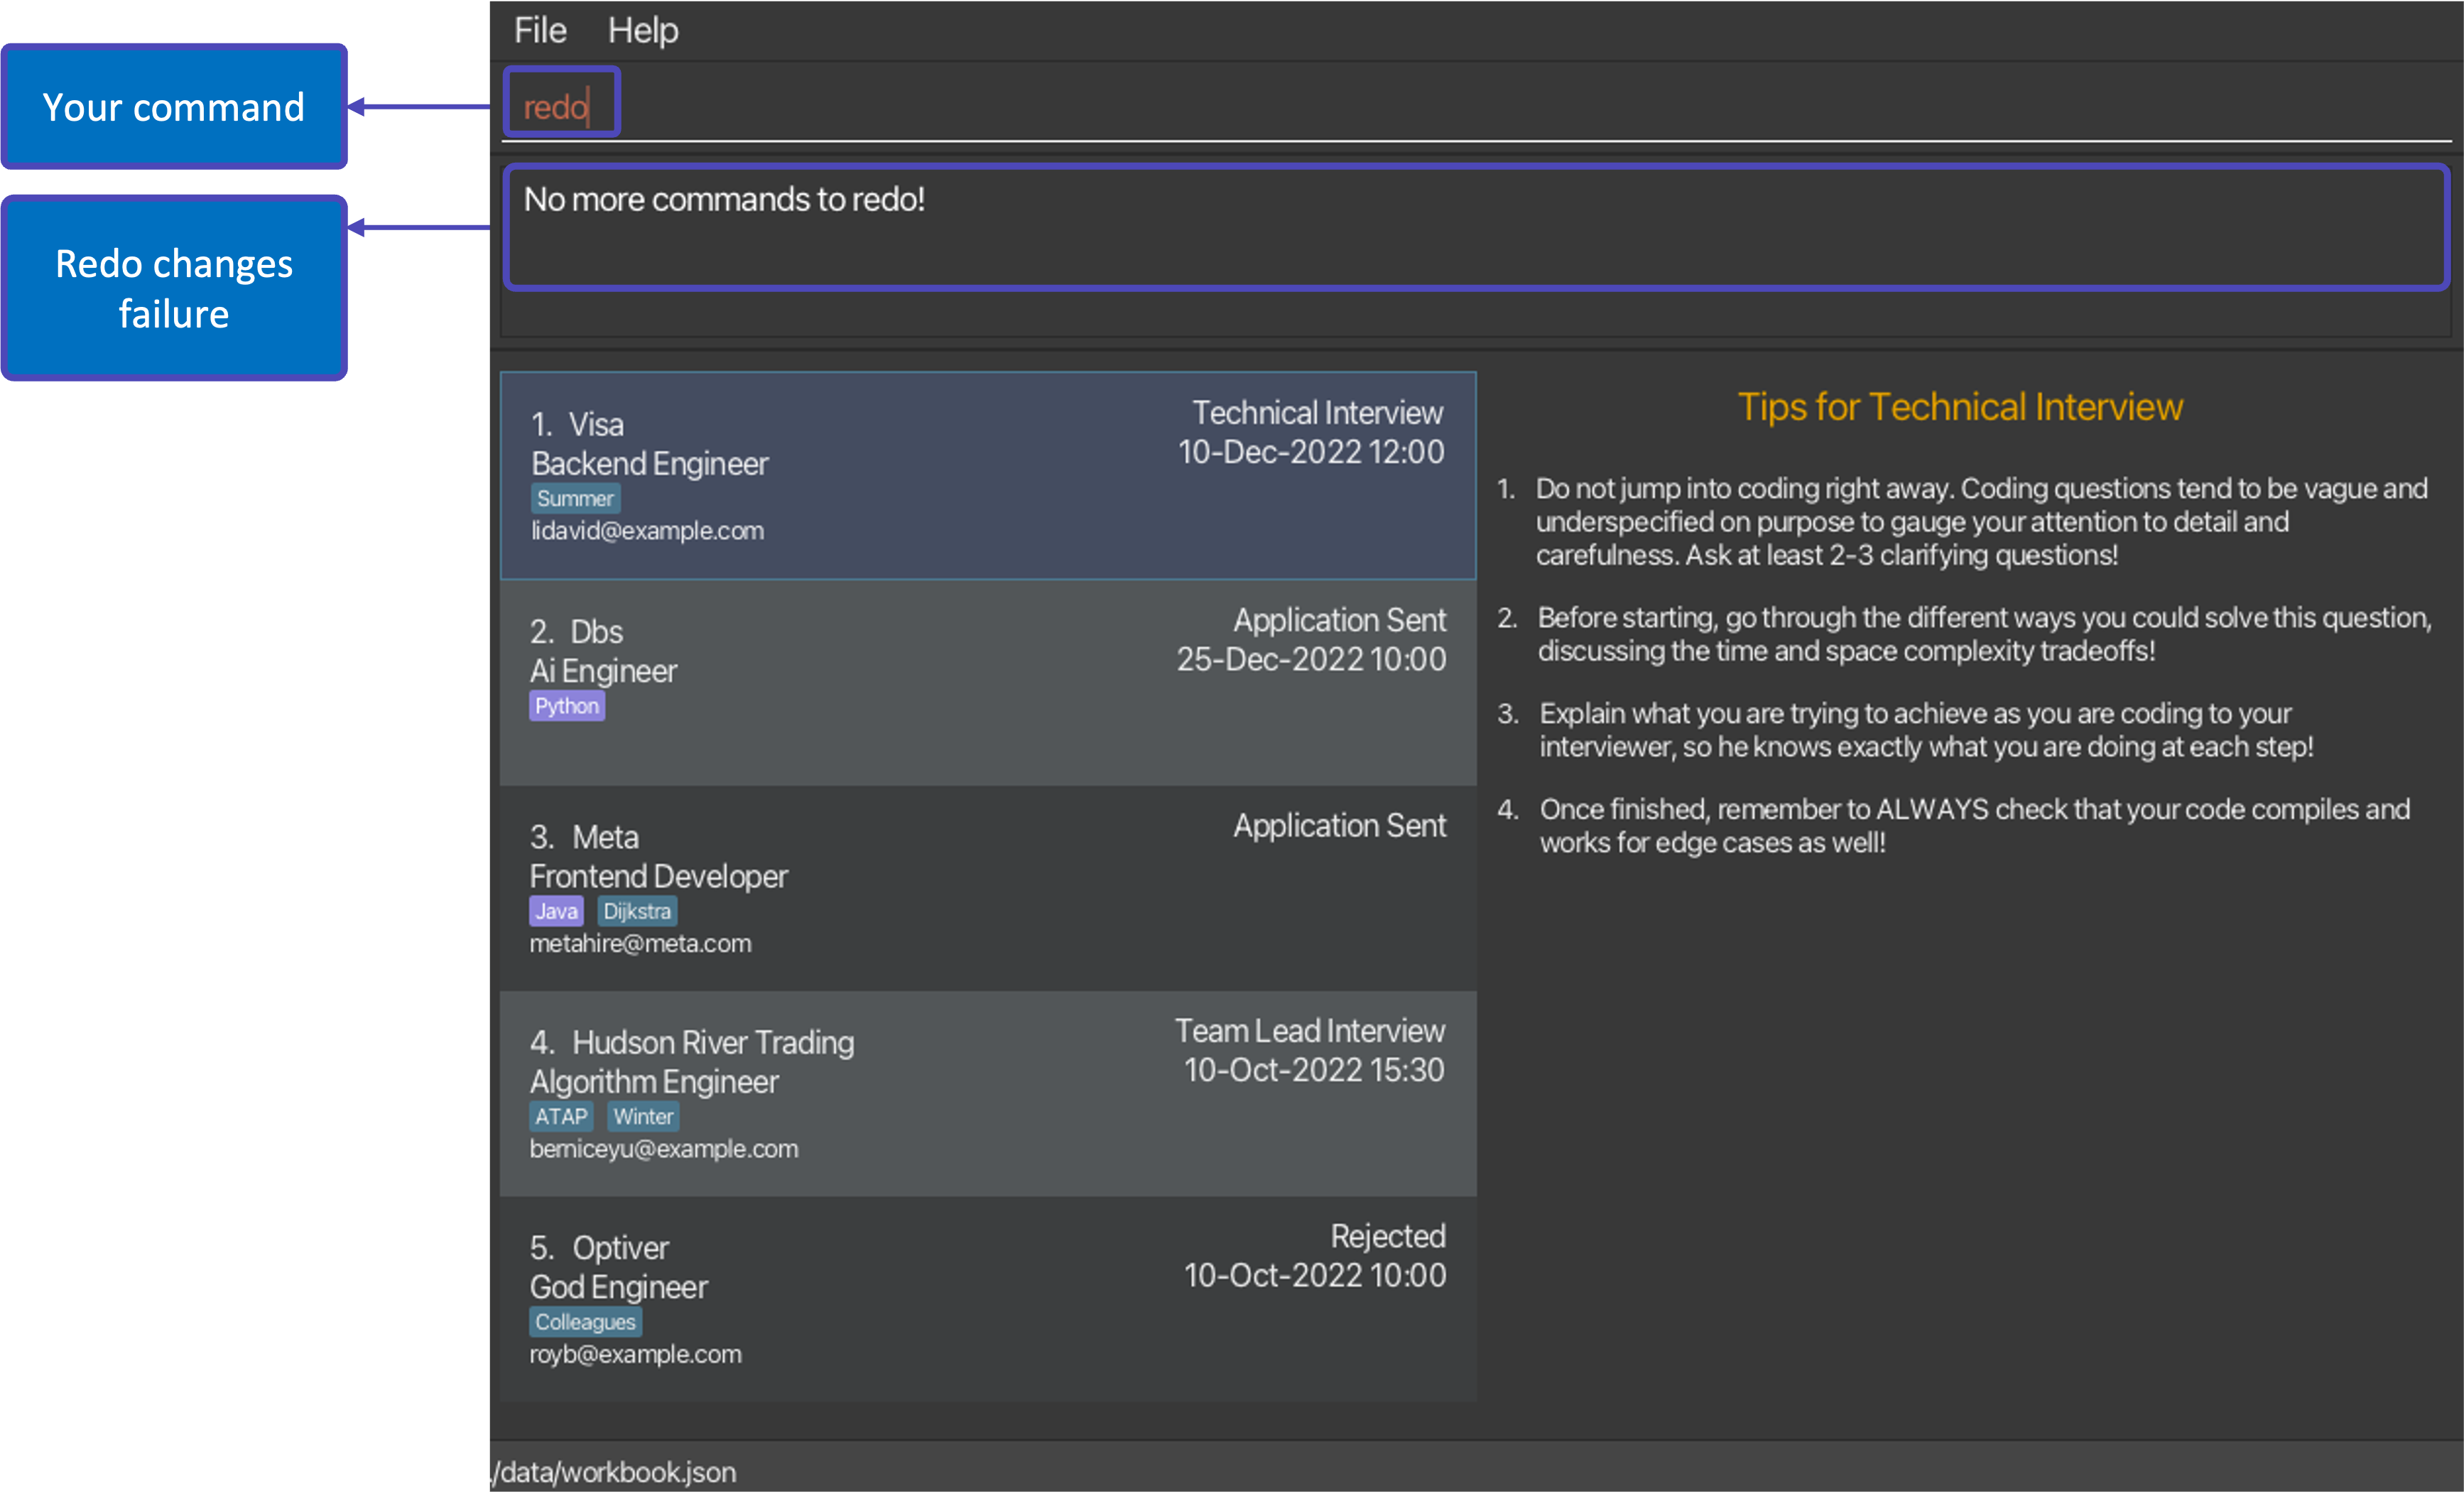
5.9. Redoing your previous command
Now, what if you mistakenly performed an undo command?
Workbook can help you to redo your changes after performing
an undesirable undo command and restore itself to the version before that!
WorkBook keeps track of all your previous undoable commands and its current version,
allowing the redo command to be performed as many times to reverse the
undo commands you have performed!
Format: redo
- Redo the previous
undocommand. - You can perform the redo command as many times as the number of undone versions in the Workbook’s tracked versions
i.e. stacking 2 redo commands sequentially will revert the WorkBook back to its version 2
undocommands ago, assuming that you performed at least 2undocommands previously. - When you perform an
undocommand, it will be stacked on top of the previousundocommand in the stack. Theredocommand will redo the firstundocommand at the top of the stack. - If you have not executed a previous
undocommand, the WorkBook will remain in its current state and return an error message: “No more commands to redo!”.
Examples:
-
add c/Meta r/Frontend Engineer s/Application Sent d/29-Oct-2022 12:00 e/hrmonkey@example.comfollowed byundoand thenredowill restore the WorkBook version with the added internship. -
edit 1 s/Behavioural Interview e/hr@visa.comfollowed byclearwill create 2 new WorkBook versions. If you perform 2 consecutiveundocommands, the WorkBook will be restored to the version before botheditandclearcommands. When you perform aredocommand now, the WorkBook version will contain the edited stage and email for the first internship.
| State | What you will see |
|---|---|
After executing command edit 1 s/Behavioural Interview e/hr@visa.com |
 |
After executing command clear |
 |
After executing command: undo |
 |
After executing command: undo |
 |
After executing command: redo |
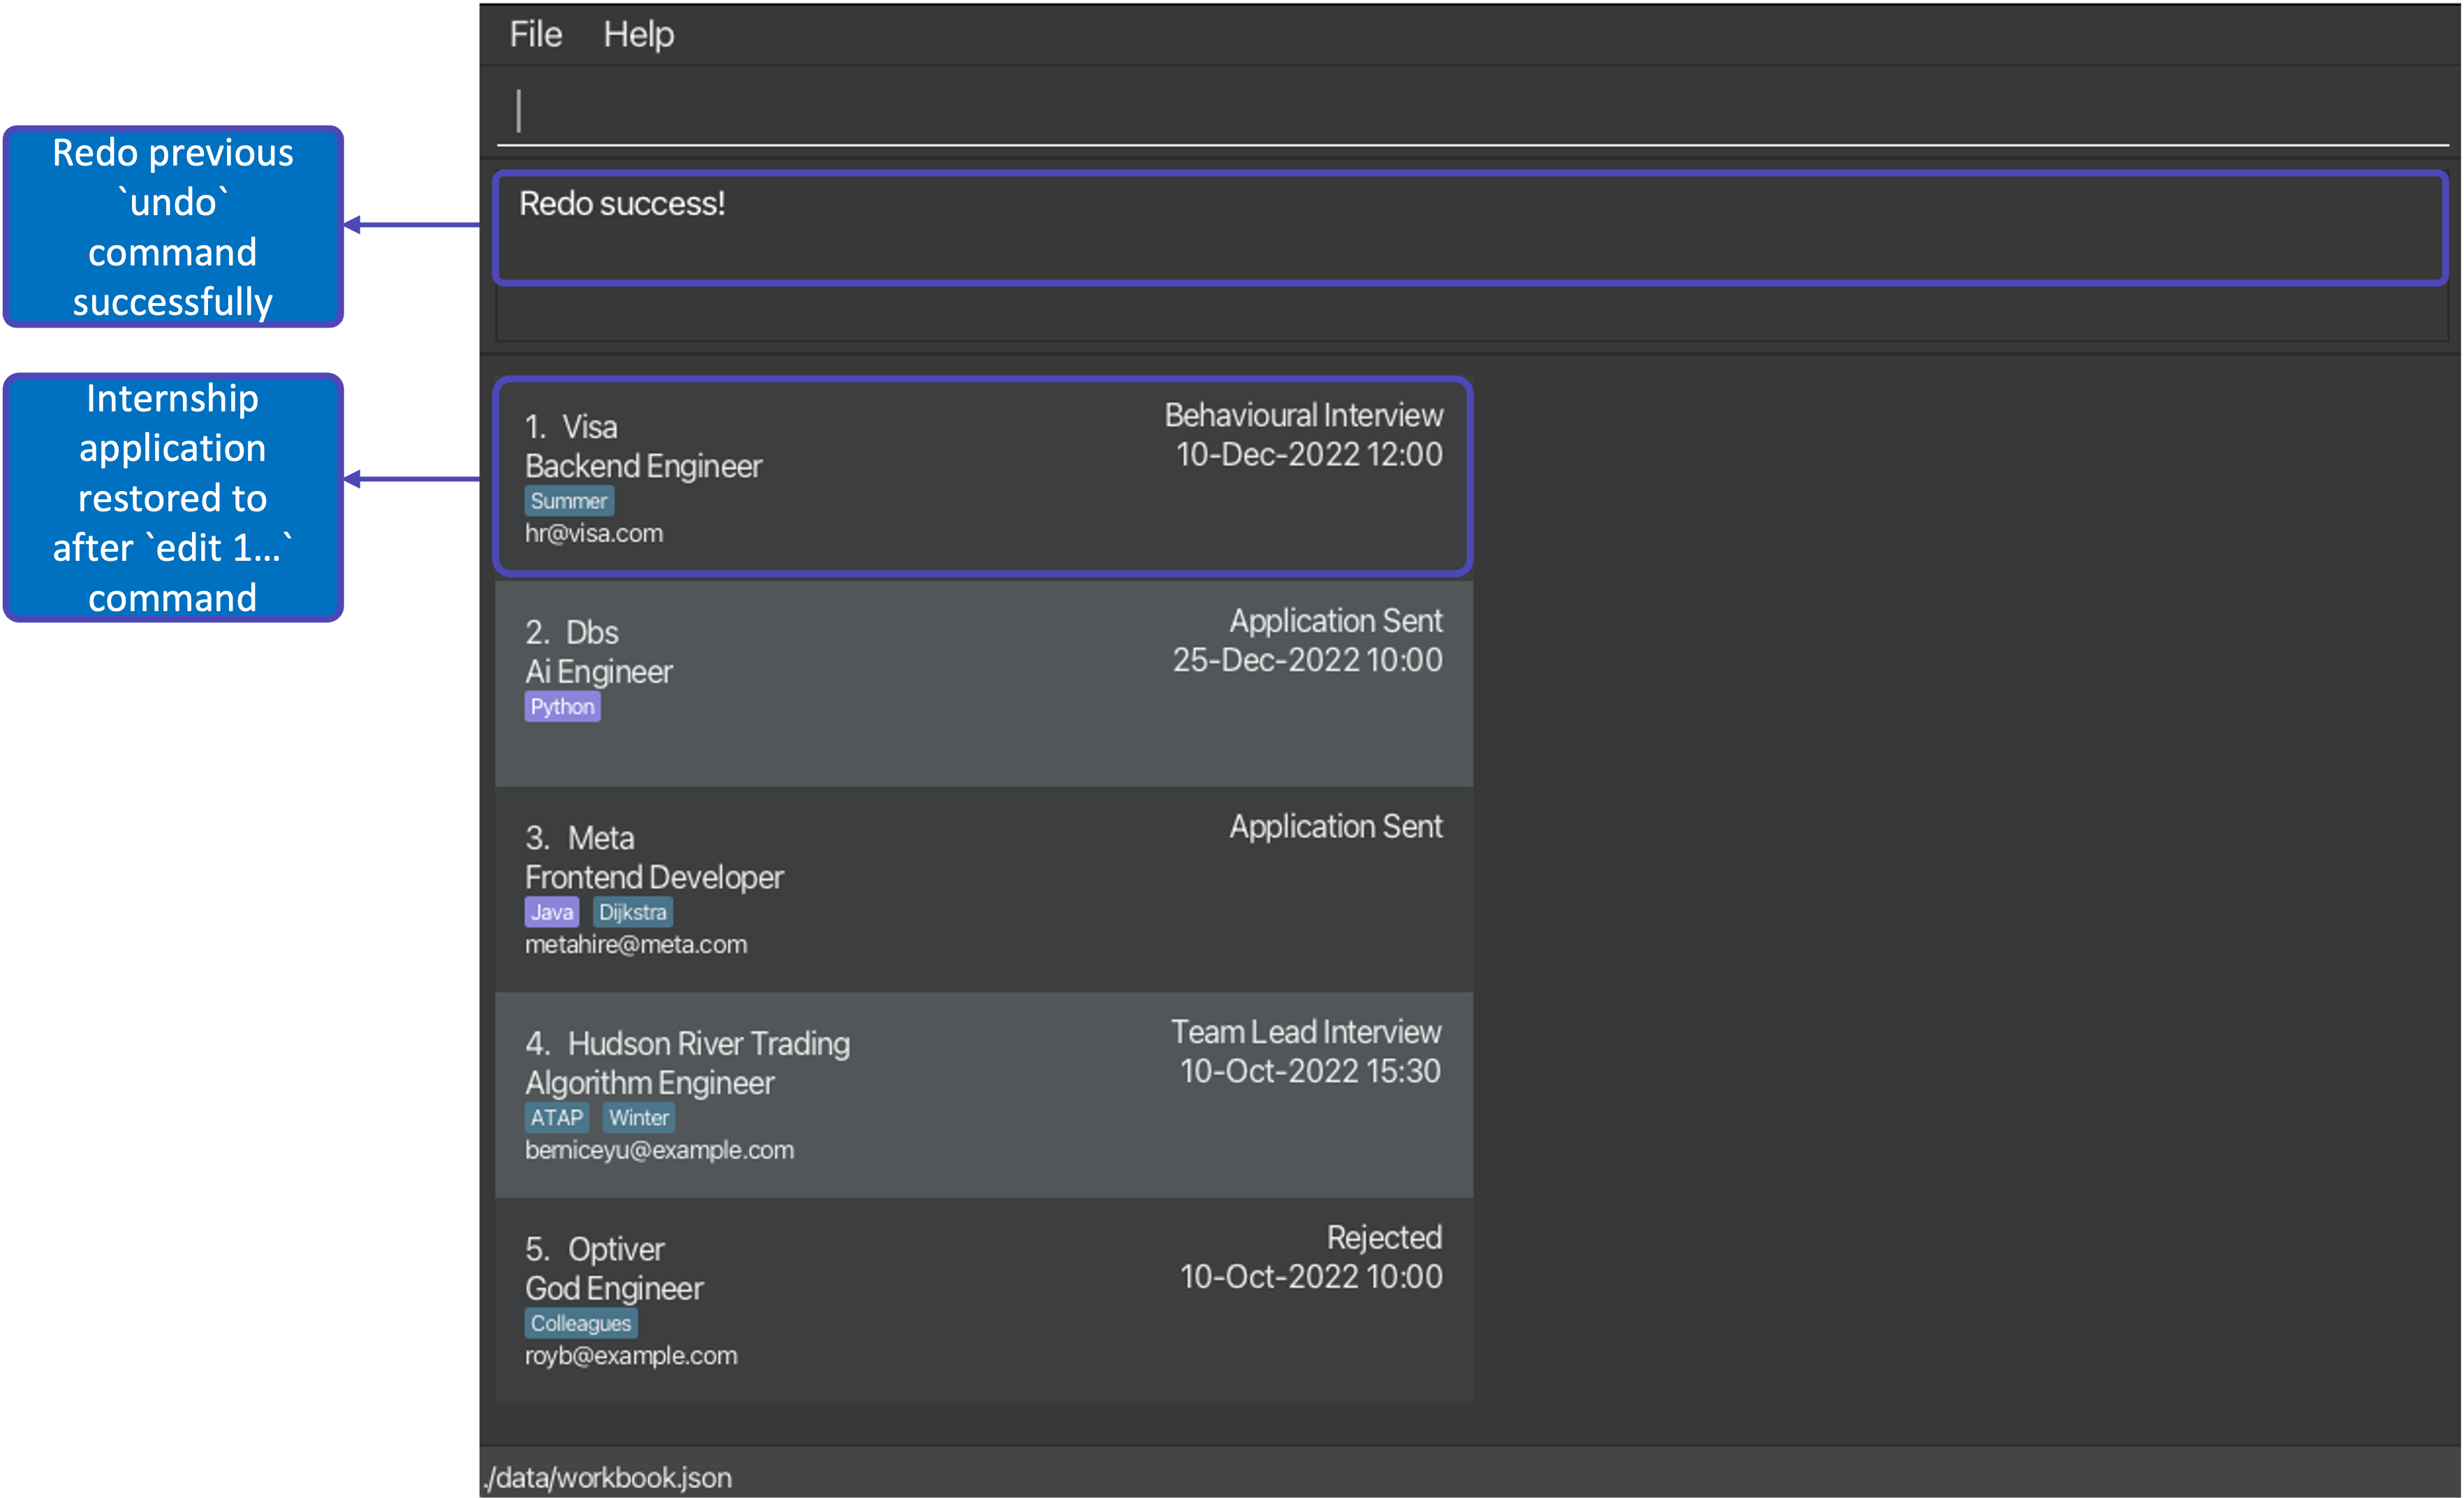 |
![]() Tip:
Tip:
- If you have redone your previous undo command by mistake, fret not as you can easily undo this again to remove the initial changes!
- Performing multiple
redocommands may confuse you as to whichundocommand you are redoing and how your WorkBook currently looks like! - Tracked WorkBook versions will reset once you
exitthe application!
5.10. Viewing help
This shows a summary of the commands as well as a link to this User Guide.
Format: help
5.11. Exiting the program
Exits the program.
Format: exit
6. Managing your data
6.1. Saving
Conveniently, any inputted command that changes any part of your internship application is automatically saved! Hence, you need not worry about pressing ctrl + s on your keyboard everytime you update your list of internship applications.
6.2. Editing
All of your internship applications are saved in a JSON file under the data subfolder.
You are free to update any internship application directly by editing that JSON file.
![]() JSON?:
JSON?:
- JSON stands for JavaScript Object Notation, learn how to edit the file here!
7. Frequently asked questions
Q: How do I transfer my data to another Computer?
A: Install the app in the other computer, copy and override the JSON file in the new data subfolder, and you are done!
Q: How do I change the theme of WorkBook?
A: It is not possible as of now, but will be coming soon!
8. Prefix summary
| Prefix | Symbolizes |
|---|---|
| n/ | Company Name |
| s/ | Stage |
| r/ | Role |
| d/ | DateTime |
| e/ | |
| l/ | Language Tag |
| t/ | Tag |
9. Glossary
| Term | Description |
|---|---|
| Graphical User Interface (GUI) | GUI allows user to interact with an application through graphics such as icons, menu, etc. |
| Command Line Interface (CLI) | CLI allows user to use text as commands to be executed by an application. |
| Command | Instruction typed by the user for WorkBook to execute. |
| Parameter | A component of a command for the user to input information. For WorkBook’s context, this refers to the internship application details. |
| Prefix | An abbreviation for the name of the parameter. Prefix should be entered before the actual parameter in a command and always ends with a slash (/). |
| Alphanumeric | Characters that are either a number or a letter. |
| Subfolder | A folder within a folder. |